While I was porting and reorganizing code from Unity to fit my workflow into monogame started to think how to deal with Update/Draw methods and which is the best or more convenient method.
In Unity since I never liked the MonoBehaviour approach of having too many Update calls all over the palce, made a hub with one single Update call that calls virtual methods from component that would subscribe to it, with a simple for loop.
I see monogame has this sort of method in palce already having one Update and Draw call from the Game based class. So I reorganized my code one way, my Game class has also other classes in it with each their own function, for example I got a Rendering class that holds all the info regarding what to render and a collection of components that need to be drawn. So from the Game class in Draw I just call a method in Rendering that does a loop trough the active component and draw the stuff on screen.
Same goes for other things like audio, input and animation stuff. So in the end would have one Update and one Draw that calls methods in other classes that runs loops to do whatever it need to do.
My doubt is that maybe isn’t the best approach to this and maybe I should have multiple Update calls using GameComponents, how do you guys organize your code with this? Also is a for or foreach loop to iterate trough the list of components to Draw/Update the right method to do so?
I’ve generally had no issues using update logic with a collection, but drawing is where it gets tricky. If you need to use more than one shader and/or other graphics state (Ex. RasterizerState), you will have to batch objects using these states together since you cannot change state without first ending all the SpriteBatch with End.
It’s hard to tell how to structure your game without more information, but hopefully an example might give you a better idea.
Giving some info to better explain, my game is 3D, uses different shaders and hopefully will have deferred rendering in it once I manage to understand a few things on how monogame works.
I still didn’t look much into SpriteBatch, is a new concept for me but correct me if I’m wrong, a SpriteBatch basicly is a bunch of graphical things being rendered in one draw call as long they have the same properties like shader or lighting value, so in the case I have different light conditions on some mesh or different materials I’d need another spritebatch for those, right?
My idea in how to roganize this stuff was to have an Entity class, this entity has inside it a colelction of Components, these components can reference each other. For example an entity can have a Player component, a Physics component and a Renderer component. When the components gets created they subscribe to a collection on the various managers, like a renderer would subscribe to Rendering manager which is in a singleton, and use the Game Draw loop to iterate trough those components to draw the stuff.
There is also a Camera component for the matrices and all this stuff, so based on what you said in my case I would need a SpriteBatch in the component of the renderer itself, and a custom Draw function then?
Could I potentially use the Camera to SpriteBatch renderers of the same type together?
Since I will ahve to add to some form of culling I might have to manage to identify the renderers on the fly and batch stuff together, well this is just thinkering, but thanks anyway for your reply, again.
How you describe your idea is very similar to how my engine works. I have entities which can be static or animated (and also more complex things like a player/networked player or an enemy, they can also be instanced/shadowed/soft so then at load time they are added to the appropriate collection so then a renderer/shader can take care of drawing and updating them.
Therefore I can easily batch up calls with transparent, skinned, soft, instanced, billboarded geometry etc. The renderer can take care of culling depending on what it’s rendering.
SpriteBatch is just a way of grouping together a bunch of things you want to draw the same raster/blendstate and effect (and a few other settings). You can draw different fonts or textures and at different locations within one batch but if you needed to switch to (for example) AlphaBlending from Opaque you’d need to start a new batch.
btw I use a mixture of deferred and forward referring (forward mostly for reflective/transparent and particles).
Oh and to answer your question about Update best practices. I try and keep it simple and do things like update the enemy AI and time based animation of skinned models etc and purely rendering in Draw. Whether that’s best practice or not i’m not sure but it still runs nice and smoothly for now
My apologies; I incorrectly assumed that you were working in 2D. My lower-level 3D knowledge is more limited.
For memory reasons, it’s good to use at most a few SpriteBatches for repeated Begin and End calls. It’s possible to use more, but I don’t see a benefit unless there’s a specific reason for doing so.
You will want as few SpriteBatches as possible as mentioned above. If the Renderer needs to draw a 2D sprite, it should reference a particular SpriteBatch or have the rendering manager decide which one based on the Renderer’s information. SpriteBatch has a Begin overload that takes in a Matrix; you can pass in your Camera’s matrix to this to help manipulate how your sprites are drawn.
Getting a bit of a better understanding now, so theoretically I could render a whole ui in one SpriteBatch. To further explain what I’m doing, my game is an fps sprite based, think of something like Blood or Doom1/2, but in a real 3d environment, so even the items/enemy/etc sprites are still meshes, just billboarded quads. Also want to add some more modern features like lighting and post process effect which shouldn’t be too much of the problem now with the info provided.
So the general workflow is to divide type of renderers by their category on how they should be rendered. Does having lighting affect how to organize this? An example, I have two meshes that has the same shader and effect, same texture but they are lit differently by a light source, for my understanding this would need to draw the two meshes differently because the lighting and could need to divide the drawcall into two, nto sure if I’m wrong, having used engines all the time that does all this for me sure didn’t help.
I’ve only worked with simple lighting so I’m not the most knowledgeable on the subject, but it looks like you’ll need multiple RenderTargets to achieve what you want. Essentially, render everything to a RenderTarget, which is a texture containing everything rendered in your scene. Applying post-processing effects will involve switching between two RenderTargets and applying subsequent shaders.
Hopefully someone more experienced with lighting can chime in. Keep in mind that when you switch to a RenderTarget, the default, most platform-compatible behavior, is to discard that RenderTarget’s contents.
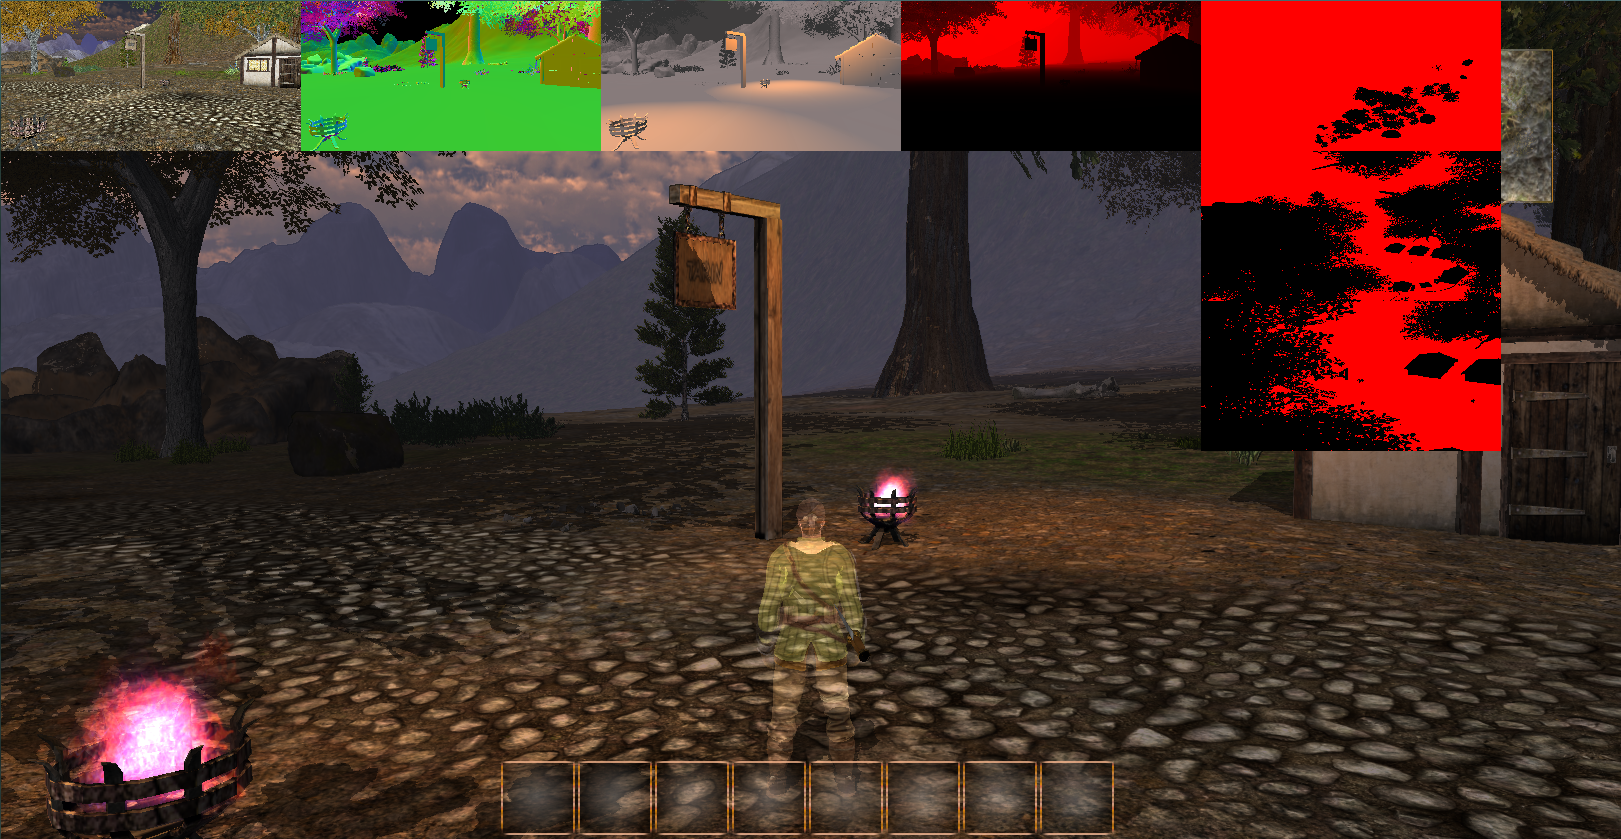
A picture tells a thousand words so hopefully this will help. This is a screen shot of what I’m working on with post processing stuff turned off so we can see more clearly.
Since I deferred rendering I don’t have to worry so much about how something is lit that’s all taken care of by rendering the required lighting information to the relevant render target.
The little boxes along the are was I see in debug mode. There are the render targets. So when I draw each model I output to all of them simultaneously. First one is the color map, then the normal map (I can modify these by using normal maps and specular maps for each model but lets not worry about that for now). skip the 3rd render target for now we’ll come back to that and the 4th one is the depth map (how far each pixel is away from the camera).
Coming back to the 3rd one. This is the light map. As you can there are two flaming pots which are radiating light. So I draw light model (just a basic sphere) which just outputs to this render target.
That might sound a bit complicated (I’m never that great at explaining this stuff tbh) but it’s actually really nice when you combine these together in the end. Since models don’t have to worry about light. When do our final draw call which outpus all this information from the render targets to another render target (which is essentially the screen in the end) we can just look up how lit each pixel should be from the light map.
This also allows you to easily do stuff like add shadows or blur objects or have lights following models etc.
Hopefully that made some sense. If you need some snippets of shaders or whatever to explain this further I’ll try and help.
This actually helps a lot, got a better understanding of the steps required now and I’m sure I’ll be able to pull that off, also the links you provided with the code snippets help to understand where to look for to make this happen.
I just have to do some testing and try a prototype of sort. Thank you for the explanation, for now no need for further snippets or shader code, as I need first to set up a more solid base.