Deferred Engine Playground - download

Wow, this is very impressive work, AND with frequent updates!

You are ok with it being reverse engineered, and used by others in their games?

I mean, you could almost just paste this on top of existing 2d game code and have a complete 3d game, by the looks of it. :slight_smile:

Not much reverse engineering with the source code, is there :stuck_out_tongue:

Go ahead and take what you need!

Yeah, I guess thats the point I was trying to make, really :slight_smile: This is just a huge leap for me, in terms if accessibility to this kind of material. As I’ve stated before, finding good help with shaders is a small job in itself! I feel really optimistic about your project helping me a long way!

It is gettting a little complex now, the Renderer class is becoming a bit big (1400 lines). I have #regions and stuff, but I think I will try to refactor or at least comment a lot more in near future.

There are a lot of complexities with selecting the meshes that are culled / rendered / updated each frame and consequently updates to shadow maps if objects or lights have moved.
In the end the performance gains are worth it, but it doesn’t help in readability and branching.

Sounds great! -If you can find the motivation for making such changes to working code. Of that size.

+1!

I added the option to force different shadow Modi for the directional lights (only).

Console commands: g_ShadowForceFiltering (0 - 4) and g_ShadowForceScreenSpace

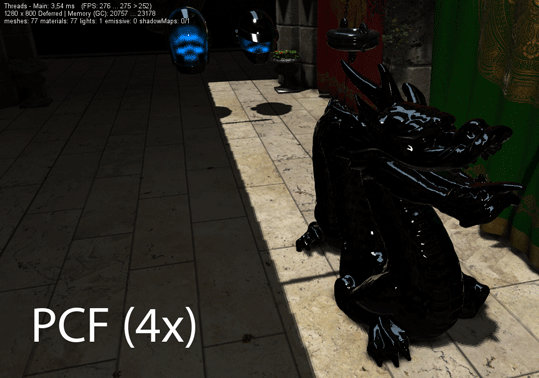
EDIT: Also added some better PCF modes.

I started on a basic editor mode. You can press Space to enable it.

Features so far: Outlining the currently hovered and (left mouse button) selected Entity. It shows a transformation gizmo and you can click and drag on a specific axis to move the object.

EDIT: One can rotate now, too. The transformation is a bit bugged, but I leave it like that for now. Switch between rotation and translation with the R and T key.

Can you explain a little bit, how the different shadow techniques work?

PCF(4x)
Poisson
VSM (+blur)
PCF(4x) + SS Bilateral
Poisson + SS Bilateral
VSM (+blur) + SS Bilateral

How do you achieve highlighting in editor mode? Is it a wireframe draw of the selected model?

Making some progress with my deferred renderer, but a bit too early to start a new thread I think :slight_smile:

sure,

First of all - the priority of shadow filtering is to make the shadows appear smooth and soft.

PCF means percentage closer filtering.
The PCF shown compares the depth to the shadow map at the correct position, plus the four surrounding texels in the shadowmap as well, and blurs the results to get the average. This smoothes out the edges a bit.

In the newer release I also fade the edges out in a subtexel manner, where I weight them based on their position in the texel.

In the engine this would be g_ShadowForceFiltering set to 1.

We can have better PCF filtering if we use more samples, g_ShadowForceFiltering 2 and 3 do that with 5x5 and 9x9 samples respectively.

Most shadowing in games uses PCF today I think.

Poisson sampling is very well explained here: http://www.opengl-tutorial.org/intermediate-tutorials/tutorial-16-shadow-mapping/

We randomize our sampling locations, but try to make the random sampling points correspond to each other in a way that they aren’t biased too much into one direction. A poisson disk does this more or less, it’s basically a distribution of points on a disk where the points still adhere to some rules to guarantee good distribution.

VSM is Virtual Shadow Mapping.

One might naively assume that simply blurring the shadow map might generate soft shadows, but that isn’t the case because blurring the depth map will only make the depth values incorrect, therefore we can’t reliably compare them anymore.
In VSMs however we store not only the depth, but also the square of the depth (in a second channel) and because of their relationship and the algorithm use we can just do what previously wasn’t possible - blur the shadowmap.
If you want to know more about the math behind it you have to google Chebyshev Bound.

So in my case I use a simple blur filter (7x horizontal + 7x vertical) to blur the shadowmap and get softer shadows.

This blurring is pretty expensive, but less blur means less softness.

The biggest problem with VSMs is that they are not reliable, sometimes light will leak through the shadows.

The SS Blur mentioned means Screen Space blur. Instead of calculating the pixel when calculating lighting, I calculate only the shadows extra on a different rendertarget and read this rendertarget as a texture when drawing my lighting.

This allows me to sneak in another blur pass, this time in screen space instead of texture space. Of course, simply blurring the rendertarget would give wrong results, since shadows on a fore/background object could “bleed” into the neighborhood pixels which might not be shadowed.
So we have to use a depth aware blur filter (bilateral).

This is just one more step in making the results appear less choppy.


The highlighting in editor mode is achieved by drawing the objects once again (in transparent) and then drawing them again with frontface culling and their vertices pushed out along their normal vectors and textured with a simple color. This way we enlarge the models, but only draw the outlines, because the other pixels are occluded.

Not super trivial, and not super cheap either. Search for outline / toon shaders and you’ll find plenty of good material on that.

I have some questions :grin:

How do you “know” you’re on an edge?

I think it’s Variance Shadow Mapping

So this means you check that the difference in depth of the sampling point around the target point is not greater than some specified value? Or how does it work?

I don’t understand the first part. Why would you draw it transparent first? Perhaps to fill the depth buffer, before drawing the front face culled and colored version?

Thank you for the explanation! If it takes too much time, I can look inside the code. But I think it helps a lot to get the idea first and then figuring out how it’s done in code.

It’s not edge per se, but you can multiply by a factor like this frac(shadow_coord.x * ShadowMapSize) to get the fractional of the pixel we are working on.

yes

Not a hard depth difference, but instead the sample is weighted based on the depth difference.

 [unroll]
    for (uint i = 0; i < numSamples; ++i)
    {
        float2 sampleOffset = float2( texelsize * samplerOffsets[i],0);
        float2 samplePos = input.TexCoord + sampleOffset;
         
        float sampleDepth = DepthMap.Sample(texSampler, samplePos).r;
         
        float weight = (1.0f / (0.0001f + abs(compareDepth - sampleDepth))) * gaussianWeights[i];
        
        result += SampleMap.Sample(blurSamplerPoint, samplePos) * weight;
        
        weightSum += weight;
    }
    result /= weightSum;

exactly. I could alternatively read the depthMap stored in the Gbuffer, but then my outlines are not drawn on the ground etc.

Thank you once again for the explanations :slight_smile:

When you go into editor mode you can now also select lights!

Plus you can copy and delete objects by pressing either Insert or Delete

I wish there was a really easy way to add some generic UI for some editor features. I’ve tried Gemini, but that is not what I’m looking for.

1 Like

Damn bro… I keep downloading this… But I never get started because there is new and better release waiting for me!

Awesome :slight_smile:

Thank you for sharing the code of your engine. I’m a begginer in shaders and this helps me understand how the whole thing works :wink:
I have a little question if someone can help me understand the code better : what is the class QuadRenderer used for ? The method RenderQuad is used many times but I don’t get what quad is rendered ?

If you want to use an effect / shader, you have to draw something. So in this case a quad is used to apply an effect. The quad is rendered, so that it covers the whole viewport. This way you can combine the GBuffer textures / GBuffer data and render the final image for example. Hope this helps :slight_smile:

Ok, so if I understand correctly, we can’t just give a shader a Texture2D to process but we have to give vertices (in that case : a quad) in which we store the texture, am I right ? But couldn’t we use spritebatch.Draw to draw only the texture ? (or maybe we can’t use shaders with spritebatch.Draw ?)


I don’t find where the dimensions are defined so that the quad covers the viewport. How does the quad take up the whole space ? It just seems to be a 1x1 quad :

_quadRenderer.RenderQuad(_graphicsDevice, Vector2.One * -1, Vector2.One);

You don’t need a texture at all. You can render geometry / vertices without applying a texture. The texture is seperate input for the shader. In the shader you can sample the texture and use this information in the render process.

SpriteBatch also draws vertices to output something and it’s possible to use a pixelshader for the SpriteBatch.

It is a 2x2 quad. If I’m not wrong these are normalized device coordinates. You don’t transform them. Just output them and you have the whole viewport covered.

Thank you for your answers, that helps me a lot =)

1 Like

Instead of quadrenderer I can also use Spritebatches and draw a full screen texture, I think I sometimes even use it still.

The downside to Spritebatches is that a new quad is generated each time I call it, with quad renderer I can just create one quad and draw that over and over again, since it’s always the same. I don’t have a computer right now, but thatshould be how it works

When models are rendered they are transformed to view space.

Viewspace’s x and y coordinates are ranged from -1 to 1, so they are resolution independent.
So we can just have them fixed in quad renderer.

Spritebatches on the other hand has to transform your pixel coordinates to [-1,1]x[-1,1] range first