I want to use a custom pipeline processor to re-build some fonts for my iOS game, but the MG documentation page (http://www.monogame.net/documentation/?page=Using_The_Pipeline_Tool) is vague about that. Apparently the old content project(.csproj) I was using before is not working anymore, and I can’t find a pipeline project template when creating a new project in Visual Studio 2012/2010… Can someone help shed some light on this issue please?
There is no content pipeline extension project yet (I think there is a PR for one. I’ll have to check), but essentially a content pipeline extension is a Windows class library project. Add your processor and other content pipeline-related source files to that project, reference the MonoGame.Framework.Content.Pipeline assembly or project, then build it. Once it is built, select the project (top-most) node in the Pipeline tool and in the Properties double-click the References entry. Now you add your built class library as a reference. The custom content pipeline processor should now be available for selection in your asset’s properties.
Thanks very much again @KonajuGames! 
Hey @greyp
We are using custom content pipeline projects in MonoGame.Extended. You’re welcome to take a look at how they are implemented there.
I’ve also got a reasonably detailed tutorial on my blog.
Cheers.
1 Like
Hi @craftworkgames,
Thanks so much for your help!! =)
1 Like
@greyp - There is also the session I did on Microsoft Virtual Academy…
I walk thru in details creating a pipeline extension and using it from the MonoGame Pipeline GUI Tool.
1 Like
Hi @Tom, thanks very much for the link! I’ll go through it later today! 
@Tom / @zman
Having some very weird issues trying to create a simple Custom Content project and use it.
Do you have the sample source for the advanced MVA course published anywhere? (could only find the basic course code)
Can’t even get the basic old XNA Custom Model importer to work under MG now. Just get ContentLoadExceptions when loading the content back in (content build works fine)
So if you have that project, it’ll be good to check my sanity as I can’t see why it’s failing for the life of me.
Nope… unfortunately it was all on my laptop when it died on me.
The sort of good news is that I wrote that code in a couple of hours a few days before the MVA course. There is nothing particularly tricky or complex about it.
I’m sure that this is something simple. Remember everything has to be build against MonoGame for this to work… the pipeline extension as well as your data types assembly if you have one.
No worries Tom. Managed to move beyond my original headache now.
Will follow up with some new content based of yours and Andy’s work plus others based of my resurfaced experiences.
I’ve logged one issue recently as it seems mg is missing a MaterialContent reader which was the source of my woes when I got to the bottom of everything.
FYI. Another great tutorial on custom content processors…
1 Like
I’ve also re-discovered all the episodes for Tom and Andy’s MVA session on Content Pipeline extensions:
Hello @craftworkgames , I have just came across your blog post about the custom content importer, really liked how to the point it is and I am well on my way creating my own now.
One big question I was left with after reading however was, how do I debug my wip. After some time I found a solution here.
I feel like it would be a great addition to your post if you include a link to it in your blog post or otherwise embed it somehow for new programmers like myself  I bet it will safe a cumulative lifetime
thank you
1 Like
Tom recommended this one as well ^^^ I actually have this one converted over on my hard drive as a refernce.
It’s short simple complete and straight forward.
The uncut code if you don’t want to cut out all the little parts.
The Game1 file and the model xml
// Simple.xml goes in the custom content pipeline.
//<Model>
//  <Vertex id = "0" >
//    < Position > -0.5 0 0</Position>
//    <Normal>0 1 0</Normal>
//    <Color>255 255 255</Color>
//  </Vertex>
//  <Vertex id = "1" >
//    < Position > 0.5 0 0</Position>
//    <Normal>0 1 0</Normal>
//    <Color>255 255 255</Color>
//  </Vertex>
//  <Vertex id = "2" >
//    < Position > 0 - 1 0</Position>
//    <Normal>0 1 0</Normal>
//    <Color>255 255 255</Color>
//  </Vertex>
//</Model>

using Microsoft.Xna.Framework;
using Microsoft.Xna.Framework.Graphics;
using Microsoft.Xna.Framework.Input;
using CustomContentReadingWriting;

namespace HowToCustomContent01
{
    /// <summary>
    /// This is the main type for your game.
    /// </summary>
    public class Game1 : Game
    {
        GraphicsDeviceManager graphics;
        SpriteBatch spriteBatch;
        public static BasicEffect basicEffect;
        public static Texture2D generatedTexture;

        // Loaded thru the content pipeline.
        CustomVertexModel myDemo;
        // A vertexbuffer as example
        private VertexBuffer vertexBuffer;

        public Game1()
        {
            graphics = new GraphicsDeviceManager(this);
            Content.RootDirectory = "Content";
            graphics.GraphicsProfile = GraphicsProfile.HiDef;
        }

        protected override void Initialize()
        {
            graphics.PreferredBackBufferWidth = 500;
            graphics.PreferredBackBufferHeight = 500;
            graphics.ApplyChanges();

            base.Initialize();
        }

        /// <summary>
        /// LoadContent will be called once per game and is the place to load
        /// all of your content.
        /// </summary>
        protected override void LoadContent()
        {
            spriteBatch = new SpriteBatch(GraphicsDevice);
            spriteBatch = new SpriteBatch(GraphicsDevice);
            basicEffect = new BasicEffect(this.GraphicsDevice);
            generatedTexture = GetDotTexure(GraphicsDevice);

            // Load our custom content model in thru the content manager.
            myDemo = Content.Load<CustomVertexModel>("simple");

            // We could place the mesh into a vertexbuffer.
            vertexBuffer = new VertexBuffer(GraphicsDevice,VertexPositionColor.VertexDeclaration, myDemo.Mesh.Length,BufferUsage.WriteOnly);
            vertexBuffer.SetData(myDemo.Mesh);
        }

        public Texture2D GetDotTexure(GraphicsDevice gd)
        {
            Texture2D tex = new Texture2D(gd, 1, 1);
            tex.SetData<Color>(new Color[1] { new Color((byte)255, (byte)255, (byte)255, (byte)255) });
            return tex;
        }

        protected override void UnloadContent()
        {
        }

        protected override void Update(GameTime gameTime)
        {
            if (GamePad.GetState(PlayerIndex.One).Buttons.Back == ButtonState.Pressed || Keyboard.GetState().IsKeyDown(Keys.Escape))
                Exit();

            base.Update(gameTime);
        }

        protected override void Draw(GameTime gameTime)
        {
            this.GraphicsDevice.Clear(Color.CornflowerBlue);

            SetStates();
            SetUpBasicEffect();
            foreach (EffectPass pass in basicEffect.CurrentTechnique.Passes)
            {
                pass.Apply();
                GraphicsDevice.DrawUserPrimitives(PrimitiveType.TriangleList, myDemo.Mesh, 0, 1, VertexPositionColor.VertexDeclaration);
            }
            base.Draw(gameTime);
        }

        public void SetStates()
        {
            GraphicsDevice.BlendState = BlendState.Opaque;
            GraphicsDevice.DepthStencilState = DepthStencilState.Default;
            GraphicsDevice.SamplerStates[0] = SamplerState.LinearClamp;
            GraphicsDevice.RasterizerState = RasterizerState.CullNone;//RasterizerState.CullCounterClockwise;
        }
        public void SetUpBasicEffect()
        {
            basicEffect.VertexColorEnabled = true;
            Viewport viewport = GraphicsDevice.Viewport;
                Vector3 cameraUp = new Vector3(0, -1, 0);
                basicEffect.World = Matrix.Identity;
                basicEffect.View = Matrix.CreateLookAt(new Vector3(0, 0, -10), new Vector3(0, 0, 0), cameraUp);
                basicEffect.Projection = Matrix.CreatePerspectiveFieldOfView(1.5f, viewport.Width/ viewport.Height, .5f, 500);
        }
    }
}
The class library file this still has comments in it.
using System;
using System.Linq;
using System.Xml.Linq;
//using System.Xml.Serialization;
using Microsoft.Xna.Framework;
using Microsoft.Xna.Framework.Graphics;
// the content pipeline
using Microsoft.Xna.Framework.Content.Pipeline;
using Microsoft.Xna.Framework.Content;
using Microsoft.Xna.Framework.Content.Pipeline.Serialization.Compiler;
//
// Based off of felsirs flatredball example which can be found here.
//
// I have seen very few examples of how to do it.
//
// http://www.felsirworld.net/content-processors-in-monogame/#comment-473
//
//Make it work
//Once the Class Library is compiled, we can use it in our projects.Reference the Flatshaded.dll (or reference the project in your solution).
//The Pipeline tool must be aware of the new contentprocessor.Open the content.mgcb file in a text editor.Lookup the References section:
//#-------------------------------- References --------------------------------#
// reference:..\..\Flatshaded\bin\Debug\Flatshaded.dll
//1
//2
//3
//#-------------------------------- References --------------------------------#
//reference:..\..\Flatshaded\bin\Debug\Flatshaded.dll
//Add the(relative) path to the dll.This can also be done from the Pipeline tool, I find it easier to add it from the content.mgcb file.
//When you now add a vpnc file (for example the XML on the top of this page- saved as demo.vpnc) to the Pipeline tool, you should see the content processor being used in the bottom left corner:
namespace CustomContentReadingWriting
{
/// <summary>
/// This simple yet practical class will hold a array of vertices
/// </summary>
public class CustomVertexModel
{
public VertexPositionColor[] Mesh
{
get;
set;
}
public CustomVertexModel()
{
// nothing in here yet. May add things later.
}
}
//
// ContentImporter how do we tell the pipeline how to read in files.
//"Vertex PosNorCol Importer"
// This tells the Pipeline tool to use this content importer for files with the .vpnc extension.
// It also tells the Pipeline tool to use VPNCProcessor as the default processor.
[ContentImporter(".vpnc", DefaultProcessor = "VPNC Processor", DisplayName = "VPNC Importer")]
class VNPCImporter : ContentImporter<XDocument>
{
public override XDocument Import(string filename, ContentImporterContext context)
{
// Debug line that shows up in the Pipeline tool or your build output window.
context.Logger.LogMessage("Importing VPNC file: {0}", filename);
XDocument doc = XDocument.Load(filename);
return doc;
}
}
//
// ContentProcessor
//
[ContentProcessor(DisplayName = "VPNC file Processor")]
public class VPNCProcessor : ContentProcessor<XDocument, CustomVertexModel>
{
public VPNCProcessor()
{
//The Processor’s constructor is currently empty-
// you may add parameters to the Pipeline process.
// For example,
// maybe you want to scale the model or do some different preprocessing things.
// Variables that you can change in the Pipeline tool can be added like this:
//[DisplayName("Scale")]
//[DefaultValue(1)]
//[Description("Set the scale of the model.")]
//public float ScaleModel { get; set; }
//[DisplayName("Scale")]
//[DefaultValue(1)]
//[Description("Set the scale of the model.")]
//public float ScaleModel { get; set; }
}
// CustomVertexModel is created from the data.
// The input type is XDocument as defined by the ContentImporter
// The output is CustomVertexModel
// We can pass that one to the ContentWriter.
public override CustomVertexModel Process(XDocument input, ContentProcessorContext context)
{
try
{
context.Logger.LogMessage("Processing FlatShadedModel");
CustomVertexModel fsm = new CustomVertexModel();
int verticecount = input.Document.Root.Elements("Vertex").Count();
VertexPositionColor[] vertices = new VertexPositionColor[verticecount];
foreach (var elem in input.Document.Root.Elements("Vertex"))
{
int v = int.Parse(elem.Attribute("id").Value);
vertices[v].Position = ParseVector(elem.Element("Position").Value);
vertices[v].Color = new Color(ParseVector(elem.Element("Color").Value) / 255f);
}
fsm.Mesh = vertices;
return fsm;
}
catch (Exception ex)
{
context.Logger.LogMessage("Error {0}", ex);
throw;
}
}
private Vector3 ParseVector(string s)
{
string[] xyz = s.Split(' ');
return new Vector3(float.Parse(xyz[0], System.Globalization.CultureInfo.InvariantCulture), float.Parse(xyz[1], System.Globalization.CultureInfo.InvariantCulture), float.Parse(xyz[2], System.Globalization.CultureInfo.InvariantCulture));
}
}
//
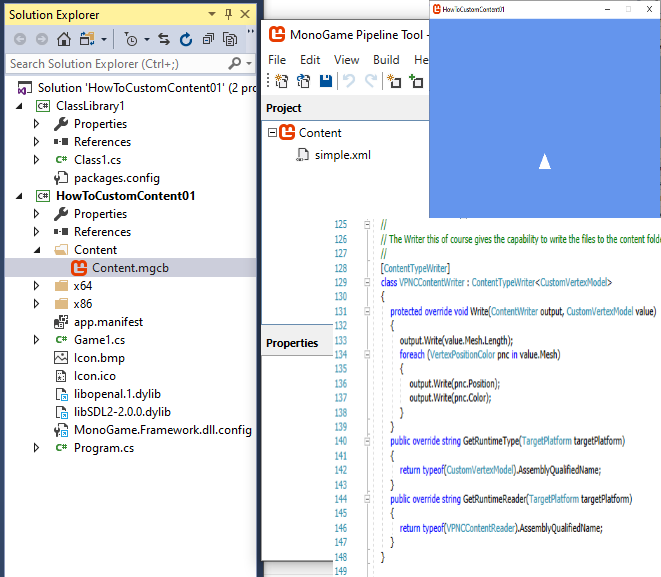
// The Writer this of course gives the capability to write the files to the content folder.
//
[ContentTypeWriter]
class VPNCContentWriter : ContentTypeWriter<CustomVertexModel>
{
protected override void Write(ContentWriter output, CustomVertexModel value)
{
output.Write(value.Mesh.Length);
foreach (VertexPositionColor pnc in value.Mesh)
{
output.Write(pnc.Position);
output.Write(pnc.Color);
}
}
public override string GetRuntimeType(TargetPlatform targetPlatform)
{
return typeof(CustomVertexModel).AssemblyQualifiedName;
}
public override string GetRuntimeReader(TargetPlatform targetPlatform)
{
return typeof(VPNCContentReader).AssemblyQualifiedName;
}
}
//
// Reader Reads in our files.
//
class VPNCContentReader : ContentTypeReader<CustomVertexModel>
{
protected override CustomVertexModel Read(ContentReader input, CustomVertexModel existingInstance)
{
CustomVertexModel fsm = new CustomVertexModel();
int vertexcount = input.ReadInt32();
VertexPositionColor[] vertices = new VertexPositionColor[vertexcount];
for (int i = 0; i < vertexcount; i++)
{
vertices[i].Position = input.ReadVector3();
vertices[i].Color = input.ReadColor();
}
fsm.Mesh = vertices;
return fsm;
}
}
}
2 Likes