Methods to prevent texture bleeding for tilemaps.

Hello

I know, that this topic has been discussed a lot of times until now. I did a lot of research and found some potential solutions for my issue, but actually I’m not happy with those solutions. Maybe someone has a better idea?

The problem statement:
I render a tile-map, tile by tile to the screen. Of course, I use SamplerState.PointClamp as texture filter. The tile-set is like a texture atlas. It is this example tile-set from tiled:
tmw_desert_spacing

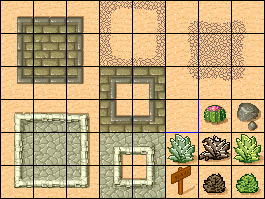
As you can see, every tile has a black border in the tile-set, so there is some kind of padding. Please notice the blue border on the one tile, which I intentionally added here to debug this issue.

I have a camera with zoom. The camera position and the zoom is applied as transformMatrix in the Begin(...) method of the sprite-batch. If I have certain zoom levels, I suddenly see black gaps between the tiles like this:

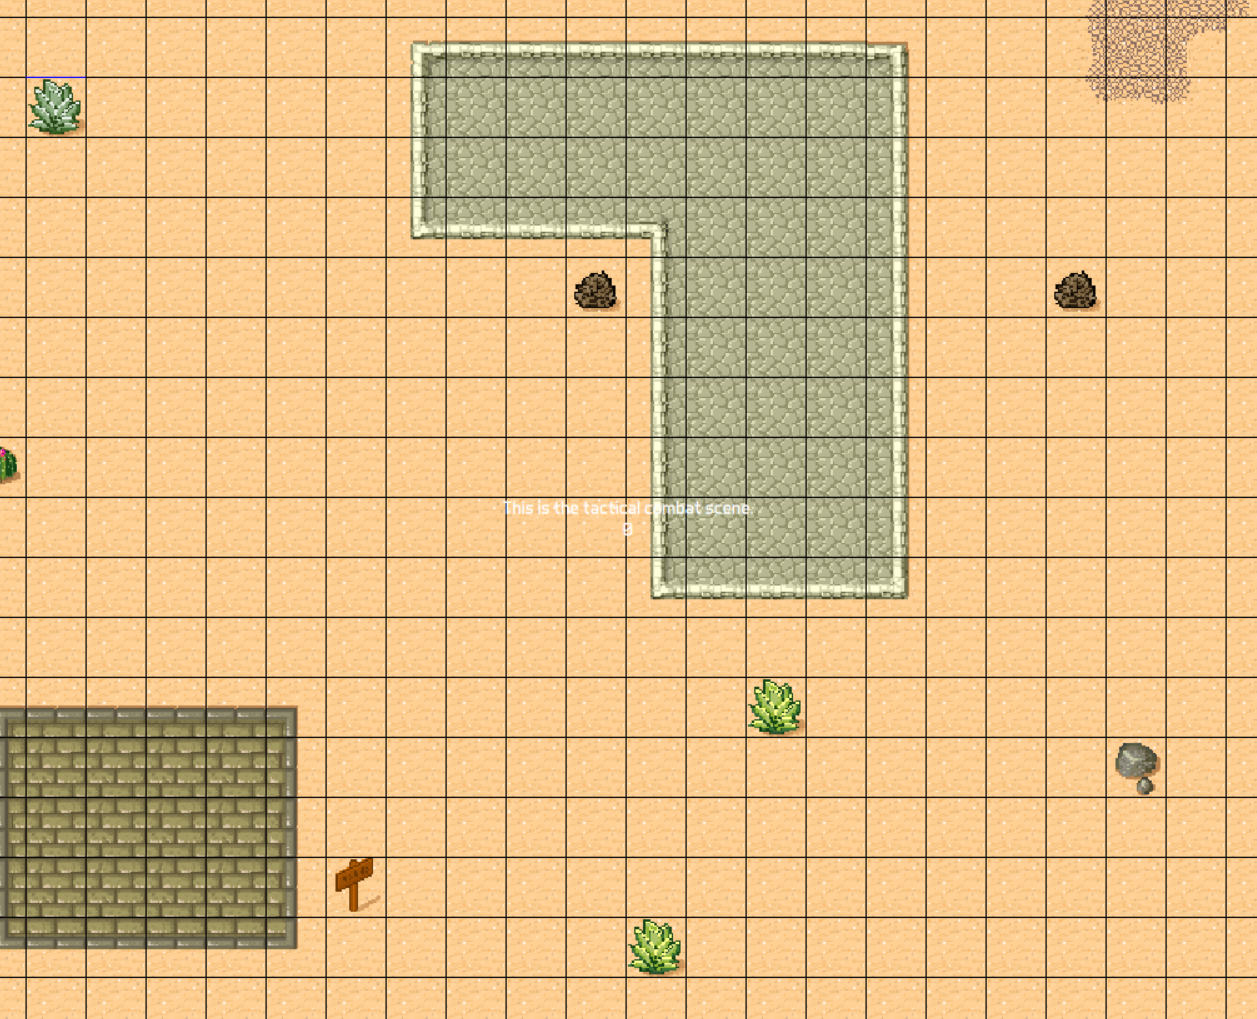
First I was thinking, that this are really gaps between the tiles, but it isn’t. I changed the background color from black to pink, but the gaps are still black. Then I found out, that this issue has the name “texture bleeding”.

This happens when textures are in a texture atlas, like a tile-set atlas. The texture coordinates are given as floating point numbers from (0.0, 0.0) to (1.0, 1.0), which corresponds from the left top corner the atlas to the right bottom corner. Now it can happen, that the texture coordinates for the left corner of a tile are subject to floating point imprecision, so that actually not the first pixel of that tile inside the texture is chosen, but one pixel before (which is the black padding pixel). Therefore I get those strange gaps on certain zoom levels.

I found out, that there are 2 very common workarounds available for that and one workaround, which is not so often recommended.

  • The first very obvious workaround is to not have any zoom levels at all, applied to the transformationMatrix. Often it is recommended to render the tiles to an empty texture of the size of the screen and then apply the zoom level on that texture, when rendering it to the screen. This sound like a nice workaround, since often you anyway have to apply post-processings, so having this system inside the game, would make those post-processing easier. However it only works nice for zooming in. If you also want to allow zooming out, you need an texture render target, which is 1 / zoom-level times bigger than the screen itself. For huge screens like 4k and zoom levels of around 0.1, this leads to a very huge render target. Furthermore, I’m not 100% sure, if this really fixes this issue in all cases and for all possible camera positions. Maybe, when the size of the atlas changes (for example getting much bigger) then the floating point imprecision starts again, even on zoom levels of 1, but then just on certain camera positions.

  • The second very smart workaround is, to just add a padding pixel around every tile, which copies the color from the adjacent tile-pixel. If the floating point imprecision starts, it is just selecting the prepared padding pixel instead of the black border, thus we don’t see black gaps. I already tried this out, by just reducing the tile size by 2 pixel and it works fine. However, I now get on some zoom-levels and camera positions artifacts, where the pixels of some tiles, sometimes look twice as big as all other pixels. Normally this is not really noticeable, except you move the camera a lot and then you get on some flickering around those tiles. Especially on tiles with high color diversity (like the ones with the bricks), this looks ugly. Furthermore it means, that every atlas must be preprocessed by any kind of script to add the padding automatically. It really seems to be just a workaround and not a solution to me.

  • And now there is the 3rd solution I found here: Gaps Between Tiles - #16 by CSharpCoder In this thread the author is suggesting to add a small offset to the texture coordinates inside the pixel shader, to prevent a sampling of the wrong pixel. Honestly the thread is some kind of chaotic, the so called “solution” changes from post to post (sometimes, the author is giving a half pixel offset, sometimes just a very small offset like 
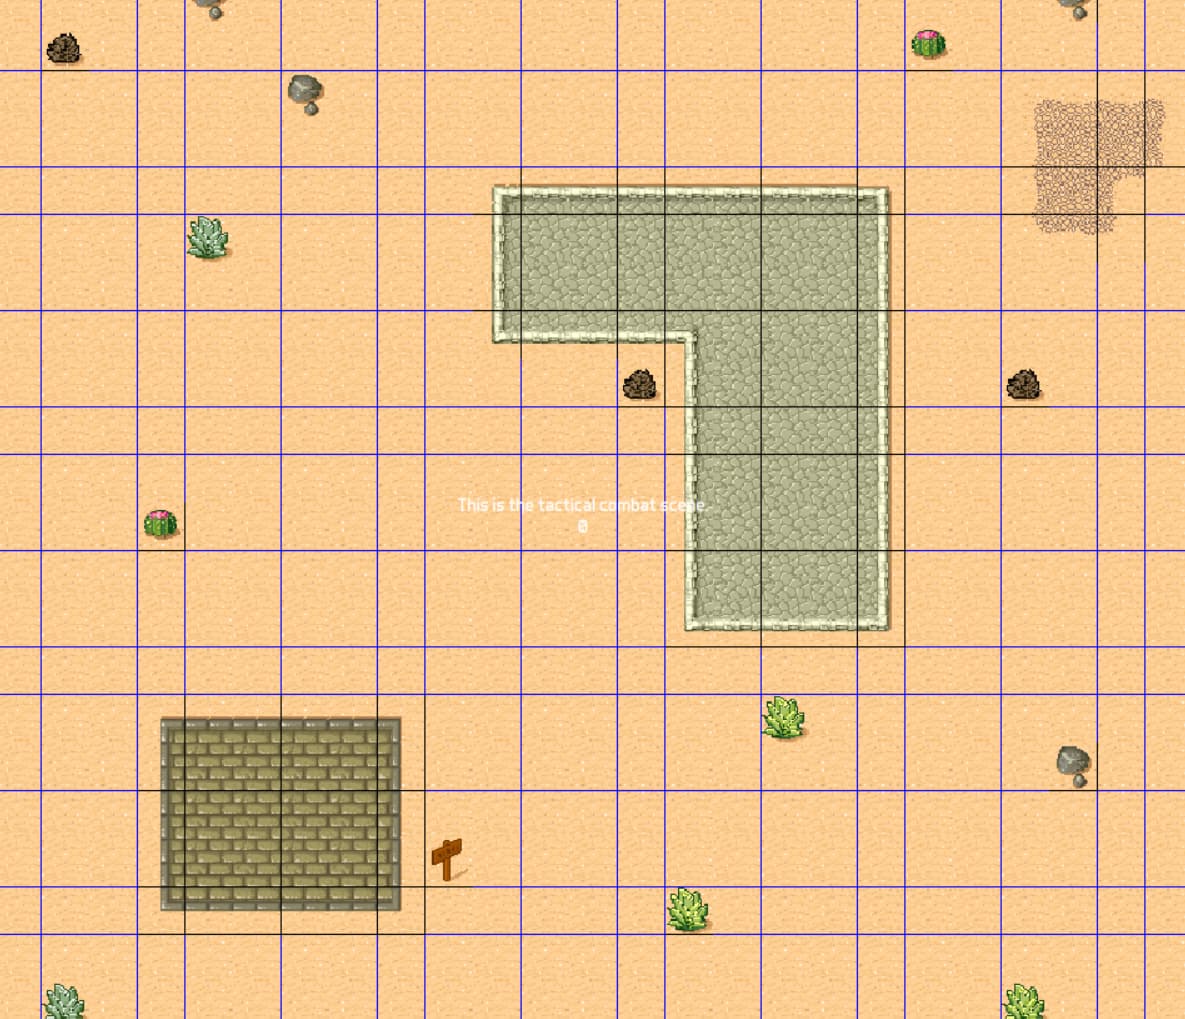
pixelSize * 0.001. Also here, I have the feeling, that is is not proven, that this is a generic solution for all kind of textures, camera positions and zoom-levels. I tried it out with the half pixel offset and get the following result:


    Now, I get blue gaps, so it is not under-sampling but over-sampling (don’t know if this are the right words for that) the tile in the atlas. When I just apply an offset of pixelSize * 0.01 it works fine. But also here, I have the feeling, that on some zoom levels, I get flickering when moving the camera (like in the seconds solution). And furthermore, I have to implement my own pixel shader and pass the texture size to it, which might be a performance issue, if I want to mix up tiles from different tile-sets in the same map (then I have to change the texture-size every time, I render a tile).

So as you can see, I’m not really happy about any of those solutions. I would say, that the first solution seems to be the most reasonable, if there is the guarantee, that this really solves the issue. But why should the floating point imprecision just occur on certain zoom-levels and not also on certain camera positions with zoom level 1? Does anyone has a explanation for that?

Furthermore, I wonder how the “half pixel correction” of DirectX plays into that. Maybe there is just a flag, I have to switch on to get rid of the issue? However settings GraphicsDeviceManager.PreferHalfPixelOffset to true does not change anything.

Are there more detailed (theoretical) explanations to this issue? How are you fighting against it?

In my personal experience, I have developed a game with tiles similar to what you have above, my solution was the combination of the 1st one and 2nd one. So I added space between tiles, used point clamp, rendered to a 1:1 render target and then zoomed in and out according to my needs. I had no bleeding after following that method, but if not rendering 1:1 using different zoom levels I may experience the same issues mentioned above, so zoom has to be calculated based on the final render target to avoid this.

About 4k or other resolutions, I personally think that no matter the resolution the amount of visible tiles should be the same in any screen size at the same zoom level, the reason for that is if you give more tiles at 4k or 8k, the player will have more visibility and depending of the game it may make it easier than expected, and on the other side if the screen is smaller your player will have a handicap only because of the monitor resolution, so I ended up giving the same amount of tiles no matter the monitor size.

Another solution I tried is to add one extra pixel to all my textures around the sprite with the same color as the tile border, so if the zoom takes one of those and bleeding happens it will pick that color, but I ended up not needing that because of the next method below.
There is one more solution not mentioned above that I tried and works too. I created a custom mesh, a grid the size of the map and I assigned to each vertex the position of the texture that I wanted to use , that worked perfectly for all the static stuff in the map like terrain and buildings, no matter what the zoom is it works but initializing the mesh is quite costly but after that it doesn’t use much time since you only need to adjust the x,y position and render the mesh. I ended up using this method for my game, you can see the difference in one of my blog posts here , the first image I was using simple spritebatch and using the method above and it worked at all zoom levels, then moved to grid mesh thing from the 2nd image onward, and for the final images I dropped the tilemap approach since it was too much work to make all the transitions for all the tiles and moved to a high map to achieve 3rd and 4th images. Only used tilemap on top the gridmesh to draw non static things like characters, and stuff that was supposed to change , like doors. And also I divided the screen into multiple grid meshes so I had 9, in a 3 x 3 setup, where the middle was always the full screen plus some buffer. Also, make sure your texture is power of 2.

In any case, if you want to render more tiles, then have a bigger render target and render again 1:1 and show that in 4k or 8k. If your game is pixel art style, render point filtering so you always get crispy clear pixels.Use the simple method of spritebatch to a render target to a 1:1 scale and zoom in/out the result of it, I know it works and I tried it.

Also, about your option 3, I am guessing that the person who wrote that had the same problem as I did, I started doing offsets in pixel shaders but I noticed that depending on the zoom level the offset should be changed, it was quite hard to make it work, so I am guessing he or she had the same problem so ended up writing different values like 0.001 in one case because of the zoom level, if it changed the zoom level the offset number needs to be adjusted again to 0.01 for example. So it is not a viable solution in my opinion.

1 Like

As mentioned above, the easiest solution which will not cause any bleeding is to add a 1 pixel buffer around each tile, coloured the same colour as the edge pixel on that tile

Hello! Thanks for sharing your experience. After reading your post, I think using the first approach makes most sense. Also having a more or less fixed “internal resolution” and then scale it to the screen resolution (but keeping aspect ratio) is a good idea.

I will try this out as next.

About your idea with the map-mesh: Why does it solve the issue? Texture bleeding is also an issue for 3D games, where some pixel from the adjacent texture are bleeding to a position, where it should not be. Is it, because you can control the u,v variables of the texture as you want and therefore prevent rounding errors from happening?

A little bit off topic: What happened to your game? I read some of your blog articles and it seems, that your game was already quite advanced in 2015. But then the time after, there are no news anymore. Are you still working on it?

The same issue exists in 3D, that’s why (in the texture) you leave gaps between elements and why texture software like substance produces overdraw for each UV element.

Also MipMaping can create (or solve) issues in such cases where zooming (or other non 1:1 pixel ration to texture) is involved.

The problem becomes less apparent, the bigger the elements in the texture-atlas are, as there is naturally more room for error then.

Another way to solve it is to not use tile-maps but texture arrays instead, where you can just clamp the texture and there’s never bleeding.

Well, game was moving forward till mid 2017, then I had to redo all the user interface because I ended adding a “lot” of new stuff and that mess up all the development, so UI killed my game for the time being because I decided to create a new user interface library from scratch, none of the libraries could do what I wanted to do in the way I wanted it to be, so going back to today, my new user interface library is at maybe 80%, and writing a totally new template for developing all my games at 70% now.

In summary, wrote a new UI library with UI editor, now writing a game template, and after that I will start making games non stop, my goal is to make a template project that will work on all my games, that means I will also rewrite the old game. I want to make 1 game a month from next year for a year and see how it goes. Besides, long story short, used a lot of time learning Unity and also Unreal Engine for more than a year, then went back to Monogame because I didn’t like either.

Interesting note about the same effect in 3D.

About your solution, using single textures for every tile: Isn’t this very inefficient? I think the rendering is much faster, when in between the texture does not need to be switched. Therefore Sprite-Atlas is very common.

Too bad, your game from 2015 looks very promising to be honest. I wish you a lot of success with your plans.

A texture array “basically” is a single texture object for the GPU - but don’t catch me there if there is some special handing in terms of internal caching, but there is no texture/state switch like there would be with multiple textures.

Dont mix this up with an array of textures, which is indeed just an array of textures, while a texture array is basically a Texture2D but you put several textures in it as layers. Not so different from MipMapping (but still different). Check the SetData Function, there is some overloads you can actually supply an index - and in shader there is overloads for the sample methods which take a float3/int3 where the 3rd component is the actual index of the array.

Atlases are from a time when there were no TextureArrays - and I still use them for UI as the elements dont have equal size in there (and UI doesnt get scaled etc, so you dont need to bother with scaling issues), but for equally sized tiles, a TextureArray fits very well.

Wow, I didn’t know that such a feature exists! Thank you very much, it is indeed another good solution, which fixes the problem directly at the root, where it happens.

Forgot to mention the texture array option!, that’s what I used for the last 2 images in my game at that time. It worked ok but it was quite slow to use set data for all the grids, I wanted to be at 60 fps but when using SetData for each vertex the frame rate dropped a lot. Found some other workarounds so keep in mind that it may be slower.

As far as I understood, you just prepare a texture2d object a single time as texture array. Maybe at the startup of the game. Just copy all tiles from a tile atlas into the texture array using get-data on the tile-atlas and set-data on the texture array. Then hand over the texture array as texture to the draw call and setup before every draw the index, passed to the shader. This should not have any real overhead, or did I misunderstood the concept?

well it depends how big your map is, I wanted to dynamically create the map of the whole world as the player walks through it, so if your map is small it will be ok, but if you need to re-create slices of the world as you move, your game will stutter a lot when switching areas

But this should also not be an issue, since you only prepare the textures of the tiles. So you can add any amount of additional tiles, using the same textures in the same texture-array without any additional setup-effort.
It only hurts, if you need to change the tile textures dynamically. For example because you have procedural textures or because you have to render a chunk of many tiles to a render target, to not render every time every single tile on big maps. Them it would be good to think about, what can be done of it in a background thread.

You can do a few things and not rely on point clamping.

  1. Premultiply alpha
  2. Put a 2 pixel gap between tiles in the atlas and extrude the edge of the tile into each adjacent pixel.
  3. Make sure Texel sampling is done at half Texel increments, not at (0,0)… So first sample would be (1/tilesize * 0.5, …)

I created a pipeline for generating atlases that adhere to the extrusion from sets of source tile images. Works great, no bleeding, plus I still can use linear filtering.

Talking about packing your images with gaps, you can use this tool, it is a sprite sheet packer, and you can select how much padding you want, it creates a XML file to find the sprites in the atlas, I have a version of it but heavily modified to add more features.

Also about the grids, it was slow because i had to setup new grids as the player walked and I wanted to minimize memory usage since the world could be huge, in the billions of tiles, so I had to create the grids that are needed only instead of the whole world, every map was procedure generated and depending of the player walking speed it could slow down.

If you don’t want to use a render target and mip mapping which is wonky last i checked in monogame for a ton of reasons.
To say if you want to individually place tiles seamlessly which in 3d for mesh seems can be a real pain.

Besides point clamp turn off multisample anti aliasing.
However you don’t really want point on you do however want clamp on when you are zooming in on tiles and expanding them because then some rows and columbs will get doubled in size.
For that you need your own shader if i remember because i don’t think you can set that individually from the framework with a sampler state.

Be aware also that 99% of these people are only thinking about the Source Rectangle you will get gaps those black lines from Destination floating point errors as well.

Aka when you draw most people will calculate the position per tile.
| square 1 | | square 2 |
One thing that will help a lot is to reuse the ending position of square 1 | as the starting position of square 2.

Nobody ever tells people that which makes me think like 90% of the people don’t know. How can there be a destination gap if the end of one tile is the beginning of the other exactly. That eliminates the destination problem.
Spacing the source textures is requisite if upsampling or the card aliases at all techically bilinear sampling actually means you need 2 or more blank pixels Trilinear at least 3 between each tile without floating point errors taken into account. The gaps should be transparent and you should draw with alpha blending or a shader that ignores drawing pixels that have a transparent alpha.

Also a pixel is actually 1f / texture width and 1f / by texture height thats the size of a pixel those values divided by 2 is a half pixel offset.

The best way to see what is happening is to actually just make a square image in paint and that the edge is a single pixel draw 4 of them with a single space between them then start zooming in and out very slowly you will see lines dissappear or double in size and the spaces between then shrink or expand by a pixel or two. For all the aforementioned reasons above.

Why do you have to pre-multiply alpha?

And about point 3, how do you ensure this? Just adding an offset to tex2d in the shader?
I did it and it lead to bleeding at the other end of the tile-texture (so towards 1.0, 1.0).

Thanks for the hint with this tool, it looks interesting.

This is also a good information, for tile maps, build out of meshes. This is something, I need to do later, when I want to have huge maps. I will keep in in mind. Thanks!