1,500 words according to Word and roughly 12 minutes to read according to my TTS app. [stats not including this line]
A bit late, sorry, but here is something I think may help complete beginners understand how MonoGame works, I plan to create a Game Engine Framework overview next.
If you think some of the content may have better explanations there, please do comment for the sake of newcomers.
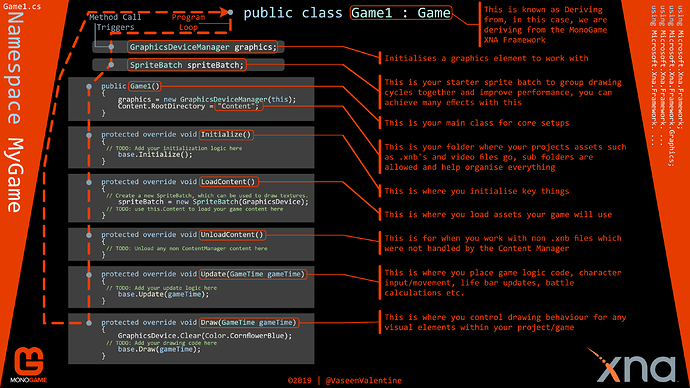
Basically, if you notice the top of the graphic, you see the overall class inside Game1.cs.
public class Game1 : Game
I will post - as mentioned above - a graphic and post explaining what is going on there soon, for now, let’s focus on the structure in this class.
First up, you have two field properties.
GraphicsDeviceManager graphics;
SpriteBatch spriteBatch;
The first sets up something for us to utilise graphical representations of visual elements in our games/projects.
The second sets up a starter sprite batch which we can use to draw some sprites as a group. You may be asking now, ‘What do you mean by starter sprite batch?’. Well, imagine if you will, we are developing a 2D platformer game. You have the player character and the immediate platform the player interacts with. Let’s call this batch, the platform batch, behind this we have the background batch and naturally the foreground batch and so on.
Can you guess which is drawn first?
We would have:
  LOOP START
  BackgroundBatch()
  BackgroundSkyBatch()
  PlatformBatch()
  ForegroundBatch()
  ForegroundSkyBatch()
  MenuBatch()
  TextBatch()
  UIBatch()
  LOOP END
…and so on, of course everything depends entirely on your game’s requirements and specifications.
But why this order? Let’s investigate further.
If you have any experience with Photoshop/Illustrator or similar graphics design applications, you may be familiar with the Layers options, or if you remember tracing paper in school during art class or maths classes etc.
Layers allow you to blend effects or elements to achieve a final result, while reducing complications or separating visuals in order to achieve an intended effect.
Going back to coding, basically the first batch group is drawn first, so this is your bottom-most illustrator layer, next you have the second batch which is drawn on top of this and so on. So essentially, your most top placement visual is drawn last in order to sit on top of the various layers. In the above example, our UI is the utmost visible layer. That is, in this example, our touch controls on a mobile device to interact with the game’s/project’s menu or player character/vehicle.
Remember, UI and Menus are two separate things, UI is User interface. you may also hear UX User Experience from time to time but that is more of a web development expression, you do have a website going right? I may write a guide on creating a bare bones website and possibly just hand out the code for it on GitHub, I resent WordPress.
So, next call.
Game1(), here we have our first method, I am going to be honest, I am yet to do more with this at the time of writing this, so, I will just point out the two presented elements within this.
    graphics = new GraphicsDeviceManager(this);
    Content.RootDirectory = "Content";
First, we create a new instance of our graphics management system, this enables us to send visual draw calls to the graphics device and thus our game window.
Following this we declare where our game’s/project’s assets are placed so we can simplify where everything is being loaded from. This means we can simplify the addresses of assets by simply naming any file within the contents folder, or forward slashing for organised assets in sub folders such as Content/Music, more on this later.
Moving along.
Initialize(), another method I lack explanation for at this time, but you can create and prepare things here that the game/project requires prior to beginning, so that they are ready ahead of time.
Next…
LoadContent(), here we can load objects from our assets folder. remember from above, we declared an assets folder, Contents. We can now use simplified code to load objects from this folder like so:
Imagine you created an asset such as a sprite font through the Content Pipeline Tool [I will post my guide further down here soon] named Segoe UI Mono.xnb; and you placed it inside the Contents folder.
We would load it using the following code:
FontSegoeUIMonoBold16 = Content.Load<SpriteFont>("Segoe UI Mono");``
Where did the extension go? Now I should mention here, let’s say you wanted to load a sprite graphic for a main menu logo, you called it GameLogoMainMenu.png - because naturally you would have a smaller one for other areas in the game - and it’s a PNG file - naturally because we don’t want a huge solid square or rectangle everywhere, more on that in a future guide post - now, you can load this graphic directly using the code above like so:
logoTexture = Content.Load<Texture2D>("GameLogoMainMenu.png");
[Note that you would declare a texture2D just below where you see SpriteBatch spriteBatch at the top, like so: private Texture2D logoTexture; similarly you would declare fields for sprites and sprite fonts etc. Oh, and Textures are called Sprites because, well it stems back from the old days of spritely images on dot matrix displays, look it up, it’s a fascinating back story.]
Assuming it was directly inside the Contents folder, but this carries some issues in future, perhaps someone can explain this reason further should they feel like it, but let’s assume we took this graphic through the Content Pipeline Tool and ended up with an XNB file, we would use the code like so:
logoTexture = Content.Load<Texture2D>("GameLogoMainMenu");
So, instead of GameLogoMainMenu.xnb we simply omit the ‘.xnb’ because in XNA this is not required as we are already declaring it as a Texture2D; which accepts images of various formats within the .xnb file format. The Content Pipeline Tool has already translated the images to an optimised format for the framework to play with, therefore we no longer need to know what type it is, be it .jpg or .png, it no longer matters. [I suspect I just explained it better here, though there is a larger discussion on how images are stored on/in a graphics processors memory].
Before I forget where I was, let’s say you placed this graphic in a sub folder called MainMenuItems, we would therefore use the following code to load it:
logoTexture = Content.Load<Texture2D>("MainMenuItems/GameLogoMainMenu");
Now, I want to point out, this is what I use for Windows programming, I am unsure what the situation is for iOS/Mac or Android/Linux and whatever Nintendo Switch is; but as far as I am aware the above works for UWP, Windows Desktop and XBOX development.
I think that was succinct? let me know if I missed anything, moving along…
UnloadContent(), I think this one is self-explanatory, but basically you can run .Dispose() calls etc. in here. Please do spark a discussion below if you can expand on this at this time.
Next up…
Update(), this one is easy to explain, Here we will place all logic the game/project processes, this includes physics calculations, user input from a game pad, keyboard inputs, mouse clicks, mathematical code for calculating battle events and such, not just that but if you created an in-game console interface, that code would all be located in here, whilst it’s visual representation would be in the Draw() method.
Finally( ), we arrive at…
Draw(), here all graphics and those aforementioned batches are drawn here, as well as 3D graphics, UI elements and so on. I think that explains this method in a nutshell.
So, now, if you look to the left of that graphic, you can see a dotted line, this line begins at the top of the graphic at the Game1 class and once each field inside the Game1 class is processed it moves along to the next method, notice I placed a dot next to the two fields inside Game1, I wanted to illustrate that these are processed before the proceeding method calls further down.
Lastly, notice the Namespace to the left and the using statements to the top right, having studied some basics in C# and .NET, you should be familiar with how these function, do ask me for my preferred/recommended route to grasp the basics, happy to go through it.
This concludes this guide, thank you for reading.
Remember, you can hover over each method to see a tooltip of what they do for some more clarity, that is the method name with the () brackets, not the part that says something like private void.
By the way, these guides are what the Beyond part of the thread title refers to.
I may create a video version of this guide and others soon as well as audio podcasts perhaps too, may take a while though
I also have a Pixel Art guide planned soon; however I may put that on Udemy to help my development, or perhaps not, we shall see!
Valentine out!


 ), we arrive at…
 so, hopefully I can start testing on it instead of my local system.

 .
.


 I do not like taking NSAIDs so you can understand, having to take a total of 2052mg [3x684mg with a minimum of 5 hours between dosages with food] of Ibuprofen daily is not exactly what I want to be doing… for the record, not a doctor and seriously seek professional advice before you take any drugs kids! Learn more
  processor with a Surface Edition GPU chip}] but that is so costly and so many months away for now, I should still get pretty good 60fps; fingers crossed. But, I do have an XBOX ONE X

