Tips on improving a 3D game's lighting?

Hi all! I’m a self-taught game programmer, and I’ve been working on a 3D game for around two years now. My… general lack of level design skills notwithstanding, I find that its lighting is a bit… bad:

As you can see, things like the bins and the picnic table look rather bad without having a shadow beneath them. Now, my style is meant to be that of the N64s, so a bit of bad lighting is to be expected. However, I believe I should still try to get it a bit better than what I currently have.

The main character does have a textured plane beneath him to create a shadow, but I can’t exactly do that everywhere since I intend to use uneven terrain (and the shadow mesh clips through the floor enough as it is). Is there a quick out there that can spruce up my game’s appearance? Unfortunately, I know very little about Shaders, else I would have given it a try myself.

Thanks in advance!

2 Likes

Do you currently use basic effect then.

You want to learn a bit about shaders you could make that scene look so much better with your own shader lighting and a shadow cube would make it vastly better looking.

Hi willmotil,

I currently use a modified basic / skinned effect which has an alpha clip threshold (due to the amount of textures that I use which have alpha. You can see a bit of sub-par alpha clipping on the tree in the background on the right).

I have looked into learning more about shaders, but… I didn’t have the best luck (just modifying the Skinned Effect to include Alpha clipping was a challenge for me). I’d invest more time into learning, but it would eat up too much development time (I am a 1 man development team). I was hoping the issue was caused by me mis-using the settings on my current shaders rather than needing to create more complex ones. Are there any existing (public domain) shaders out there that you would recommend I look into using? Thanks!

Also sorry, but what’s a “shadow cube”? I looked it up and I just keep getting forum posts about Fortnight.

Well there are all kinds of shadow mapping techniques i should of just said shadow mapping it would look better with any of them even a simple one.

There are some in the monogame samples.

a Cascaded shadow map one here

kosmoto had a blog post on it.

I believe monogame extended implements them as well.

Here is a nividia article for Pcf shadow maps Percentage closer filtering which looks the best to me.

What i did on my last shadow mapping attempt was to basically used a RenderTarget cube to snap shot off a depth map from the light source to the scene in order to later generate occlusions of the lighting diffuse and specular basically i just didn’t light shadowed areas.
The advantage to that is that the light can simply be anywere even with a heavily distorted perspective projection which is what i wanted at the time. The disadvantage was that its expensive.

Ooh! That CascadedShadowMaps example looks like something worth investigating! I’ll give it a shot (which will likely take ages due to my lack of Shader skills).

Oh, one more thing while I have your attention. Is it possible to do the following with shaders?

So, my tree model is rather basic (and on the right you can see how it’s mostly made out of quads).

I imagine that casting a shadow from my trees is going to be cast down as squares because of it, so I’m thinking, is it possible to manually create a shadow texture, like this for example:

And just have anything directly beneath the tree be affected by it? I think it’s called a “decal”. It won’t be the nicest looking effect, but that’s exactly the kind of effect I’m going for! Thanks!

Hello Milun,

I think your models already look kind of good, but of course they are a bit flat - we can change that easily. You can start by adding some diffuse lighting -> for example like here: http://what-when-how.com/xna-game-studio-4-0-programmingdeveloping-for-windows-phone-7-and-xbox-360/lighting-xna-game-studio-4-0-programming-part-1/

If you post your current SkinnedMeshShader we can also give you a more concrete example of how that could work

2 Likes

Thanks kosmonautgames! Yeah… from this thread it’s occurring to me I need to expand my knowledge on Shaders; and that tutorial looks like it explains things really well! I’ll give it a try over the next few days and report back (hectic work week, else I’d do it sooner)!

I imagine that casting a shadow from my trees is going to be cast down as squares because of it

Writing to the depth buffer based on position alone will treat a quads transparent pixels as solid.

so I’m thinking, is it possible to manually create a shadow texture, like this…

The answer to the question is…

Yes.

.

When you write to the depth buffer and you are shadowing quads with transparent pixels, you take a extra step, you first check if the current pos in that (triangle / quads) texture is transparent or not before you write to the shadow depth buffer.
If it is transparent like the areas of the quad between the tree leaves and limbs. You don’t add that positional depth of the triangle/quad that relates to its distance from the light, to the depth buffer.
So…
In that manner no depth marked at that position later on means… the regular lighting calculations are used or just regular texturing when you later test for a shadow as you draw the scene.

Kosmotos advice is good. Even adding diffuse and specular lighting will make you gasp at just how much better things will look. Diffuse is cheap and easy to do to start with. Specular is a natural next step after that, and shadowing follows.

Note.
The above is fine for pixels that are known to be fully transparent pixels but not so much for shadows from objects that represent actual semi opaque objects glass crystal or semi transparent objects. That requires a entirely new additional buffer and can be expensive but its doable in these scenarios the concept of a intensity buffer needs to be introduced. Even that however is only a partial solution to the full range of possible scenarios, a full solution would probably be beyond reasonable expectations at the current capability’s of modern gpu’s. Though you usually never here anyone ask how to shadow objects behind multiple windows.

1 Like

Out of the box Basic Effect support : (3)Three directional lighting, with different color per light, option to use per pixel lighting, ambient light, diffuse color, emissive color, specular color/power and opacity that you can apply on your tree ^_^y

1 Like

So I studied up the very basics of XNA shaders, tried my best to make one from scratch (heavily relying on tutorials to walk me through it), and WHOA! Normals you can SEE!

…And they’re not done properly (one bench vs. the other bench. The only difference between them is a rotation of 180 degrees).

I assume it’s because I’m doing:

output.Normal = input.Normal;

Instead of:

output.Normal = mul(input.Normal, World);

But when I do the latter, I get this:

Uh… I’m really not sure what am I doing wrong here (I deliberately disabled textures and vertex colours while testing)…

// Matrix
float4x4 World;
float4x4 View;
float4x4 Projection;

// Light related
float4 AmbientColor;
float AmbientIntensity;

float3 DiffuseDirection;
float4 DiffuseColor;
float DiffuseIntensity;

float AlphaClipThreshold = 0.75;

// The input for the VertexShader
struct VertexShaderInput
{
    float4 Position : POSITION0;
    float4 Normal : NORMAL0;
    float2 TextureCoordinate : TEXCOORD0;
    float4 Color : COLOR0;
};

// The output from the vertex shader, used for later processing
struct VertexShaderOutput
{
    float4 Position : POSITION0;
    float4 Normal : TEXCOORD0;
    float2 TextureCoordinate : TEXCOORD1;
    float4 Color : COLOR0;
};

texture Texture;

sampler2D textureSampler = sampler_state {
    Texture = (Texture);
    MinFilter = Linear;
    MagFilter = Linear;
    AddressU = Wrap;
    AddressV = Wrap;
};

/*
The VertexShader is used to manipulate vertex data.
It gets a VertexShaderInput object as input, and outputs a VertexShaderOutput object.
*/
VertexShaderOutput VertexShaderFunction(VertexShaderInput input)
{
    VertexShaderOutput output;

    // Standard positioning code
    float4 worldPosition = mul(input.Position, World);
    float4 viewPosition = mul(worldPosition, View);
    output.Position = mul(viewPosition, Projection);

    output.Normal = mul(input.Normal, World);
    //output.Normal = input.Normal;

    output.TextureCoordinate = input.TextureCoordinate;
    output.Color = input.Color;

    return output;
}

/* The Pixel Shader manipulates all pixels of the model. Its input is the output from the Vertex Shader. */
float4 PixelShaderFunction(VertexShaderOutput input) : COLOR0
{
    float4 normal = normalize(input.Normal);

    float4 textureColor = tex2D(textureSampler, input.TextureCoordinate);

    float4 diffuse = AmbientColor * AmbientIntensity;

    float4 NdotL = saturate(dot(normal, float4(DiffuseDirection, 1.0)));
    diffuse += NdotL * DiffuseColor;

    float4 color = diffuse * DiffuseIntensity + (textureColor * input.Color * 0);
    
    // Cut off the sides of transparent textures.
    color.a = textureColor.a;
    clip(color.a < AlphaClipThreshold ? -1 : 1);

    return color;
}

// Our Techinique
technique Technique1
{
    pass Pass1
    {
        VertexShader = compile vs_2_0 VertexShaderFunction();
        PixelShader = compile ps_2_0 PixelShaderFunction();
    }
}

I think he was wanting you to use the basic effect stuff but i don’t think it includes a shadowing function maybe i dunno.

Anyways its good to learn how to do your own shaders and its fun after a bit.

You typically do everything to the normals as you do to the positions they are ideologically welded to the polygon vertices and averaged out as the triangle is rasterized for positions between vertices.
That said i usually make a position 3d float3 and pass it to the vertice shader and pass the normal as is so i can work with them both in world space.

Edit it looks like whoever wrote this is doing the same

output.Normal = normalDirection; // so they want the position world transformed then passed.

however here in the pixel shader.

float4 NdotL = saturate(dot(normal, float4(DiffuseDirection, 1.0)));
    diffuse += NdotL * DiffuseColor;

Im guessing diffuseDirection is basically the light source direction at some far distance.
I typically pass in my light source position and calculate the direction to it directly.
Anyways.
You might want to make that negative -DiffuseDirection. at a glance dot( N, L) here could be backwards which is what you would see in your image if it was. The dot in this function wants both N and L to be pointing in basically the same way so actual sunlight directions or the normal direction one or the other is usually negated.

VertexShaderOutput VertexShaderFunction(VertexShaderInput input)
{
    VertexShaderOutput output;

    // Standard positioning code
    //precalculating the view and projection is fine.
    float4x4 vp = mul(View, Projection); 
    // well need seperate world rotated positions before we leave though so save these.
    float4 worldPosition = mul(input.Position, World);
    float4 normalDirection = mul(input.Normal, World);
    // we will pass these to the pixel shader as these have the full transformations to homoegenous space.
    output.Position = mul(worldPosition, vp);
    output.Normal = normalDirection;
    output.TextureCoordinate = input.TextureCoordinate;

    // Steping back to the world Position and normal direction lets compare them against the lightPosition we may pass into the shader as a global.
    // this is now the intensity of the light on the surface by the angular theta between two normals.
    // the angular difference between the calculated normal of the polygon surface to the light vector, this then doted against the normal of the polygon we passed as vertice data gives 
    // the angular theta any result ranging between 0 to 1 is the lights intensity.
    float intensity = dot(normalDirection, normalize(WorldLightPosition - worldPosition));
    // the dot can return a negative or a positive if both vectors are normalized this value ranges between -1 and 1
    // this means basically if the part of the surface is opposite facing the light it is 0 or less if the light is shining on it how directly is how much towards 1 the result is from 0.
    // so we saturate it and get rid of that negative.
    intensity = saturate(intensity); 

    // You could right here in the vertice shader just pass the intensity by mulitplying it against the color. 
    // though it really shouldn't multiply against the alpha part of the color. So it the intensity is low near zero all the parts of the color will go towards zero it will darken.
    float a = input.Color.a;
    output.Color = input.Color * intensity;
    output.Color.a = a;

    return output;
}

Think of the normals as little arrows hanging off the edges of the points of your quads and models and they get stronger when they point at your light source and very weak when pointing at right angles to it.

<img src=https://proxy.duckduckgo.com/iu/?u=https%3A%2F%2Fuploads.toptal.io%2Fblog%2Fimage%2F123070%2Ftoptal-blog-image-1495085096912-8842b1a4d90ad60234b6324f0995bd77.jpg&f=1 />

So in that sort of case you can actually just calculate intensity in the vertice shader and pass it if you don’t want anything fancy.

That said here is one of my light shadow vertice shaders or part of it so you can see the vertex shader.

struct VsNormMapLightShadowInput
{
    float4 Position : POSITION0;
    float3 Normal : NORMAL0;
    float2 TexureCoordinateA : TEXCOORD0;
    float3 Tangent : NORMAL1;
};

struct VsNormMapLightShadowOutput
{
    float4 Position : SV_Position;//: SV_POSITION;
    float4 Position3D : TEXCOORD4;
    float2 TexureCoordinateA : TEXCOORD0;
    float3 Normal: TEXCOORD1;
    float3 Tangent : TEXCOORD2;
};

VsNormMapLightShadowOutput VsNormMapLightShadow(VsNormMapLightShadowInput input)
{

    VsNormMapLightShadowOutput output;
    output.Position3D = mul(input.Position, World);
    float4x4 vp = mul(View, Projection);
    output.Position = mul(output.Position3D, vp);
    output.Normal = input.Normal;
    output.Tangent = input.Tangent;
    output.TexureCoordinateA = input.TexureCoordinateA;
    return output;
}

// this part is probably useless to you other then to look over for how intensity is calculated.
float4 PsNormMapLightShadow(VsNormMapLightShadowOutput input) : COLOR0
{
    // Normal Map
    float3 NormalMap = tex2D(TextureNormalSampler, input.TexureCoordinateA).rgb;
    NormalMap.g = 1.0f - NormalMap.g; // flips the y. the program i used fliped the green.
    NormalMap = normalize(NormalMap * 2.0 - 1.0);
    float3 normal = input.Normal;
    float3 tangent = input.Tangent;
    float3x3 mat;
    mat[0] = cross(normal, tangent); // right
    mat[1] = tangent; // up
    mat[2] = normal; // forward
    NormalMap = mul(NormalMap, mat);
    NormalMap = mul(NormalMap, World);
    NormalMap = normalize(NormalMap); // we do this to ensure scaling wont break the normal.
    // prep
    float3 temp = WorldLightPosition - input.Position3D;
    float distancePixelToLight = length(temp);
    float3 surfaceToCamera = normalize(CameraPosition - input.Position3D);
    float3 surfaceToLight = temp / distancePixelToLight; // cheapen the normalize. normalize(pixelToLight);
    float3 lightToSurface = -surfaceToLight;
    float shadowDepth = texCUBE(TextureDepthSampler, float4(lightToSurface, 0)).x;
    float4 TexelColor = tex2D(TextureSamplerA, input.TexureCoordinateA) * (1.0f - LightVsTexelRatio) + (LightColor * LightVsTexelRatio); // LightVsTexelRatio == .5 is normal        
    // shadow 
    float lightFalloff = (1.0f - saturate(distancePixelToLight / (IlluminationRange + 0.001f)));
    float LightDistanceIntensity = saturate(sign((shadowDepth + .2f) - distancePixelToLight)) * lightFalloff; // if removal.
    // lighting
    float3 surfNom = NormalMap;
    // Ive added over or underdraw to the diffuse.
    float diffuse = saturate((dot(lightToSurface, -surfNom) + DiffuseCresting) * (1.0f / (1.0f + DiffuseCresting)));
    diffuse *= diffuse;
    float3 reflectionTheta = dot(surfaceToCamera, -reflect(surfaceToLight, surfNom));
    float specular = saturate(reflectionTheta - SpecularSharpness) * (1.0f / (1.0f - SpecularSharpness)); // this is for sharpness i didn't want to use powers.
    // finalize it.
    float3 inverseAmbientControl = 1.0f - AmbientStrength;
    float3 additiveAmbient = AmbientStrength;
    float3 additiveDiffuse = diffuse * DiffuseStrength * LightDistanceIntensity * inverseAmbientControl;
    float3 additiveSpecular = specular * SpecularStrength  * LightDistanceIntensity  * inverseAmbientControl;
    float3 FinalColor = TexelColor * (additiveAmbient + additiveDiffuse + additiveSpecular);
    return float4(FinalColor, 1.0f);
}

technique NormalMapLightShadowDrawing
{
    pass
    {
        VertexShader = compile VS_SHADERMODEL VsNormMapLightShadow();
        PixelShader = compile PS_SHADERMODEL PsNormMapLightShadow();
    }
}

Probably not the problem, but are you sure you have your input normal as a float4 instead of float3? Check your vertex format! Usually normals are stored as float3.

The float4 of a normal must have a zero for the 4th vector entry, so

normal.x
normal.y
normal.z
0

otherwise if you multiply with the world crazy transformations can happen.

For a quick check you can try
output.Normal = mul(float4(input.Normal.xyz,0), World);

Yup! That was the problem. Thanks Kosmonaut!

Now… to study up on adding shadows. Thanks for being patient with me. I’m trying not to put stuff in without first understanding it.

1 Like

Update: Really getting somewhere now! Gonna take a break for a bit (cos of work), but really liking how this looks! Just need to expand on it a lot more, and I’ll be done (and I’ll share my findings, and my probably very optimized shader code for others to use of course).

I’m hoping to make the shadows orthogonal, and for the entire stage to be covered (at the moment, it’s at the mercy of what my perspective view matrix sees, so I get a small box where shadows are cast, while the rest remain shadeless).

EDIT: Here’s another update. I think I’m going to opt for a higher resolution, but only rendering the shadow texture once per room load.

5 Likes

Phew. Well, first off; apologies this took so long. Life and broken laptops did get in the way for a bit in my defense.

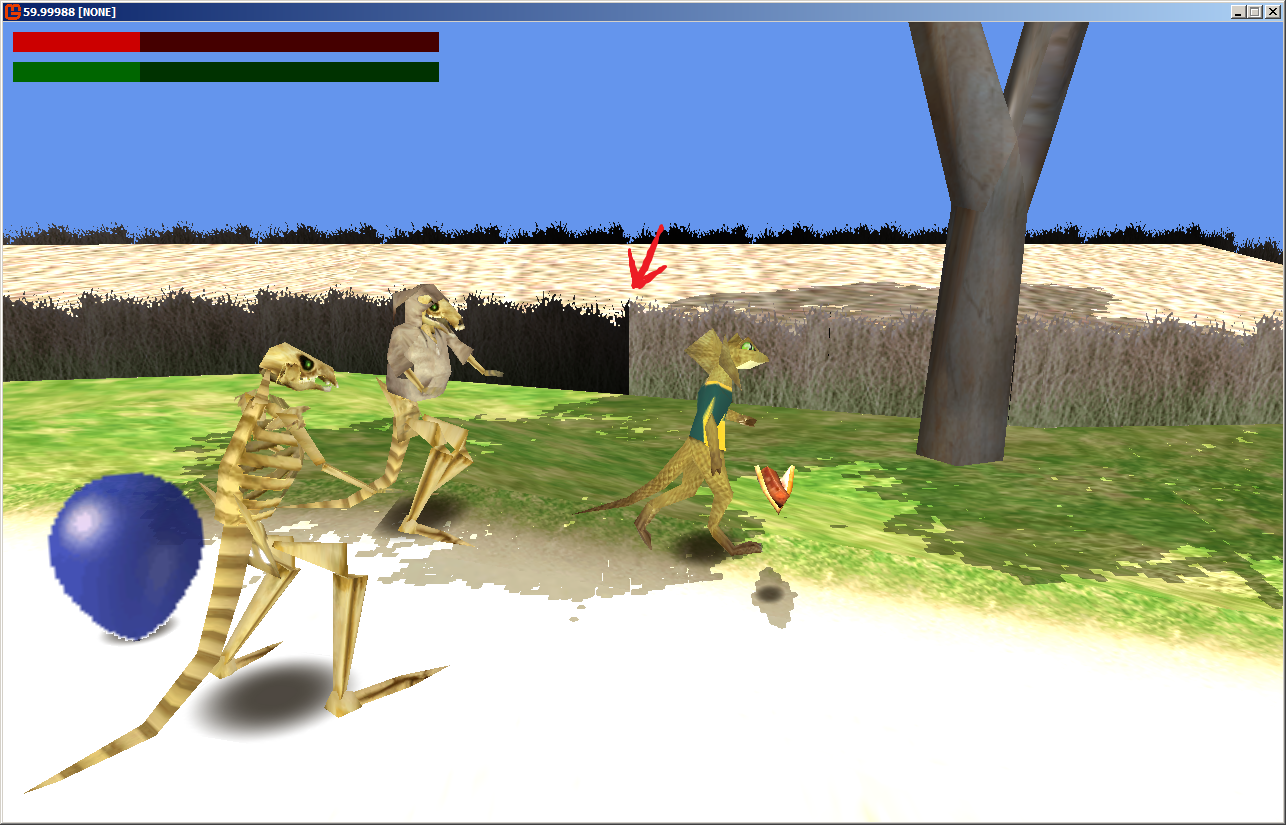
Anyways, without further ado, here’s the final result (that I am quite satisfied with!):

To anyone in future who may find themselves in my position, these tutorials were great in helping me get an understanding of what was going on and how the whole process worked:

1. Reimer’s Shadow Map
2. Reimer’s Render to Texture
3. Reimer’s Real Shadow

I had to tweak the shader quite a bit to get the result I liked, and here’s my resulting Shader code: Pastebin

There were a few issues to its implementation that I’ll cover below just in case anyone has a use for it too:

Before I start the list however, I’d like to say the biggest help for solving some of my Shader issues was to have the direction of the light rotate with the game time. It made it much easier to see which parts of meshes weren’t being affected by the light properly, as they stood out much more with the changing light.

  • Incorrect backface lighting. I have an abundance of planes in my game with no culling (such as the leaves in the trees pictured above). I found that the back of the plane would have inverted lighting on it (which makes sense, as I was asking for the shader to light both sides of the mesh at once). While I’m not sure if it was 100% the right thing to do, I re-added culling, and just did two planes facing outwards instead to solve the issue.

  • Weird diffuse lighting. This one took me the longest to solve, and the issue looked like this:

In the end, it had turned out that I had accidentally applied my diffuse calculations twice. Once when the shader detected that a specific pixel wasn’t covered by the shade, and once universally afterwards (rookie mistake, but for my second shader, not too bad).

  • Awkward looking shadows for complex meshes. Due to my shadow map being downscaled, complex meshes ended up having a lot of awkward pixels in the shadows they cast. This was solved by using a technique I learned from Smash Bros. I added much lower resolution meshes for those cases, which would be used to cast the shadow instead (while the main technique still rendered the high resolution model).

  • Z-fighting shadows. These occurred when perfectly vertical planes (like the grass edge in the picture above) would cast and receive shadows from themselves. I’ve simply disabled shadow casting (but not receiving) on those cases to solve this. I imagine it would also be possible to automatically detect and disable shadows with the shader itself (detecting vertical planes based on normals), but the method I’m using at the moment works fine for me.

There we are! I’m sure most of what I’ve said you already know (I hope at the very least what I wrote wasn’t misguided O_O). I hope maybe someone else will have a use for it someday though!

Thanks for the help everyone!

2 Likes