Flag Shader?

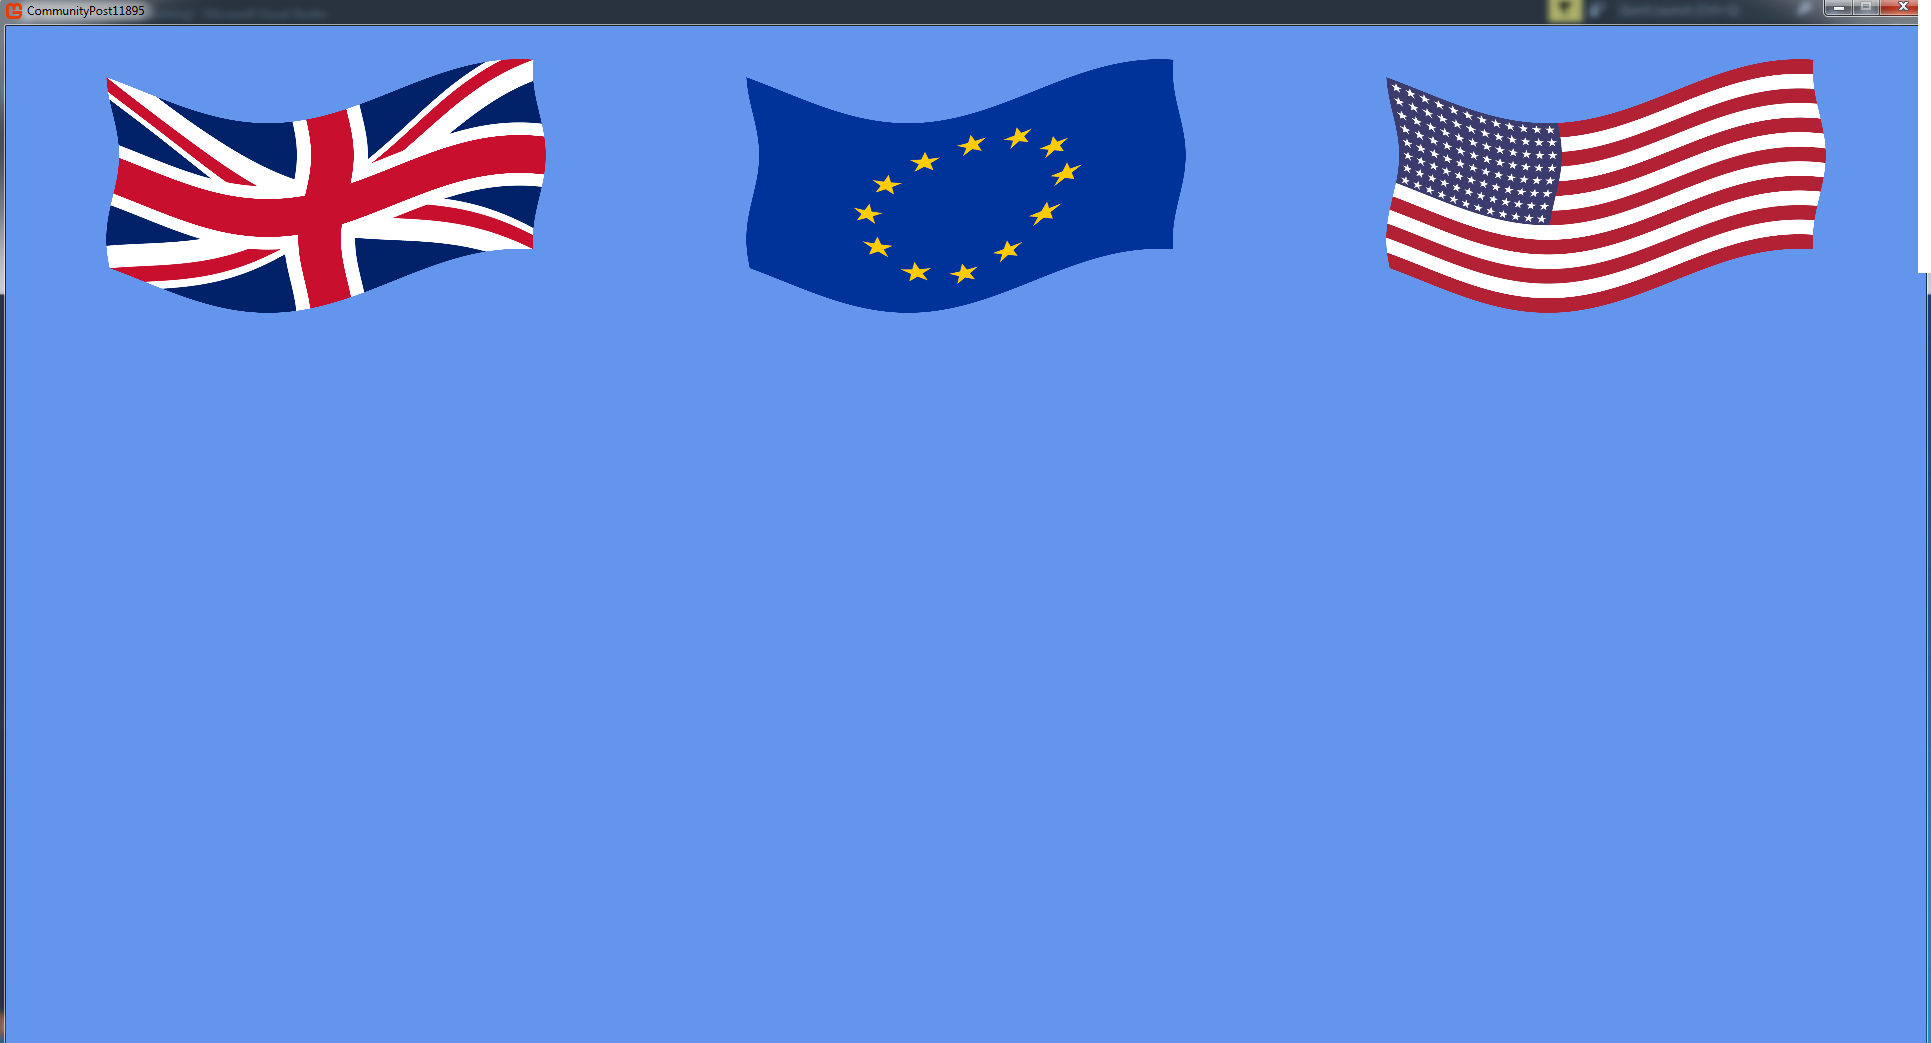
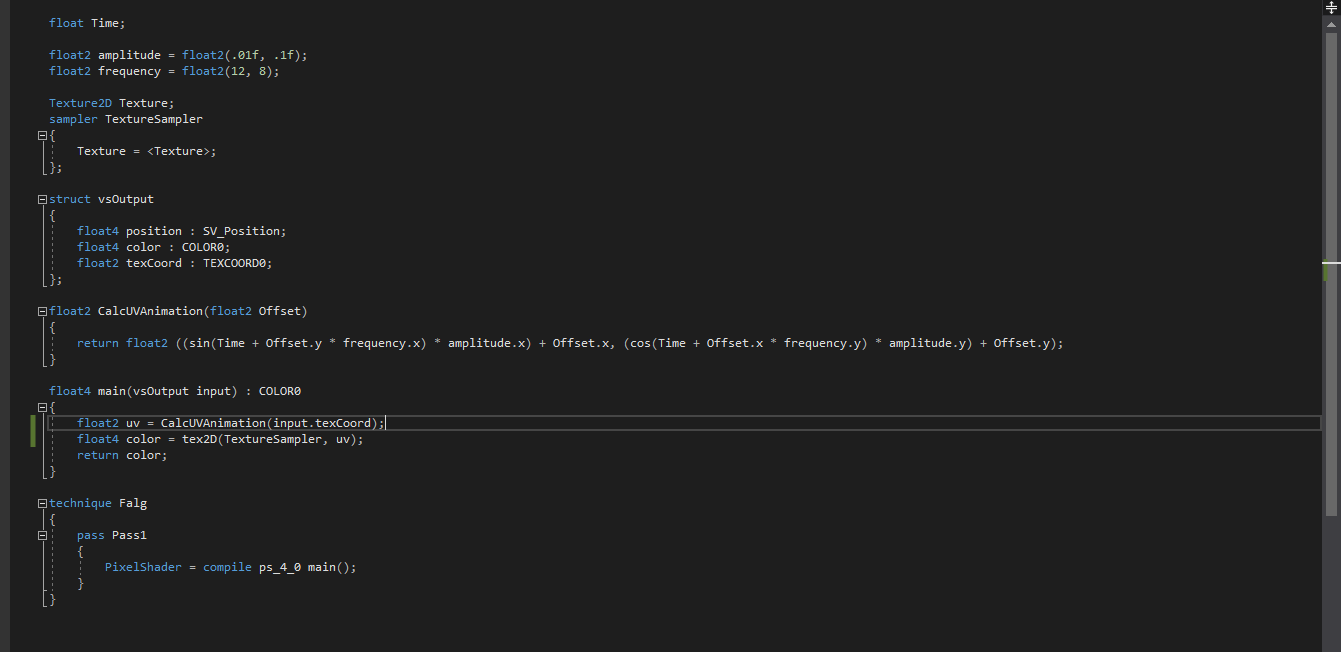
I looking for either an existing shader, or a little help writing one… I would like to make a 2D flag wave effect. I’ve never written a shader before but after a few hours reading online I was able to come up with this test that looks like a flag waving in the wind if you use lots and lot of imagination. :sweat_smile:

FlagShader.fx
#if OPENGL
#define SV_POSITION POSITION
#define VS_SHADERMODEL vs_3_0
#define PS_SHADERMODEL ps_3_0
#else
#define VS_SHADERMODEL vs_4_0_level_9_1
#define PS_SHADERMODEL ps_4_0_level_9_1
#endif

float x;
float y;
Texture2D SpriteTexture;

sampler2D SpriteTextureSampler = sampler_state
{
	Texture = <SpriteTexture>;
};

struct VertexShaderOutput
{
	float4 Position : SV_POSITION;
	float4 Color : COLOR0;
	float2 TextureCoordinates : TEXCOORD0;
};

float4 MainPS(VertexShaderOutput input) : COLOR
{
	float2 coord = input.TextureCoordinates;
	if(coord.x > y - 0.5 && coord.x < y + 0.5) {
		coord.y += x;
	}
	return tex2D(SpriteTextureSampler, coord) * input.Color;
}

technique SpriteDrawing
{
	pass P0
	{
		PixelShader = compile PS_SHADERMODEL MainPS();
	}
};

Game1.cs
using Microsoft.Xna.Framework;
using Microsoft.Xna.Framework.Graphics;
using System;

namespace shadertest {
    public class Game1 : Game {
        GraphicsDeviceManager graphics;
        SpriteBatch spriteBatch;

        Texture2D flag;
        Effect flagShader;

        float x, y;

        public Game1() {
            graphics = new GraphicsDeviceManager(this);
            Content.RootDirectory = "Content";
        }

        protected override void LoadContent() {
            spriteBatch = new SpriteBatch(GraphicsDevice);

            flag = Content.Load<Texture2D>("united-states-of-america-flag-small");
            flagShader = Content.Load<Effect>("FlagShader");
        }

        protected override void Update(GameTime gameTime) {
            x = (float)(Math.Sin((Math.PI / 2) * gameTime.TotalGameTime.TotalSeconds));
            y = (float)Math.Cos((Math.PI / 2) * gameTime.TotalGameTime.TotalSeconds);

            base.Update(gameTime);
        }

        protected override void Draw(GameTime gameTime) {
            GraphicsDevice.Clear(Color.CornflowerBlue);

            spriteBatch.Begin(SpriteSortMode.Deferred, BlendState.AlphaBlend, effect: flagShader);

            flagShader.Parameters["x"].SetValue(x);
            flagShader.Parameters["y"].SetValue(y);
            flagShader.CurrentTechnique.Passes[0].Apply();

            spriteBatch.Draw(flag, new Vector2(125, 125), Color.White);
            spriteBatch.End();

            base.Draw(gameTime);
        }
    }
}

If anyone can give me a shove in the right direction, that would be greatly appreciated :slight_smile:

Hi,

Not looked at your code in detail, but a long time ago I did a blog post for XNA with a simple flag shader, hoping this might point you in the right direction :slight_smile:

You can find my old archived post here.

Hope it helps :smiley:

looks exactly what i want. thanks! but my game is 2D. Can i convert this to work with a 2D sprite? i have no idea how to do that.

Yea, you should be able to. If I get chance in my lunch tomorrow, I’ll see if I can knock one up :slight_smile:

Is this something that can be applied to a 2D sprite? I tend to stay mostly in the 2D realm so I’m not well versed in vertex shaders. Truth be told, I’m not well versed in pixel shaders either, but I dabble :slight_smile:

@bwoogie

I’m wondering if it might be possible to use some refraction techniques to achieve the desired result in purely 2D. A while back I ended up writing a lens shader for an XNA project I was working on. It might be useful here… I’ll just post the shader, feel free to monkey with it as desired

sampler2D inputSampler : register(s0);

float2 xTextureSize;
float2 xLensCenter;
float xLensRadius;
float xLensHeight;
float xNSource;
float xNTarget;
float4 xLensTint;

// Adapted from http://steve.hollasch.net/cgindex/render/refraction.txt
float3 TransmissionDirection(float nSource, float nTarget, float3 incoming, float3 normal)
{
	float eta, c1, cs2;
	eta = nSource / nTarget;
	c1 = dot(incoming, normal);
	cs2 = 1 - eta * eta * (1 - c1 * c1);

	float3 result = float3(0, 0, 0);

	if (cs2 >= 0)
		result = eta * incoming + (c1 - sqrt(cs2)) * normal;

	return normalize(result);
}

float4 LensRefraction(float2 tcPos: TEXCOORD0) : COLOR0
{
    float4 color = tex2D(inputSampler, tcPos);

	// Get the screen position for our point, then get the position vector.
	float2 screenPos = tcPos * xTextureSize;
	float2 positionVector = screenPos - xLensCenter;

	// If the lens height is greater than zero, calculate the radius of the new lens.
	float rPrime = xLensRadius;
	if (xLensHeight > 0)
	{
		rPrime = sqrt(xLensRadius * xLensRadius - xLensHeight * xLensHeight);
	}

	if (length(positionVector) <= rPrime)
	{
		// Only bother to do all this calculation if we are inside the lens radius.

		// Calculate our normal, which is the direction from the center of the lens to where our
		// view ray contacts the lens.
		float3 lensCenter = float3(xLensCenter.x, xLensCenter.y, 0);
		float3 rayContact = float3(screenPos.x, screenPos.y, sqrt(xLensRadius * xLensRadius - positionVector.x * positionVector.x - positionVector.y * positionVector.y));
		float3 normalVector = rayContact - lensCenter;
		float3 normalDir = normalize(normalVector);

		// Calculate the transmission directrion
		float3 transDir = TransmissionDirection(xNSource, xNTarget, float3(0, 0, -1), normalDir);

		// Get where the transmission vector intersects with the height plane.
		float3 pCutPlane = lensCenter + float3(0, 0, xLensHeight);
		float3 nCutPlane = float3(0, 0, 1);
		float t = dot(nCutPlane, pCutPlane - rayContact) / dot(nCutPlane, transDir);
		float3 intersectPoint = rayContact + t * transDir;

		// Get the new pixel from our sampler.
		float2 tcIntersectPoint = float2(clamp(intersectPoint.x / xTextureSize.x, 0, 1), clamp(intersectPoint.y / xTextureSize.y, 0, 1));
		color = tex2D(inputSampler, tcIntersectPoint);

		// Apply the tint...
		// Calculate the ratio of how much further the ray traveled due to refraction as opposed
		// to if it just traveled straight through.
		float3 transmissionLength = length(intersectPoint - rayContact);
		float3 materialPercent = (rayContact.z - (xLensRadius - xLensHeight)) / transmissionLength;

		// Now use that ratio to apply a tint to the colour we obtained.
		color.r += (xLensTint.r * xLensTint.a * (1 - materialPercent));
		color.g += (xLensTint.g * xLensTint.a * (1 - materialPercent));
		color.b += (xLensTint.b * xLensTint.a * (1 - materialPercent));
	}

	return color;
}

technique Technique1
{
    pass LensRefraction
    {
        PixelShader = compile ps_2_0 LensRefraction();
    }
}

That’s a lot of shader for a 2D flag…

Ill try and get some time today to do a 2D shader for a flag.

So, knocked up a quick example :slight_smile:

Draw Call looks like this:

Shader looks like this:

I have not added any lighting (not had time) but it should be pretty easy to do, ill update the repo if I add it. On holiday next week in Holland, so won’t be near a machine :frowning:

I have put it on my repo here

Hope you find it helpful :smiley:

2 Likes

Well, it’s not for a 2D flag. It’s for a lens effect. It’s just a thing I wrote one time that I thought might be adaptable to this problem.

I had originally thought about something like what you posted, where it skews the image in the X and Y (UV), but the 3D example you posted gives a depth effect. I was thinking, how might we achieve that in 2D and remembered that lens shader I had kicking around.

Ahh, yes, re read your post, sorry :slight_smile:

If you added lighting to my shader (ill have a go in a bit if I can find a bit of time) will give you a better looking render I think.

Is this what you mean by depth?

The end result is not for me haha, I’m not the OP. It’s just my own personal take on it :smiley:

Anyway, no what I meant by depth was like, the Z axis to the user’s view. You see this result in the 3D example you posted in your archived blog post because you’re actually manipulating vertices in 3D. This is why I suggested the lens shader, because it will warp things with the illusion of depth in the Z axis.

This would also have the added benefit of keeping the boundaries of the rectangle more or less stable, as it would be on a real flag. Of course, perhaps the OP isn’t looking for realism… these are just the thoughts I have, lol. The nice thing about coding is that there’s never any real solution, just the thing you come up with that works!

For the lens way though, I don’t really know how to string it together to get the alternating pockets. It’s a really simplified one that I wrote when I made a demoscene style video as the photo album for my buddy’s wedding back in 2014. Haha we were both into Future Crew when we were younger so I modeled it after 2nd Reality. Anyway, it just checks ray interaction with a virtual lens that is convex, circular, and bounded.

I’m wondering if it could be applied in a cylindrical fashion in bands of convex and concave refraction areas to give a similar effect to your archived blog post.

Anyhoo, yes it’s complicated and I don’t really know how to do it right now, but there’s fun in speculation :slight_smile:

(I think your shader looks fine though, just not what I was envisioning in my own take.)

1 Like

Wow! thanks so much for taking the time to do this! It looks great! One question though, I’m only able to get it to work under DirectX. Any idea why it’s not working with OpenGL?

1 Like

Hi, just updated the shader with some simple (though incorrect) diffuse lighting. Also it should now work for OpenGL too I think :smiley:

Now worries, love playing with shaders, it’s fun :stuck_out_tongue:

1 Like

Did you push? not seeing the update, unless github takes a few minutes. :thinking:

No, was me, forgot to sync :stuck_out_tongue:

Done now :smiley:

#if OPENGL
#define SV_POSITION POSITION
#define VS_SHADERMODEL vs_3_0
#define PS_SHADERMODEL ps_3_0
#else
#define VS_SHADERMODEL vs_4_0
#define PS_SHADERMODEL ps_4_0
#endif

Still not working with OpenGL. it must be because it errors out when I try to build with ps_4_0… I have to compile for ps_3_0… How do upgrade to 4?

Hang on, ill set the shaders to a lower version. My code is also set to HiDef.

Try now, moved it to Reach profile and SM3 :slight_smile:
If that don’t work, then I don’t know what else to do :confused: I don’t use OpenGL…

1 Like

Did my last update work @bwoogie?

Nope, still not able to get it to work under opengl. :disappointed: