[Solved] Scissor Rectangles

So I’m trying to create my own GUI for a project, mostly for the experience than anything else, and I’ve run into a perplexing series of… bugs, I suppose. Or features I’m misunderstanding! Either way, here’s what’s going on…

I need to create a clipped, scrollable area, such as what you’d find from a scroll pane, list view, scroll bar, etc. Basically a region in my UI that can have its content(which itself can be other controls like buttons and the like) scrolled up and down. Looking into how to do this, I found 3 main solutions recommended in older posts. Temporarily changing the viewport, using scissor rectangles, or stencil buffers. I chose to try scissor rectangle.

Then weird things started happening.

First of all its worth noting that I’ve rolled my own resolution independence solution, and so far as I can see it works just fine. It puts my game’s viewport in the correct place inside the window no matter how I shape the window. Whenever I do a spritebatch.Begin(), I pass in a transformation matrix which adjusts the scaling of drawn objects as well. That all seems to work. Here’s a snippet of the example draw code:

    protected override void Draw(GameTime gameTime)
    {
        base.Draw(gameTime);

        ShowTitleFPS(gameTime);

        StateManager.Draw(SpriteDispatch);
        
        SpriteBatch batch1 = new SpriteBatch(GraphicsDevice);

        RasterizerState raster = new RasterizerState();
        raster.MultiSampleAntiAlias = false;
        raster.ScissorTestEnable = true;
        GraphicsDevice.ScissorRectangle = new Rectangle(0, 0, 200, 200);

        batch1.Begin(SpriteSortMode.Deferred, null, null, null, null, null, Resolution.RenderingScale);

        Texture2D tex = new Texture2D(GraphicsDevice, 1, 1);
        tex.SetData<Color>(new Color[] { Color.Red });

        Rectangle coloredRect = new Rectangle(0, 0, 1280, 720);

        batch1.Draw(tex, coloredRect, Color.White);


        batch1.End();
        
    }

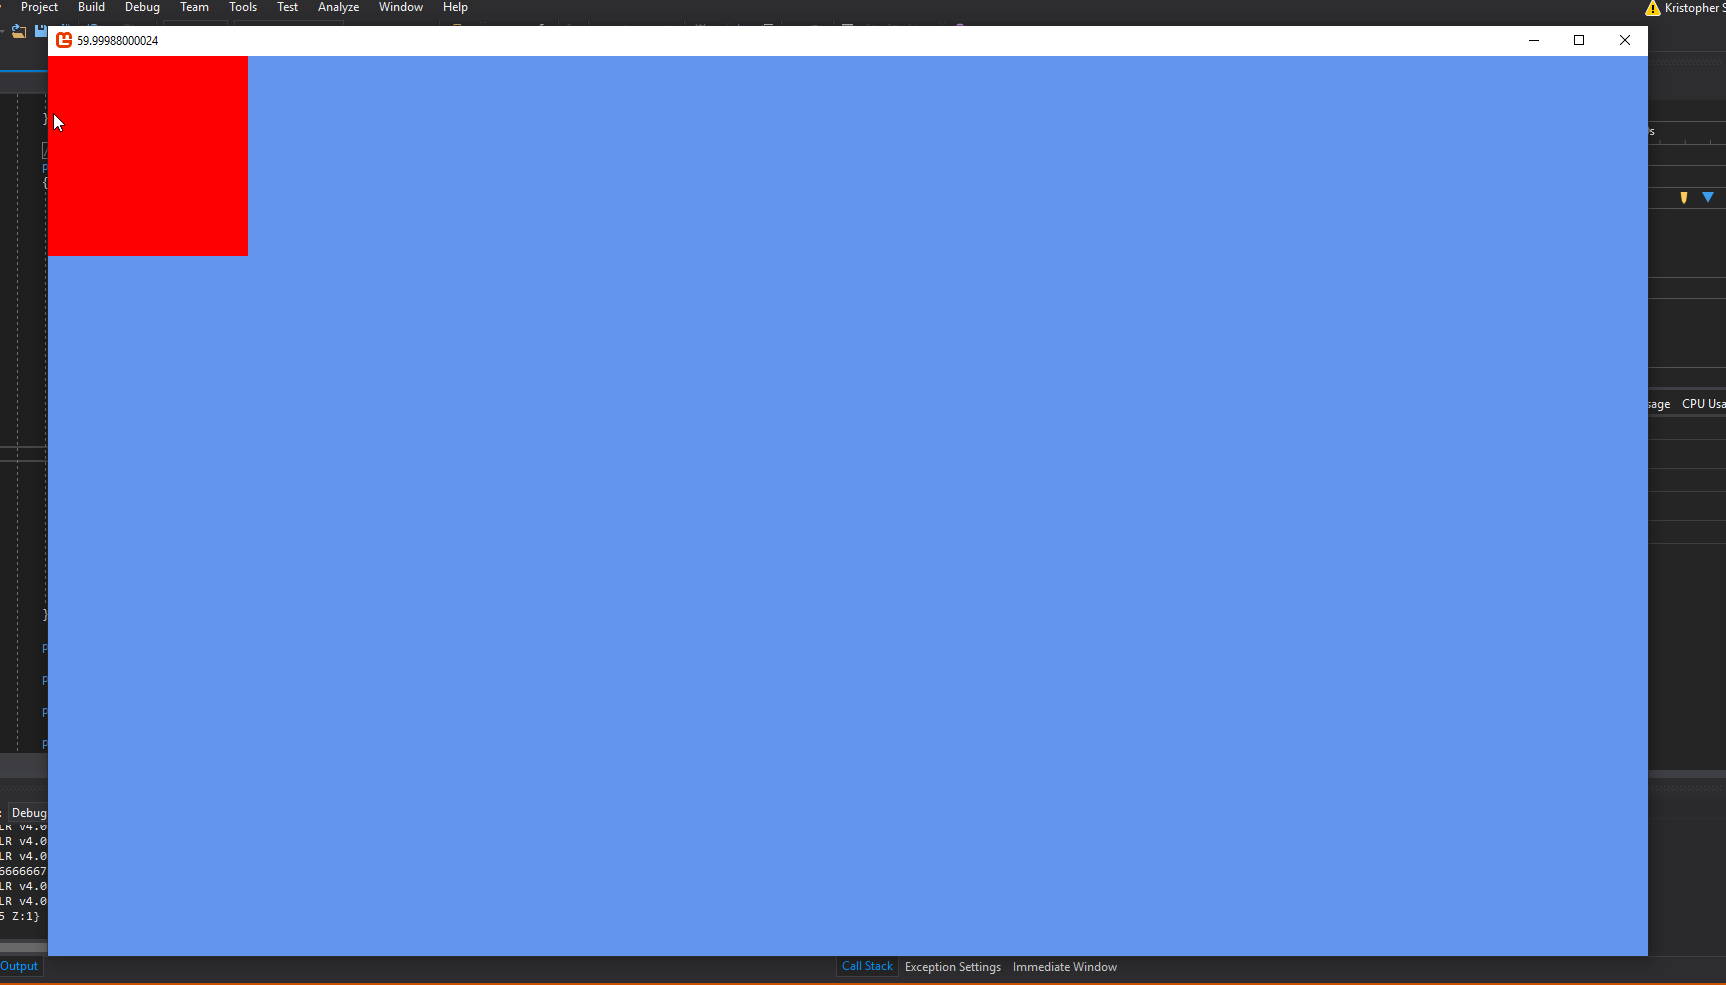
You can see here that I’m NOT using the raster state or the scissor rectangle for this example. It’s just a normal batch with my transformation matrix from the Resolution Class. Since my virtual resolution is 1280x720, I get th expected result of the entire screen being filled in red.

Now, if I resize my monogame window, I correctly get letterbox or pillarbox effect with the drawn red square filling the viewport area inside:

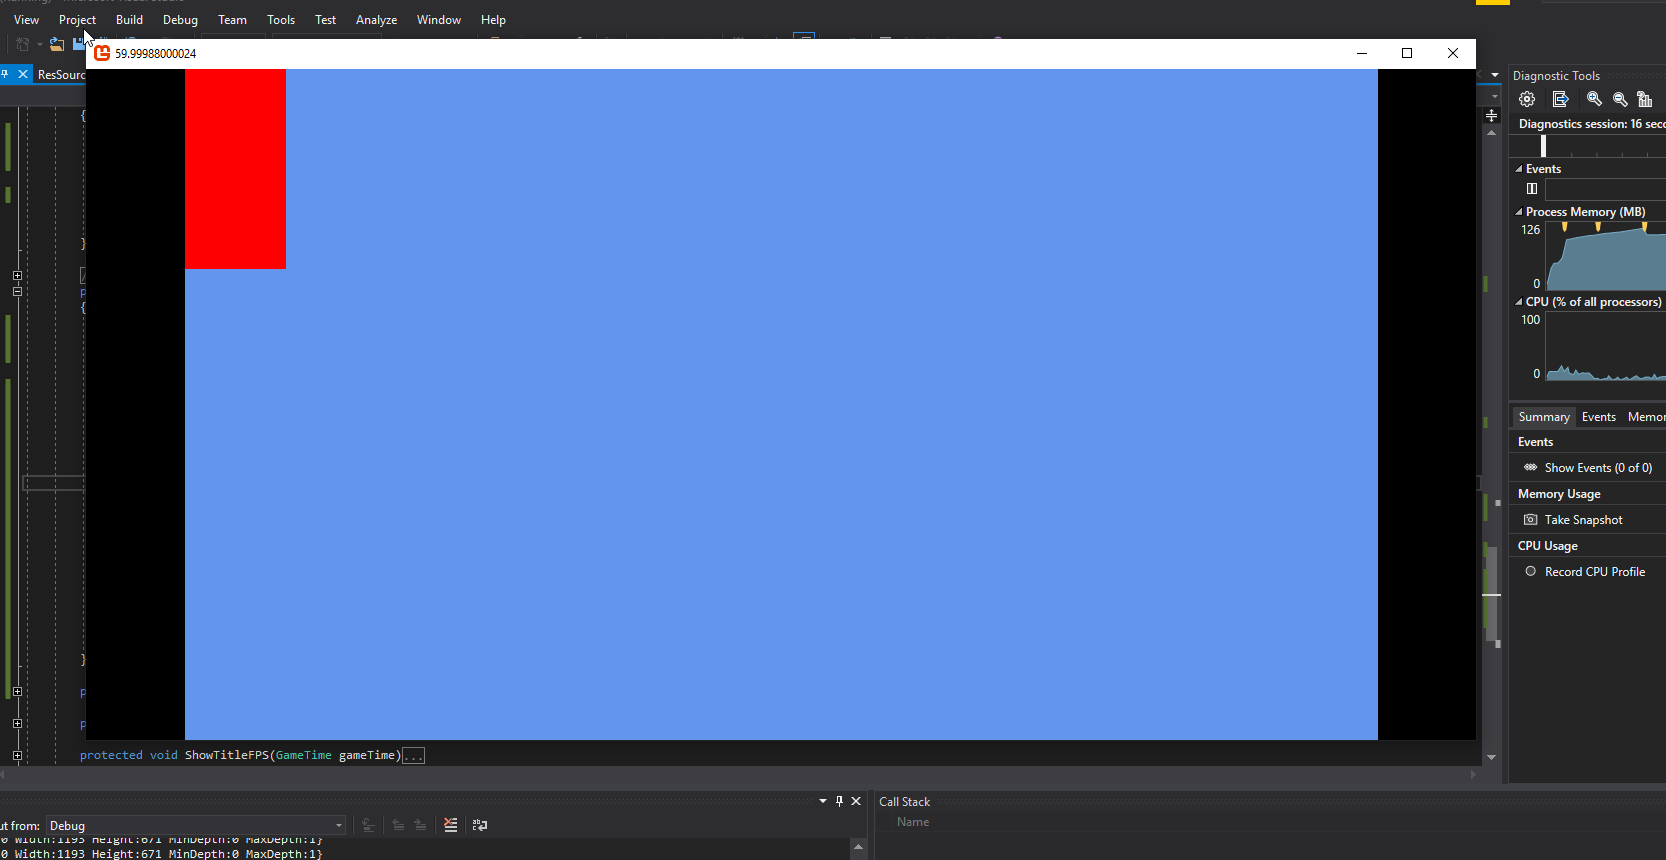
Now let’s change the raster state to the one in the snippet. The only thing I’ve changed from the code snippet above is I changed the batch1.Begin() to include the ‘raster’ Rasterstate defind above. It turns on scissortest, and we create a clipping region with a 200x200 size at 0,0. Here’s the result:

So far so good. It’s at the top-left of the screen… but the keenly eyed will notice a snag. The box is indeed 200px, but it hasn’t been rescaled to the window size(which is 1600x900 btw). It’s just 200px… So theres oddity number one. The scissor test seems to ignored the transformation matrix. It operates purely on absolute size of the screen, or so it appears. This can be manually correct of course… but that’s not the biggest oddity. Let’s reshape the window. First pillarbox:

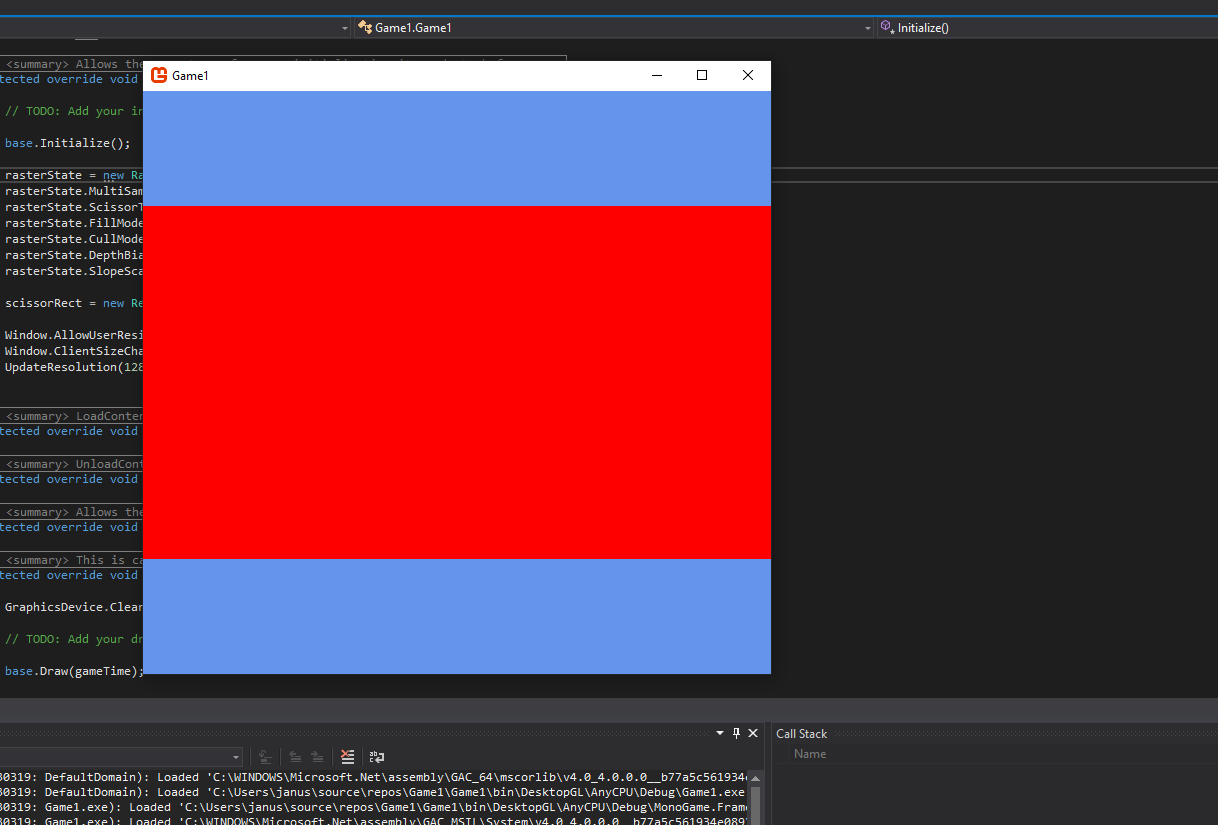
Huh? Where did the black backfill come from? And where’s my red square? We can’t see it because the scissor region is actually not inside the viewport. The scissorRectangle appears to position itself relative to the window, not to the viewport. Now letterbox:

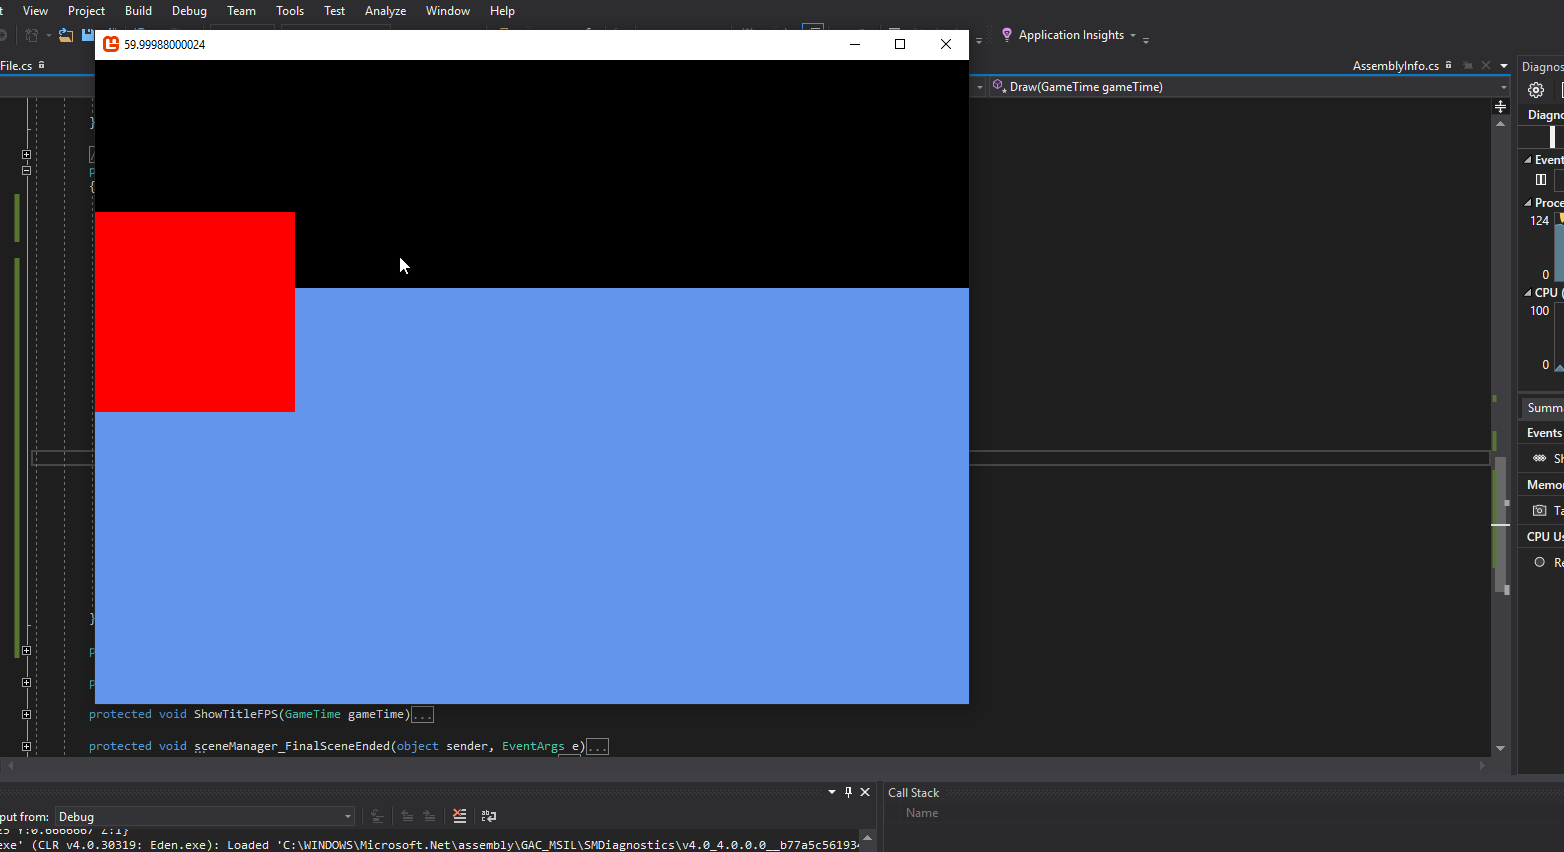
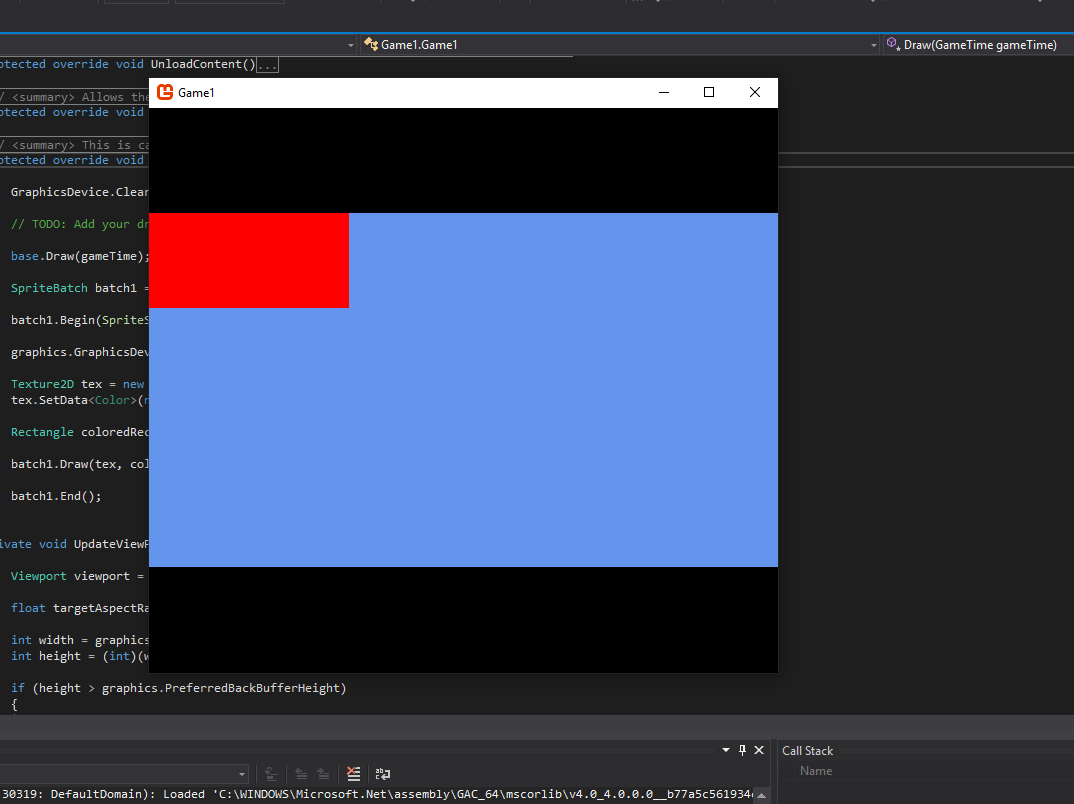
HUH?! Not only is there this new black backfill, but the original cornflower backfill is randomly showing up below, not centered in any way… and suddenly the scissor rectangle is adjusting itself downwards, even though it didn’t do so for the X position earlier… and if the cornflower filled area represents my viewport, then why is the red square not fully inside it? And if the cornflower area doesn’t represent the viewport, then why is it part of it filled black and part cornflower?

I’m very, very confused right now. I can provide snippets of the Resolution class as well if anyone thinks it might help, though considering that everything works 100% as expected when I’m not using the scissorRectangle, I’m not sure it’s the way I’m coding the viewport.

And just to be sure, I tried removing the transformation matrix as well, which had no effect one way or the other. Also, I ran Console.WriteLine to print the dimensions of the GraphicsDevice.Viewport to output before and after batch1 begins and ends, and indeed both correctly showed {X:288 Y:0 Width:985 Height:554 MinDepth:0 MaxDepth:1}, when the window height was shortened to induce a pillarbox. X position looks fine, aspect ratio is correct… it’s all correct so far as I can tell.

What’s so bizarre about this is that programmatically the viewport is positioning itself correctly in the above example, yet the backfill incorrectly fills the bottom of the screen. Since the GraphicsDevice.Clear() is being called immediately after my Resolution class reshapes the viewport to the correct space, surely the backfill would be correct at least… but it isn’t.

As an aside, since the backfill is being added after the viewport size and position changes. I expected the cornflower blue to be contained inside the viewport, but it fills the entire window. This remains true in the non-scissortest example as well. Is that normal? I tried changing my viewport to the entire window, doing a black backfill, and then changing the viewport, and doing the cornflower backfill, expecting to see a viewport-sized cornflower inside black pillarboxing when I reshape the window… but it’s always cornflower… Except in the specific case of the scissorRectangle being turned on, when suddenly there’s black again.

It’s all seemingly so random that I can’t begin to fathom where to start debugging.

Am I missing something here?

1 Like

One issue I’m seeing is you’re creating a new RasterizerState each frame and not disposing it, causing a memory leak; try using only one and caching it. I’m not sure if this is related, but the default RasterizerState has a CullMode of CullCounterClockwiseFace; try setting the values of your new state to the same as the defaults aside from the scissor test.

Alright, I tried this out. I put RasterizerState and a Rectangle instance in my Game class, and I set their values in Game’s Initialize(). I used the console to quickly check what the default values for a rasterizerstate are just to be sure and I set everything accordingly, except of course ScissorTestEnabled, set to true.

        rasterState = new RasterizerState();
        rasterState.MultiSampleAntiAlias = true;
        rasterState.ScissorTestEnable = true;
        rasterState.FillMode = FillMode.Solid;
        rasterState.CullMode = CullMode.CullCounterClockwiseFace;
        rasterState.DepthBias = 0;
        rasterState.SlopeScaleDepthBias = 0;

The result at first was the same, but resizing the window caused a full red fill. To fix that, I have to reset GraphicsDevice.ScissorRectangle() each frame. Apparently the graphics device resets this value every frame back to the default. Once I fixed that, the output is the same as before.

On pillarboxing, we can see the bounds of the scissorRectangle are still positioned relative to the window, and not the viewport. In pillarbox, the cornflower seems to correctly represent the viewport area (though strangely, it doesn’t in letterbox).

Just to demonstrate, here’s the code, in the Game Class, to show the viewport’s dimensions:

And here’s the output in Visual Studio:

We can see that the GraphicsDevice itself is reporting the viewport is exactly where we expect it to be, and the cornflower area of the screen coincides with it… at least in pillarbox. But if I switch to letterbox, the cornflower won’t be inside the viewport, but the console still reports the correct position.

Which type of project are you currently testing on? Is this WindowsDX or DesktopGL?

Took me a moment to figure out how to check this. I used this code snippet:

        var mgAssembly = Assembly.GetAssembly(typeof(Game));
        var shaderType = mgAssembly.GetType("Microsoft.Xna.Framework.Graphics.Shader");
        var profileProperty = shaderType.GetProperty("Profile");
        var value = (int)profileProperty.GetValue(null);
        var extension = value == 1 ? "dx11" : "ogl";
        Console.WriteLine(extension);

Grabbed from another user here. Command console returned ‘ogl’, so DesktopGL looks like.

Also, I ran another test for the past thirty minutes or so. I created a brand new solution with Monogame 3.6, and I recreating only the bare minimum code needed to reproduce the effect. I’ll paste the relevant code here:

public class Game1 : Game
{
    GraphicsDeviceManager graphics;
    SpriteBatch spriteBatch;

    RasterizerState rasterState;
    Rectangle scissorRect;

    protected override void Initialize()
    {
        // TODO: Add your initialization logic here

        base.Initialize();

        rasterState = new RasterizerState();
        rasterState.MultiSampleAntiAlias = true;
        rasterState.ScissorTestEnable = true;
        rasterState.FillMode = FillMode.Solid;
        rasterState.CullMode = CullMode.CullCounterClockwiseFace;
        rasterState.DepthBias = 0;
        rasterState.SlopeScaleDepthBias = 0;

        scissorRect = new Rectangle(0, 0, 200, 200);

        Window.AllowUserResizing = true;
        Window.ClientSizeChanged += OnResize;
        UpdateResolution(1280, 720);
    }

    protected override void Draw(GameTime gameTime)
    {
        GraphicsDevice.Clear(Color.CornflowerBlue);

        // TODO: Add your drawing code here

        base.Draw(gameTime);

        SpriteBatch batch1 = new SpriteBatch(GraphicsDevice);

        batch1.Begin(SpriteSortMode.Deferred, null, null, null, rasterState, null, null);

        //graphics.GraphicsDevice.ScissorRectangle = scissorRect;

        Texture2D tex = new Texture2D(GraphicsDevice, 1, 1);
        tex.SetData<Color>(new Color[] { Color.Red });

        Rectangle coloredRect = new Rectangle(0, 0, 1280, 720);

        batch1.Draw(tex, coloredRect, Color.White);

        batch1.End();
    }

    private void UpdateViewPort()
    {
        Viewport viewport = new Viewport();

        float targetAspectRatio = (float)1280 / (float)720;

        int width = graphics.PreferredBackBufferWidth;
        int height = (int)(width / targetAspectRatio + .5f);

        if (height > graphics.PreferredBackBufferHeight)
        {
            height = graphics.PreferredBackBufferHeight;
            width = (int)(height * targetAspectRatio + .5f);
        }

        viewport.X = (graphics.PreferredBackBufferWidth / 2) - (width / 2);
        viewport.Y = (graphics.PreferredBackBufferHeight / 2) - (height / 2);
        viewport.Width = width;
        viewport.Height = height;
        viewport.MinDepth = 0;
        viewport.MaxDepth = 1;

        graphics.GraphicsDevice.Viewport = viewport;
    }
    private void UpdateResolution(int width, int height)
    {
        if ((width <= GraphicsAdapter.DefaultAdapter.CurrentDisplayMode.Width)
         && (height <= GraphicsAdapter.DefaultAdapter.CurrentDisplayMode.Height))
        {
            graphics.PreferredBackBufferWidth = width;
            graphics.PreferredBackBufferHeight = height;
            graphics.IsFullScreen = false;
            graphics.ApplyChanges();
        }

        UpdateViewPort();
    }

    private void OnResize(object obj, EventArgs e)
    {
        int width = GraphicsDevice.PresentationParameters.BackBufferWidth;
        int height = GraphicsDevice.PresentationParameters.BackBufferHeight;

        if (width == graphics.PreferredBackBufferWidth && height == graphics.PreferredBackBufferHeight)
        {
            return;
        }

        UpdateResolution(width, height);
    }

}

By running this, I get the exact same sorts of weird artifacts and problems as in my main project. As long as I keep rasterizerState in the batch1.Begin() method at the default null, everything works perfectly. The viewport intelligently resizes to the desired size and aspect ratio is maintained inside the window. It’s only when ScissorTestEnabled is set true and that rasterizerState is passed into batch1.Begin() that things break. As an added test, I changed the ScissorTestEnabled to false in Initialize() and ran it again and sure enough, it works perfectly with the custom rasterizerState so long as ScissorTestEnabled isn’t set true.

Take note also that I didn’t even change the ScissorRectangle parameter in GraphicsDevice. It doesn’t even need to be given a value for things to break. I did try turning the ScissorRectangle on by giving it a 0, 0, 200, 200 rectangle, which produced the exact same results as in my other project. As long as the window isn’t resized, the clipping works, but as soon as the viewport changes, things break.

Weird.

You mentioned MonoGame 3.6; is that what you’re using in your main project? If so, can you try on develop or a recent release and see if the issue persists?

EDIT: This looks like the exact issue you’re experiencing: https://github.com/MonoGame/MonoGame/pull/5977
It was fixed in MonoGame 3.7.

Gah, I thought I had the latest version. I’ll try downloading this and seeing if it fixes the problem. Actually I’m not sure how to update a project in Visual Studio so it might take me some time. I’ll be sure to post back here as soon as I figure it out.

For MonoGame you just need to update the DLLs. The installer puts them in C:\Program Files (x86)\MonoGame\v3.0\Assemblies, so if you run the installer for the new version you should be good to go.

Yep, simple enough. Updated to 3.7.

So the behavior has changed in the new version. It’s largely fixed now, but there’s one or two things I’m still confused about.

First off, the scissoring region still positions itself relative to the window and not the viewport. This is minorly disappointing, but it can be worked around thankfully. It could even be the intended behavior now that I think about it. I can just modify the rectangle to account for the viewport’s position and scale anyway.

What’s still weird is that with scissor turned off, the cornflower blue still fills the entire screen, including the areas outside the viewport:

but when it’s on, only the viewport is being filled cornflower, while the outside regions fill in with the default black.

The only thing I changed between those two images is setting ‘ScissorTestEnabled = true’.

Maybe I’m misunderstanding how the Clear() method works? I thought it filled in the color only within the bounds of the viewport, which is what is suggested with scissor turned on since you get the cornflower inside only the viewport area. But it’s a little confusing why I get the black bars only with scissor turned on. Ah well.

That said, I just need to think of an elegant way to deal with transforming the scissorRectangle. Maybe have a public method on my Resolution class which reshapes a passed-in Rectangle to the right position/scale? Hm.

Anyways, the few oddities aside, this is hopefully enough to get me going with creating my scroll bars since the behavior is at least consistent now and the drawing region in the viewport is now filling in correctly.

Thanks for all your ideas.

Clear clears the whole screen on all platforms for consistency. OpenGL respects the scissor rectangle and other device settings, but MonoGame temporarily changes the settings to make it clear the entire screen then reverts back to the original settings. You can see that here.

1 Like

Ahhh, I see. This is part of the challenge of googling old posts relating to Monogame and XNA. A lot of the information out there is either depricated or incorrect. Hopefully as I work in Monogame more I’ll get a better feel for how the underlying framework functions without needing to poke around in 6 year old posts about XNA 4.0.

I noticed that GraphicsDevice class you listed is a partial class and that the regular ‘Clear()’ method isn’t in this file. I assume the standard Clear() is elsewhere but I couldn’t find it. I presume that it calls PlatformClear() whenever it’s invoked.

In any case this pretty much solves all my confusions. Good thing too because it was doing my head in. I guess it’s edifying to find out that the core problem(other than my ignorance) wasn’t actually in my code but a bug.

This does prompt me to learn more about the core graphics code. At the moment it’s mostly all magical code to me.

Thanks again for your help.

1 Like

No problem, I’m glad you got it figured out! MonoGame organizes the project by having shared components in the main MonoGame.Framework folder, with platform-specific implementations in the platform folder.