📔 Developer Log - Beginning and Progression | UWP Route

So, I have been procrastinating for a while, and considering it takes 60 days to form a habit, let us start today!

Posting this a bit late in the day as I had to re-arrange my room to make space and clean up all the dust… it never ends.

So, what is this thread about? why is it here? why are you delaying? You ask?

Well, I have been putting off learning MG for quite a while now, and finally I have a drive I never had before.

My aim here is to:

  • Demonstrate how a complete [almost] beginner can utilise Monogame to create an engine and subsequently publish a complete Game or a Demo, and how to go about it.
  • Create a Blog/Log to keep me on track and refer to when revisiting a certain aspect.
  • Make available discussion on topics covered throughout the process.
  • Make available tips and basic code for setups or input etc. as a form of tutorials/guides for newcomers.
  • Make available links that Windows Store Publishers find helpful.
  • Making a list that forgets what else was supposed to be here so I may come back to this list and amend to it in future.

I was supposed to post some content today, I still may achieve it, however my hoover battery went flat, and there is a huge dust patch that needs doing right now, just need to wait twenty minutes and I can get it cleared and then post some early content later tonight, the goal is I achieve something regularly on a daily basis, I even relaxed my study speed to read around nine pages per day to complete the first book by the end of next month, giving me extra days to shoot ahead or create content for each section.

The book I will start with is one I have mentioned before, but here it is for starting stage marking:

As I am already on page 36, putting me four days ahead, but I will still stick to nine pages per day as a daily goal post.

This book comes with a lot of focus on implementing Monogame into a UWP XAML app, as this is my target platform, it makes the perfect starting point for me, and will be the core focus on this log.

I cannot think too much right now, I just cleared the dust, time to do a few more chores and then get looking at MG and post some content for todays log.

See you later, thanks for reading.

Valentine


Below is a collection of useful links that will be helpful to UWP Developers.

Useful Links

! Xbox Live Creators Program | Xbox

Getting Started - Xbox Live | Microsoft Docs

[Protip, look at the left side of the screen when on this page, look at the bottom left corner, see the Download PDF link?]

Setting up a game at Partner Center, for Creators - Xbox Live | Microsoft Docs

4 Likes
Stats for this post

Approx. Reading Time: ~30 Minutes
Word Count: ~2500
Stats do not include this data block

Day 1 – Manually Setting up Monogame + Ranting

Open at your own peril, I decided to compress the entire post so that it was easier to navigate the thread once further posts are made. You have been warned!

While posting a little late in the day where I am, it should be noted I do not live by the UK time zone, anyway, I wanted to make the point known, if you need help setting up Monogame under UWP on Visual Studio, my old threads should help with that.

So, with that said, I will be working through my book, but, using my own art assets where possible, also note I am still studying art, so, it should improve as time goes on, so, expect some developer art along the way, I will post them here for everyone to download or create a GitHub repo for each section or a single content project perhaps, we shall see.

Anyway, the current position on page 36 proceeds with adding an image to a project, so we will look at doing this up ahead.

I forgot to mention, I will be publishing to Xbox as well, so my code will include setting up for that as well, I have a guide somewhere, oh here it is:

My Path 🛣 Through MonoGame and Beyond + Beginners Guides + XBOX/UWP - #28 by MrValentine

Moving along…

Remember to update Visual Studio while writing a log… [took 1 minute to download…]

For… grr

image

There is a meme for such a moment…

Anyway…

brb…

You don't need to read this part

So, I got ill on Sunday night when I should have posted this… back again… I took Monday off and stayed in bed… I feel much better now.

Took Tuesday off too…

So, I have three days to catch up on… yay!

As if life just wants me to sit by and do nothing, a smoke alarm in a neighbour’s house is now going on endlessly… it is almost 2AM… so, I cannot concentrate… Yes, it has been two days since the start of this post being drafted… until this point in the writing…

My internet decided to break on Tuesday, and it is Wednesday now… I have 3 days to write up in one night, time to make some food… brb…

Back, it is now Wednesday 10th March, 2021…

Let’s see where I get today…

Just hitting past 06:33 and I finally sat down to get going here… here come eight… thirty-two pages…

Let us begin…

So, before we start anything, we need to take a look over here:

My Path 🛣 Through MonoGame and Beyond + Beginners Guides + XBOX/UWP - #28 by MrValentine

I wrote a guide on fixing the broken full screen code for UWP apps, this is mainly an issue on XBOX in Monogame 3.8 via NUGET, it may or may not be fixed in a future release, so keep coming back to that for the code you need to fix the templates.

So, I am about to create a content project to compile all future assets so that I only require doing them once, this is my method, you are welcome to keep using the mg file method per project, I just prefer the old school content project method.

To do this I run VS Studio CE 2019 or whatever you want to call it… and create a new UWP project and name it, Content Project.

…
image

FFS…

image

Sitting here listening to calming music and then … mind you my Monogame templates have disappeared too, time to install again it seems :frowning:

image

Nope…

While waiting for that, I will create an image for the first program, something we can convert to an xmb file and later manipulate in code, I could also skip ahead a bit and create the split image as well for partial drawing and animation, be right back…

So, the book uses an image of a mouse, I want something more useful, so I decided to create a single font texture… now which character to do?

M! of course!

Meanwhile my VS MG Templates have decided they no longer wish to exist, time for a repair of VS I guess… looks like the 16.9 update and 16.9.1 updates broke something, gives me more time to create an extra graphic character…

image

Hell for sure…

By the way this is what I have on in the background:
Japanese Winter Ambient with Flute Sounds Background [Sleep, Meditation, Study, Soothing Relaxation] - YouTube

Creating the new graphic in Affinity Designer:

Let me know if I should adjust the DPI or something…

Switching to the Pixel Persona while having created the art boards and renamed them accordingly, and then selecting the pixel tool:

Let’s see what we can achieve on an 8x8 grid…

But first, we need a colour palette, no?

Let’s see… Japan, Shoguns, Samurais…

I found this image on a search and it intrigues me somewhat…

image

With that selected, let’s make a colour palette out of it and create our font graphics…

That should be plenty…

With a little inspiration from Banpresto © 1993 I made the following:

image

Notice the transparent background! It plays a role later on in the code.

Meanwhile:

image

Almost there, hopefully…

Now we also require an atlas type image with a single line of images which make up an animation sequence, in the book he used a radar type animation, but I wanted to do something more traditional… let’s create a loading graphic!

Back to Affinity Designer:

Oh, before I forget, my export settings:

image

Notice I am exporting individually, there is an export persona which allows you to on-the-fly export graphics as you manipulate them by the way, and at multiple scale factors too, at the same time!

I loaded them into Affinity Photo [I should probably mention I am not sponsored by nor paid by nor employed by Serif, I just use these tools because it saves me a nosebleed every year…] to ensure they were not being smudged in export…

Looking good!

M

G

Not sure if they load up properly here but here you go, I guess? Looks like the transparency is lost.

Anyway, time for a loading graphic!

I just want to…

image

FFS!

brb…

Installing the templates:

image

image

Nope, time to reinstall VS… FFS!

My selections for now…


See you in a while… but with the magic of editing before posting, you did not have to wait…

I just hope this fixes the issue…

image

Nope, so I have resorted to two options, one of which could break any time soon… so, ignoring creating a template project on another computer where the templates are working, I decided to use what is somewhat working and wiring up a fresh blank template and walking you through setting it up correctly, well, make it work…

YOU CAN SKIP THIS FOLLOWING BIT IF THE TEMPLATES ARE THERE FOR YOU.

Mission Impossible Time

Stage Centre, setting up your project, the long version

First things first, go through the usual setup process, Install the Extension and set up the MGCB editor from the documentations page: Setting up your development environment for Windows | MonoGame Documentation
and then if required, restart your system.

Now, we set up a C# / Windows / UWP / Blank Project XAML

Set your project up as so and run:

image

You should have a black screen come up.

So far, so good…

Let’s move on…

Right click References in Solution Explorer to your right [Assuming you did not customise the IDE] and click Add Reference, Click Browse:

image

Navigate to:

C:\Users\[YOUR_USERNAME]\.nuget\packages\monogame.framework.windowsuniversal\3.8.0.1641\lib\uap10.0

[The period in .nuget is a thing]

Now keep in mind this will update with the extensions manager when you update it, or via NuGet, some weird black box magic stuff… so, you need to stay on top of this if your app breaks suddenly.

Click Add, and then click OK to close the window. slam F5 or Click Build to ensure nothing is weird at this stage…

You should have something like this:

image

Now your first place to hit is App.xaml.cs, get ready, this one is a doozey…

[Click the arrow next to App.xaml to find the mentioned file]

Add:

static string deviceFamily;

Like so…

And Add:

        //API check to ensure the "RequiresPointerMode" property exists, ensuring project is running on build 14393 or later
        if (Windows.Foundation.Metadata.ApiInformation.IsPropertyPresent("Windows.UI.Xaml.Application", "RequiresPointerMode"))
        {
            //If running on the Xbox, disable the default on screen pointer
            if (IsXbox())
            {
                Application.Current.RequiresPointerMode = ApplicationRequiresPointerMode.WhenRequested;
            }
        }

like so…

Note that I am adding extra surrounding code to the images for orientation.

Now add [Yes this is different code but looks similar at first glance]:

    /// <summary>
    /// Detection code in Windows 10 to identify the platform it is being run on
    /// This function returns true if the project is running on an XboxOne
    /// </summary>
    public static bool IsXbox()
    {
        if (deviceFamily == null)
            deviceFamily = Windows.System.Profile.AnalyticsInfo.VersionInfo.DeviceFamily;

        return deviceFamily == "Windows.Xbox";
    }

Like so:

Just before OnLaunched()

If you are developing for Xbox as well as UWP, then this next bit is crucial, add:

        // By default we want to fill the entire core window.
        ApplicationView.GetForCurrentView().SetDesiredBoundsMode(ApplicationViewBoundsMode.UseCoreWindow);

#if DEBUG
            if (System.Diagnostics.Debugger.IsAttached)
            {
                this.DebugSettings.EnableFrameRateCounter = true;
            }
#endif

Like so:

Notice the red text underline?

Hover over the first one and select the top option as above to add the required Using statement to the top of the file.

It should now look like this:

Now, ignore the line numbers being off by a few digits, but scroll down to this:

Notice where it says MainPage, usually this would be GamePage or whatever you want it to be called, you can change this but I just want to get moving with the guide at this point. Keep in mind this may require a bit of recoding… Yes, ask me if needed…

At this point, run the program to ensure nothing is amiss…

Moving on…

Open up MainPage.xaml or GamePage.xaml and modify the code to remove the Grid /Grid tags and replace it all with the following bit:

<SwapChainPanel x:Name="swapChainPanel" />

It should look like this:

Hop over into the MainPage.xaml.cs / GamePage.xaml.cs file and add:

            // Create the game.
            var launchArguments = string.Empty;
            _game = MonoGame.Framework.XamlGame<Game1>.Create(launchArguments, Window.Current.CoreWindow, swapChainPanel);

Like so:

Now the next bit:

readonly Game1 _game;

Like so:

We will come back to this shortly.

Now we need to create a ‘Game1.cs’ file…

Click Project in the menu bar and click, ‘Add new item’ or CTRL+SHIFT+A, select ‘Class’, name it, you guessed it ‘Game1.cs’, I know this can be named whatever but for now, let’s just avoid all the code rewriting again.

Hit Add…

You should now have the following in Solution Explorer:

image

While we are at it, let’s create the Content Folder:

Right click your project in solution explorer, in my case it is App2 Universal Windows as below and select Add > New Folder and name it to ‘Content’. We will come back to this much later in the guides…

image

Let’s get a milestone overview here:

image

All good? let’s continue, back to Game1.cs

It should look like this:

Boy, are we going to destroy this from the get-go…

First up, remove all the usings and replace them with the following:

using Microsoft.Xna.Framework;
using Microsoft.Xna.Framework.Graphics;
using Microsoft.Xna.Framework.Input;

Like so:

Replace:

    class Game1
    {

Not including the closing bracket, with:

    /// <summary>
    /// This is the main type for your game.
    /// </summary>
    public class Game1 : Game
    {
        GraphicsDeviceManager graphics;
        SpriteBatch spriteBatch;

I will avoid adding screenshots for this part.

Next add the following bit:

        public Game1()
        {
            graphics = new GraphicsDeviceManager(this);
            Content.RootDirectory = "Content";
            // The following line must be present for the output window to take up the entire display area
            graphics.IsFullScreen = true;
            IsMouseVisible = true;
        }

Followed by:

        /// <summary>
        /// Allows the game to perform any initialization it needs to before starting to run.
        /// This is where it can query for any required services and load any non-graphic
        /// related content.  Calling base.Initialize will enumerate through any components
        /// and initialize them as well.
        /// </summary>
        protected override void Initialize()
        {
            // TODO: Add your initialization logic here

            base.Initialize();
        }

Remember this is all inside the closing } of the Game1 class.

We then add:

        /// <summary>
        /// LoadContent will be called once per game and is the place to load
        /// all of your content.
        /// </summary>
        protected override void LoadContent()
        {
            // Create a new SpriteBatch, which can be used to draw textures.
            spriteBatch = new SpriteBatch(GraphicsDevice);

            // TODO: use this.Content to load your game content here
        }

And then add:

        /// <summary>
        /// UnloadContent will be called once per game and is the place to unload
        /// game-specific content.
        /// </summary>
        protected override void UnloadContent()
        {
            // TODO: Unload any non ContentManager content here
        }

and:

        /// <summary>
        /// Allows the game to run logic such as updating the world,
        /// checking for collisions, gathering input, and playing audio.
        /// </summary>
        /// <param name="gameTime">Provides a snapshot of timing values.</param>
        protected override void Update(GameTime gameTime)
        {
            // TODO: Add your update logic here

            // The following allows you to exit the game
            // using the ESC key on the keyboard
            // Or the Back Button on the XBOX GAMEPAD
            if (GamePad.GetState(PlayerIndex.One).Buttons.Back == ButtonState.Pressed ||
                Keyboard.GetState().IsKeyDown(Keys.Escape))
                Exit();

            base.Update(gameTime);
        }

We then add the last bit:

        /// <summary>
        /// This is called when the game should draw itself.
        /// </summary>
        /// <param name="gameTime">Provides a snapshot of timing values.</param>
        protected override void Draw(GameTime gameTime)
        {
            GraphicsDevice.Clear(Color.CornflowerBlue);

            // TODO: Add your drawing code here

            base.Draw(gameTime);
        }

You should have a mostly yellow line down the document, hit build/run

You might come across an error in MainPage.xaml.cs / GamePage.xaml.cs

Change:

        public MainPage()
        {
            readonly Game1 _game;

to:

        public MainPage()
        {
            Game1 _game;

[Yeah, I have no explanation for this right now, hopefully it does not bring about any bugs down the line…]

EDIT

Found the reason, I missed something:

Modify the file MainPage.xaml.cs / GamePage.xaml.cs as such:

    /// <summary>
    /// An empty page that can be used on its own or navigated to within a Frame.
    /// </summary>
    public sealed partial class MainPage : Page
    {

        readonly Game1 _game;

        public MainPage()
        {
            this.InitializeComponent();

            // Create the game.
            var launchArguments = string.Empty;
            _game = MonoGame.Framework.XamlGame<Game1>.Create(launchArguments, Window.Current.CoreWindow, swapChainPanel);
        }
    }

It should now look like this:

/EDIT

Next we fix the missing SharpDX [You will get the error if you try to build+run] components.

On the menu bar, click Tools > NuGet Package Manager > Manage NuGet Packages for Solution… like so:

image

Click Browse and search for Monogame:

image

Scroll down and look for:

On the right side, click the checkbox next to your project and hit install:

image

You should see the following:

image

Hit OK, and the right side should show like so:

image

You can choose to update the updates indicated as above, just remember to remove the Monogame search phrase from the search box, or you will not see anything unless Monogame updated…

Close the NuGet Manager…

Build and Run…

You should see a full screen CornFlowerBlue screen.

Success :heavy_check_mark:

[If not, walk through this guide again, or post a support request thread with a link to this post.]

I am going to conclude Day 1 complete…

Oh Wait, I did not make that second graphic yet…

Perhaps, on Day 2!

I hope this was useful and you found it informative.

Thanks for reading. :rice_ball:

Valentine

3 Likes

Apologies for the delay in posting, I am working on Day 2, however as usual something came up, I decided I should take another trip through C# again, but also some time off, I will post Day 2 within a week or in a few days.

Day 1.5 Fixing the templates issue in 3.8 Nuget

So, I accidently stumbled across a fix for this issue the other day. I will try to keep this one short, no promises.

Modify your VS setup and ensure you have the following selected:

Windows 10 SDK 10.0.18362.0

Around 720MB when I downloaded it.

image

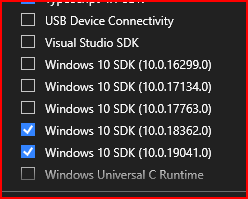
You might still see your list looking like this:

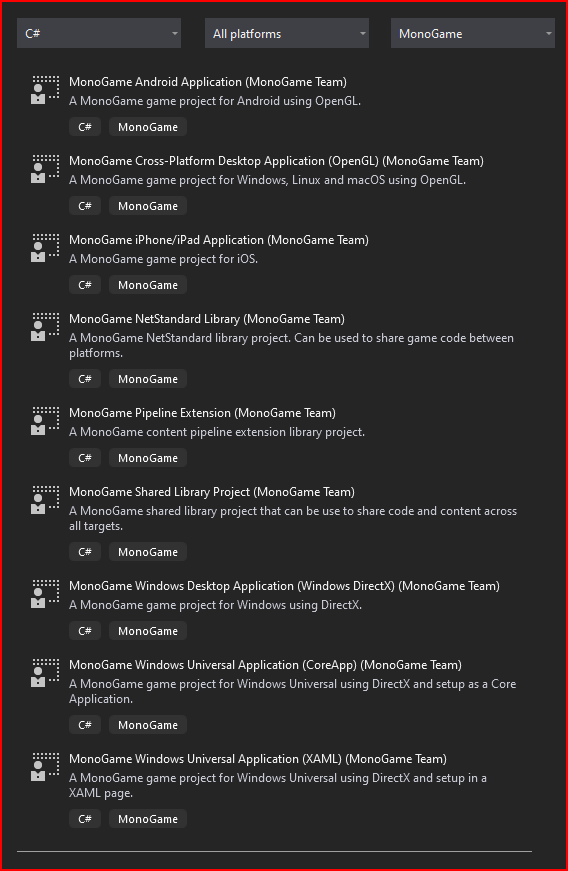
How I came across this fix:

When I chose a UWP XAML template, I noticed the template failed to load and it unloaded the project, but that got me wondering, did it create the files?

It does! Right click the project that shows as unloaded in solution explorer on the right, and choose to Open Folder in File Explorer, enter the folder there, and then open the CSPROJ file, viola, your project is there, if you look to the right in solution explorer again, you should see a yellow box with INSTALL a missing component mentioned, click the install for a specific fix for your build.

However, once the SDK is installed, this issue is no longer a problem.

I should get Day 2 out in a week, I was upgrading my dev environment, still waiting on two more deliveries before resuming.

Happy Coding!

1 Like