[Solved] Specific shader's parameter for each sprite in the same batch

Hi !

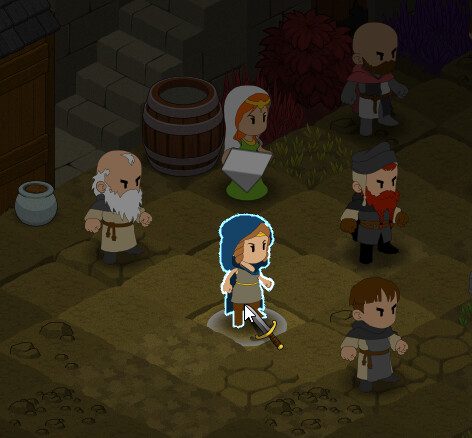
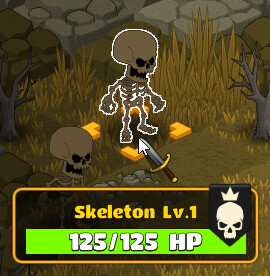
In order to reduce the amount of textures in my game I tried to use shaders instead of multiple textures. The goal is to achiev color swap of my units (same sprtisheet for different factions). The hue shifting shader is already working great and takes a parameter to select the desired shift (1 to red, 2 to green…).

My game is in isometric 2D. Sprites of tiles and units are drawed in the same spritbatch because I need to order them front to back with calculated depth according to position on the grid.

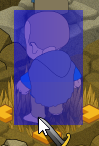
What I try to achiev is to draw each sprite or tile with a specific hue param. What I get is the whole scene drawed with the last passed param because this is how batchs are working… Distinct spritbatchs create artificial layering according to the exectuion order.

I there any way to achiev what I try to do or should I keep with multiple pre generated textures ?

Thanks for your help.

Franck

Each sprite has an individual color that you pass to SpriteBatch.Draw.
Chances are you don’t need that right now. This will give you 4 values that you can use in your shader as you please.

That’s actually a great answer !

Currently I use color argument to apply effects and shadows, but I can probably figure out a way to combine faction’s color and shadow color ==> RGB = desired faction and A = light.

I give it a try as soon as possible !

Thanks a lot !

Be aware, that color values are using only 1 byte per value which get’s translated to a value between 0-1 in shader world which may lack precision then (but there is still plenty)

Depending on how your shadows work it can also be benefitial to render all shadows to a rendertarget first and sample the shadow value from the shadowmap in the actual drawing by screen position via shader. Of course this will double your drawcalls so it depends on what your shadows are like if this or that is more beneficial (and of course you can put all sorts of things in that rendertarget, as the shadow itself will only consume 1 value of each screenpixel like emissive color and you can blur that target for effect)

It works !

Here the shader

float4 MainPS(VertexShaderOutput input) : COLOR
{
float2 coordinates = float2(input.TextureCoordinates.x, input.TextureCoordinates.y);
float4 pixelColor = tex2D(SpriteTextureSampler, coordinates) * startColor;
float4 savedColor = pixelColor;
float4 inputColor = input.Color;
float shiftColor = input.Color.r;
float lightColor = input.Color.g;
float alphaColor = input.Color.a;

// WHITE
if (inputColor.r == 1.0, inputColor.g == 1.0, inputColor.b == 1.0, inputColor.a == 1.0)
{
    tex2D(SpriteTextureSampler, coordinates) * inputColor;
}

// INVISIBLE
if (inputColor.a == 0.0)
{
    tex2D(SpriteTextureSampler, coordinates) * inputColor;
}

// NOT REDISH, HUE SHIFT
if (pixelColor.r < pixelColor.b || pixelColor.r < pixelColor.g)
{
    if (shiftColor < 0.1)
    {
        //DEFAULT BLUE
    }
    else if (shiftColor < 0.2)
    {
        //TO PURPLE
        if (pixelColor.b > pixelColor.g)
        {
            pixelColor.r = savedColor.g;
            pixelColor.g = savedColor.r;
            pixelColor.b = savedColor.b;
        }
        else
        {
            pixelColor.r = savedColor.r;
            pixelColor.g = savedColor.b;
            pixelColor.b = savedColor.g;
        }
    }
    else if (shiftColor < 0.3)
    {
        //TO RED
        if (pixelColor.b > pixelColor.g)
        {
            pixelColor.r = savedColor.b;
            pixelColor.g = savedColor.r;
            pixelColor.b = savedColor.r;
        }
        else
        {
            pixelColor.r = savedColor.g;
            pixelColor.g = savedColor.b;
            pixelColor.b = savedColor.b;
        }
    }
    else if (shiftColor < 0.4)
    {
        //TO YELLOW
        if (pixelColor.b > pixelColor.g)
        {
            pixelColor.r = savedColor.b;
            pixelColor.g = savedColor.g;
            pixelColor.b = savedColor.r;
        }
        else
        {
            pixelColor.r = savedColor.g;
            pixelColor.g = savedColor.g;
            pixelColor.b = savedColor.b;
        }
    }
    else if (shiftColor < 0.5)
    {
        //TO GREEN
        if (pixelColor.b > pixelColor.g)
        {
            pixelColor.r = savedColor.g;
            pixelColor.g = savedColor.b;
            pixelColor.b = savedColor.r;
        }
    }
    else if (shiftColor < 0.6)
    {
        //TO BLACK
        float blackColor = (0.3f * savedColor.r + 0.59f * savedColor.g + 0.11f * savedColor.b);
        pixelColor.r = blackColor;
        pixelColor.g = blackColor;
        pixelColor.b = blackColor;
    }
}

// LIGHT & ALPHA
pixelColor = float4(pixelColor.r * lightColor, pixelColor.g * lightColor, pixelColor.b * lightColor, pixelColor.a * alphaColor);

return pixelColor;

}

image
As you can see here, some units are “in the dark” and also from a different faction (green dress priestress).

Now I have to clean my code to differentiate hue shift from classic color application.

3 Likes

Great!
Just a hint, cause I’m a fan of short code :slight_smile:
In HLSL you can often handle all components of a vector at once, like this for example:
pixelColor.rgb = savedColor.grb;

You could then push it even further, and turn all of this:

into a single line:

pixelColor.rgb = (pixelColor.b > pixelColor.g) ? savedColor.grb : savedColor.rbg;
2 Likes

Thanks ! It’s a lot more readable now !

As you’re seems pretty skilled in HLSL, can I ask you if you know how works a multipass shader.
Does the second pass takes the result of the first pass or the orignial input ?

Depend on what you set in the pass i think, additive or multiply, depends on your use case i guess :slight_smile:

Not sure to understand what you mean…

I have 2 pixel shaders.
1 for hue shift
1 for outline

The oultine one gives a correct result but needs anti-aliasing. I’m looking for a way to smooth the result of the first pass by adding transparent pixels depending of the “surroundings” (1 pixel = 0.0 alpha, 2 pixels = 0.33 alpha, 3 pixels = 0.66 and 4 pixels = 1.0).

It looks like the second pass takes the original input and not the output of the first pass.

There’s nothing special about multiple passes. You get the same result when you split the passes up into separate shaders, and then apply them in the same order.

I guess your 2nd pass is drawing over the 1st pass right now, eliminating the results from the 1st pass completely. If you want the results of the first pass still visible, you probably want to do one of these things:

  • Have the 2nd pass draw to different pixels than the 1st pass. You can clip/discard pixels in the 2nd pass for example, so they won’t overdraw the 1st pass.

  • Use alpha blending to blend the results from the 2nd pass with the 1st pass. Alpha blending options are pretty limitted, but sometimes it does what you need.

  • Use multiple render targets and switch between them: Draw the first pass to a render target. Switch to a different render target (or backbuffer), using the first render target as a texture input. Now you can sample pixels from the 1st render target to incorporate them into the 2nd pass.

EDIT: Do you even need 2 passes for the outline? It seems to me you could draw it all in one pass, the opaque, as well as the transparent pixels.

1 Like

Making a shader to make the outline with anti-alias may be difficult since it requires to check pixels around the point where you want to render making it very slow. I think you can instead do the way anti-alias is calculated in games, render the outline at 2x the resolution and then resize it to screen size with anisotropic filtering, that will smooth out all the hard lines , if you want more refined anti-alias, your can render at 4x or 8x the screen size.

1 Like

Please don’t recommend brute super sampling over few extra texture taps as performance measurement. (To begin with, with increased resolution you drastically increase amount of texture taps as well as fill rate). There are reasons why we developed things like FXAA/SMAA. Your “very slow” is way better than what you suggested as better alternative, pretty please, don’t do that. Also don’t try to “sell it” as “way anti aliasing is calculated in games”… super sampling is NOT (thank science I guess) go to AA method in 2022.

For blurring either separate kernel or use downsampling (log N), also you can utilize hw linear sampling to skim few taps for minor precalc.

for downsampling blur you can check Kosmonaut’s Bloom example.

1 Like

I have a few more questions about HLSL…

1st thing I don’t understand. Is this supposed to be “a pixel” ?
float2 coordinates = float2(input.TextureCoordinates.x, input.TextureCoordinates.y);

If it’s true, is this supposed to gives me the left pixel ?
float2 coordinates = float2(input.TextureCoordinates.x -1.0f, input.TextureCoordinates.y);

2nd thing I don’t understand. Why this
Outline.Parameters["texelSize"].SetValue(new Vector2(1.0f, 1.0f));

…is not the same as this ?
float2 texelSize float(1.0f, 1.0f);

Is float(1.0f, 1.0f) in HLSL equivalent as 100% of the texture (w:h) ?

3rd thing I don’t understand. Color values. Is 1.0f equivalent of 255 in C# ?

I’have looked for tutorials but I need to understand… Can you provide a comprehensive guide so I stop to ask silly questions ?

Uv coords work in normalized 0-1 range. Behavior outside of that range changes depending on sampler state. For example 1.8 can Wrap to 0.8, or Clamp to 1.0, or result in specific Border color.

In second case subtracting 1.0 will move it to -1 to 0 range, depending on sampler state it can either provide completely different result than you expect or no difference at all, if you want neighbor pixel you have to divide your offset by texture resolution.

That’s where texel size comes in. Hence
float2 uvOffset= offset * texelSize
where texelSize is inverse of texture resolution
1.0f/texResolution

If you use DX project then you can utilized GetDimension within shader to retrieve texture size. If you use OpenGL then you can still do it if you are using glorious Compute fork provided by Markus. If you don’t, you should, its OpenGL version is vastly superior. Otherwise you have to use uniform and ship it from CPU using SetValue.

If you dont need specific sampler state and things like linear sampling you can always use .Load which takes int and operates in pixels (addresses texture as an array), again, only Dx or more modern than default OpenGL. In some case you could also use partial derivates (ddx, ddy) but more about that some other time.

To properly explain how Color works would take more time. Short answer is yes. Format is normalizedByte4, meaning it takes 4 bytes and normalizes their value in 0-1 to range.

Microsoft provides very good documentation for DirectX and Hlsl, generally I recommend to look up examples of similar challenges as you are solving and use it as learning source, basically rendering is too complex to learn top to bottom. GPU gems contains some great examples, mostly 3D tho.

@Ravendarke

Sorry for sharing a very inefficient way to anti alias, I agree there are many better ways to do it, since the brute force way was used in the past to do AA in games.

2 Likes

It’s perfectly fine to share it as an option, it was purely that performance implication I was worried about. I mean, my tip for everyone is to “profile profile profile”, just wanted to prevent someone getting potentionaly confused. No harm done, have a great day :slight_smile:

1 Like

My journey to HLSL seems to have only just begun…

To better understand the different behaviors I just tried a very simple test with no parameters:

return input.Color * input.TextureCoordinates.x;

I expected an horizontal gradient of the input color, because I assume TextureCoordinates.x is supposed to go from 0.0 to 1.0 and shader pass process each texel from (0,0) to (1,1).
[spoiler] I suppose I’m wrong on this part.

The result seems to depend of the frame’s width as you can see bellow :

imageimageimage

Also the result depends of the frame’s size : sometime I have plain color, sometime I have an actual gradient.

This tends to explain why I had a variable border thickness according to the frame’s size or maybe the w/h ratio.

As usual I’m overly confused.

Here’s my spritebatch Begin order :

spriteBatchOut.Begin(SpriteSortMode.FrontToBack, BlendState.AlphaBlend, SamplerState.AnisotropicClamp, DepthStencilState.None, null, OutlineFx, matrixOut);

And here’s my spritebatch Draw order :

spriteBatch.Draw(Texture, _adjPosition , frame.ToRectangle(), _adjColor * 0.5f, 0.0f, _origin, _adjScale, _effect, depth);

Does one of the input can affect the texel size witch I supposed to be obtained by :

var _outline = new Vector2(1.0f / frame.w, 1.0f / frame.h);
[EDIT] : get better result with the whole texture dimensions, not the frame…

I’m very sorry for keeping asking silly questions… I should not have open the HLSL pandora box or the whole monogame box back in the years… :frowning:

Texture coordinates go from 0 to 1 over the entire texture. If your sprite is only a small portion of the texture, then the coordinates will also be in a smaller range.

2 Likes

This explains a lot !!!

image

It works !!

Thanks a lot for your precious help !!