My Road to MonoGame - A Coders Experience + Beginners Tutorials

Hey, Valentine here.

So, not long ago I started learning to code, it was something I’ve always wanted to do since the late 90’s. Around that time, I first played a game called Final Fantasy VII (7) in 1997. But then I also got lucky and played Final Fantasy Tactics too (Both are on the iPad now, go play!) among many other RPG games.

I have played many more classic games than these too, from the SNES and Mega Drive eras (and other consoles), but for some reason the PSOne kind of clicked for me (I recently bought the NES Classic Mini, SNES Classic Mini and PlayStation Classic… mainly for research, honestly! {More on this later}).

And then, in 1999, Age of Empires II (AOE II) came out and I played the demo for an entire night with high school the next morning; that was a great nap in French class.

That got me ever more interested in making my own games (AOE II), however sadly I did not know nor have the right connections at the time and thus; did not know where to begin. And so, it sat on the back burner for over a decade…

A little side track, you may be wondering, what this post was made for?

My goal with this thread was to share my roots in coding; and then show how going it the custom route can be done by very much beginners (in plain English, I mean people who have very little background in math {Mathematics} and coding in general).

So, where was I…

Quite a lot in life and time went by and then finally at the end of 2010, I decided to take the challenge seriously. I remembered something that came on a demo disk back in 2008, spent three days looking for the files; found them! I went to the developer’s website and… no, I ended up doing some market research for competitors to make sure I was making the right choice; competition was lacklustre and so, I went ahead and clicked download.

Now, at this time (end of 2010), I was already aware of Visual Basic and C#, actually I was aware of C# around 1999 (It launched in 2000) and over the years, heard of VB over and over but as I was not in Code Like A Mad Man mode, I never looked at them properly; with the old nonsensical saying of: You Need Math Skills, looming over my head. What a fallacy that was (more on that later).

But this was BASIC based code (the stuff on the 2008 demo disk), a more fundamental basic level (or high-level code) code base, so from this I could learn the functions and code structure involved in coding, without the OOP (Object Oriented Programming) complexity as well as C/C++ confusing my progress.

I strongly advise beginners to look at BASIC, either in practice (there are options which are still functionally out there) or in theory just to learn how Top Down Coding functioned, not to mention who created it and for what (you may be surprised, more on that here: BASIC - Wikipedia); should be able to find a good documentary regarding BASIC on the streamers out there.

In short, I got to understand how functions made things happen, how they related to one another and how you could combine them for various effects in a game world (remember, I was completely new to programming at this point). I also got used to the dot methods (This is when a period is placed after a word followed by another word {Like this: Player1.LivesRemaining}, you may come across this when playing with Strings or Error Messages and Class data) for accessing sub data in data structures; in other words, I had a soft introduction to the OOP paradigm(more info on that here: Object-oriented programming - Wikipedia).

Personally, I highly recommend complete beginners to grab a book on Visual Basic, and then strike up a book on C and then another on C++ (I do not claim to understand programming by the way, I cannot remember how things piece together without referencing something), you can either choose to simply read through them or go about entering the code too (Though this would help you a lot, especially with seeing how the code editor reacts as you code). And then I also suggest a good starter short book on C#, you are welcome to ask me which books I used (And which I recommend for complete beginners), I don’t want to come across as a ‘pusher’ (lol) so just PM me instead if you would like ‘the list’ or if enough people ask on this thread, I will amend this post to show my book collection on this subject.

Once you have these basics down - I personally took the long road through C# fundamentals (more like a thorough walk-through of C#) - and you also understand the core of the .NET framework fundamentals too, - but not the new and latest stuff - C# 2012 and .NET 4.5 (Actually the book I used has those in the title) was my route, I highly recommend that route and then picking up the new stuff. But I was not done there, I took another run through C# with an illustrated book to dive deeper into C#, all before I looked at MonoGame (but if you prefer jumping in, read on).

And here I am today…

I am taking a semi detour again; but this time through C# but with XNA (More on that here: Microsoft XNA - Wikipedia), that is to say… MonoGame…

Recently came across a book I had not looked at before and purchased it earlier today, and then some other factors got me thinking, hey, if I am going to go through another 468-page book, I may as well document my progress in some way now. Because I use a lot of book resources, posting code makes me feel awkward, however some code I feel stuck on and if the code is rather rudimentary; I may post a support thread every now and then to get it working. In general, I wanted this thread to serve as a Showcase type post, but I have decided to leave this in the General listing instead.

I have two starting point books, and skipping this latest addition, plan to go through my Windows UWP route as that is where I will be directing my efforts in this thread; that other book, is 470 pages thick. As such, you will see a lot of XAML and UWP based content in here for some time, perhaps a month or two.

I will try to (after creating custom assets) post as many videos as I can (I have no intention of keeping archives however, so, if my YouTube channel goes down {seems to be a trend these days, though I may utilise Vimeo at some point}, those videos will likely disappear for good, you have been informed lol) but they will simply be showcase videos, which I will also compile into a single video at some point, though for those wishing to recreate each effect, I will disclose the books and chapters I followed to make the various video showcases; upon request that is.

Back on me for a moment…

So, a little about where I come from, I was never good at Mathematics, or even English or even high school, I am partially blind, which goes some way to explain why I sucked at school really… And so, some things occurred which made me skip my high schools final year, so, I dropped out of typical education routes, and as such, in 2010, when I finally got into (Oh I finally remembered where I left off while writing this by the way) coding,

I still suffered from a lack of essential coding mathematics, basically: Algebra and Trigonometry among other skills such as Geometry. Basic math I can understand but Algebra, never quite got there, I have many math books now but it’s not for me really, though I will try more in the coming months to get up to scratch somewhat. Reading for me is one of the toughest challenges due to my vision issues, it might explain why you may have seen me on here for so long, but I have not really shown much for it; I intend to change this in the coming months (Hmm, sounds familiar, this time is different).

Oh, right, so at the end of 2010 I got into this BASIC based coding toolset, and for a time I was content, it was like speaking to a computer in text and telling it what I wanted it to do, perfect! However as with all good things, it ended and I was forced at an early time to move into C#, and so it was at this point around 2013 that I started looking into future options to move into, and then I discovered MonoGame while looking into XNA, I knew then that this was where I should be heading.

But I knew nothing about C and C++ and C#, but I had heard about Visual Basic (VB) over the years and thought, maybe I could learn that. Some time went by and my coding skills became more confident, I eventually decided I would shoot through VB briefly and direct my focus onto C/C++ and C#, hence the long route I took as mentioned already (You may not be aware of this but VB and C# used to have parity, meaning you could do pretty much the same in both languages, however, recently this is no longer the case {You can find out more in this article I found after a quick web search on the matter: Is it the beginning of the end for Visual Basic? Microsoft to focus on 'core scenarios' • The Register - in short, you are best using C# for MG}). I want to cut this short here as a lot happened between then and joining up on this forum.

So, with my skills in C# somewhat worked upon, I just need to get through a couple of books, my main reason for taking so long is, I really wanted a blog that I developed using ASP.NET to document my progress, and as with anything, life got in the way. So, here I am again, this time hoping to document as a blog, on the forum for the time being to move things forward.

As you may have noticed, somewhere up there; my short-term memory and long-term memory lack some effect.

If I missed out explaining anything or if you want to know more about anything, just ask here, you might be helping me or others in doing so too.

Anyway… TL; DR.

This thread is mainly for UWP focussed projects, I will share what I can to help other - UWP with XAML - project developers (Thinking about it, I may even investigate UI creation, as I do intend to port to other platforms in future - That’s where I may document Apple platform development too).

I am finally digging deep with MonoGame, and I will document my progress here. I won’t be sharing too much code (for now), but I will be demonstrating various (oftentimes unrelated) techniques and effects and such; throughout my progress that is. My main goal is to show what can be done and easily achieved with MonoGame.

Jumping aside, when new to coding or game development, there are a few options these days, there are simple coding languages as mentioned above, advanced coding languages such as C++ where you develop from the bare knuckles by interfacing with the operating system and graphics engines (no thanks) and then there are the newer options where you use a mostly point and click tool such as Unity or Unreal or the like. Then you may be thinking; where does that place MonoGame?

MonoGame, for me, sits in the middle ground - somewhere between advanced coding as well as point and click - the point and click aspect can be tools such as Blender3D or your own tools which you create for say, level design.

This is where I love MonoGame (MG), you can create the tools you need; using MG itself (On top of your platform of choice).

So, if I want to create, say, a character model making tool, I can, or a level designer for 2D or 3D games, I can, or perhaps a particle effect tool, the option is there. Some may be thinking, why though? When tools such as MilkShape3D and Blender3D exist - not to mention Unity’s visual editor - and the reason is simply, because we can, but that’s just the short answer; the long answer is, workflow compatibility and having just the functionality and usability required to keep your workflow going. Yes, you must invest time and energy into these tools, but seldom does it take little longer than learning market tools anyway.

A good example for this would be model making, sometimes you get into issues exporting a model and displaying it correctly, this can creep up on you over and over, especially if you change your model making methods (say, static objects to animated meshes).

Another core reason is, MonoGame has a very little-to-none cost for learning and getting started, so you could take your time with it, and a bonus, it costs you nothing to publish (where MG is concerned); personally I would be happy to contribute something back to the project, say, a % of revenue earned that you are happy to give back to help keep it going.

It’s not for me to explain what the history of MonoGame is, so I will simply direct you to this page: http://www.monogame.net/about/ where you can learn all about MG and I would like to direct your attention to the link at the bottom which links to: http://www.monogame.net/donate/ which is where you can contribute to the MG project, please do it when you are able to. I should probably point out at this point that I am simply just another community member here.

What I would like to put forward is, that in learning to code using C#, you can gain some highly transferrable skills (not forgetting to mention you could easily transfer to C/C++ too, but do say goodbye to the garbage collector, though you could still keep that, Hello .NET), with routes you might not have guessed, finance being one of them. You could also transfer all your skills into other mainstream game development projects, in major game studios. You could develop your own software across many platforms - heck, even start your own chat app after learning how networking works for multiplayer game development - and heck, C# is still huge in the enterprise sector, so if you decide coding is not for you or game development overall, you haven’t really lost too much; if anything, you got some major plus marks on your resume.

Now, coming back to when I mentioned buying those classic consoles, I have been partial to 3D game development as I find it easier to understand and far more interactive, but I have recently started to consider 2D development and so, think I might develop my first game in 2D and along the way, show some interesting things as I learn them.

At present I am unable to support the MG project financially, but I hope in doing this here; I can help grow the community and assist where possible as I focus more time on coding with MG.

The first book I have to get through is based on MonoGame 3.0, a lot has changed since then and as such I will try to put together a guide on getting MG installed and set up, though this is often easier said than done, as many users come across issues simply installing (I have yet to have these) MonoGame (my route here will be Visual Studio and MonoGame Executable Release {not Dev Branches}).

Going back on math skills… Do you really need math skills? Yes, but not so much advanced skills as there will likely be a tutorial explaining concepts here and there; though improving them (your math skills) as you go, will only help you more. As I mentioned it being a fallacy on you needing advanced math skills, this was something that may have been true in the past, however these days, less so as documentation and tutorials and videos and such are in the multitudes, you just need to understand how things correlate with one-another to make things work as you wish them to, but again, getting your math levels up a bit never hurt, try reading a math book on your daily commute.

Adding to the skillset talk:
What other skills do you need if going it alone?

  • 3D modelling [to help cut down on project cost]
  • 2D art [useful in many ways]
  • Video Editing [useful for marketing and cutting your bottom line further]
  • Project Management [a very essential skill, and highly transferrable too]
  • More to follow in future.

If I had to spend money, where should I focus it?

  • Art [marketing material / concept art, box art {yes, it is still a thing}] – by way of hiring a professional artist, look for sites like Fiverr that can help reduce this cost.
  • Music [nothing beats a track made specially for your game, many indie games today have professionally made soundtracks, a bonus; you can use them in your showcase videos]
  • Assets [These are things like: game levels, objects, player characters and effects – as well as music and sound effects]
  • More to follow in future.

So, anyway, before this hits page 8 in Word, I guess I should conclude this for now as the start of something big and un-wielding, long and tiring, joyful and rewarding!

If you really need an install and first project setup guide with the current (currently 3.7.1 release and Visual Studio 2017 {2019 is almost in public release} as on March 24th, 2019) release of MG, I can make one for UWP development with XAML for now.

One thing I know right now is, you really want to run your Pipeline tool on a dedicated computer or a VM.

Not sure how to end or start this here, so let me get through a few chapters and I will update back here later this coming week.

Valentine, over and out for now.

EDIT

Current Posts:
Setting up Content Pipeline
First UWP XAML Project Setup with Asset Import and Display

Upcoming:
Nothing planned as of yet.

EDIT

Decided to share my study progress:
Don’t forget my two other threads:

Useful links related to MonoGame:

A thread where you can discuss pretty much anything, especially coding techniques…
2 Likes

Setting up Content Pipeline

Hey there, Valentine here.

So, a little ‘need to know’ here, I use OneDrive, and as such my Documents folder sits on OneDrive, this makes me a little fuzzy when it comes to installing MonoGame because… well, look here:

(Secret note here, this was a screen grab using the new annotations app in Windows 10 and as such it is called: ‘Annotation 2019-03-24 224959.jpg’ we will come back to this later)

See it?

Yep, I guess just because the directory exists in my user documents folder for Visual Studio (VS) 2015, it somehow recognises it being there during install (Even though physically it is not always actually there), I might be able to shed more light on this in future when I take a closer look at the install package, maybe a year later… but no, I do not have VS 2015 installed either.

Anyway…

I made a choice change, I will start mentioning my current book which I am using to study MonoGame with… and the current one is:

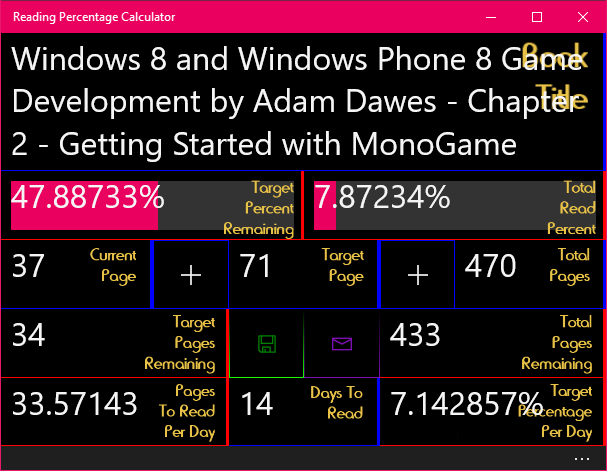
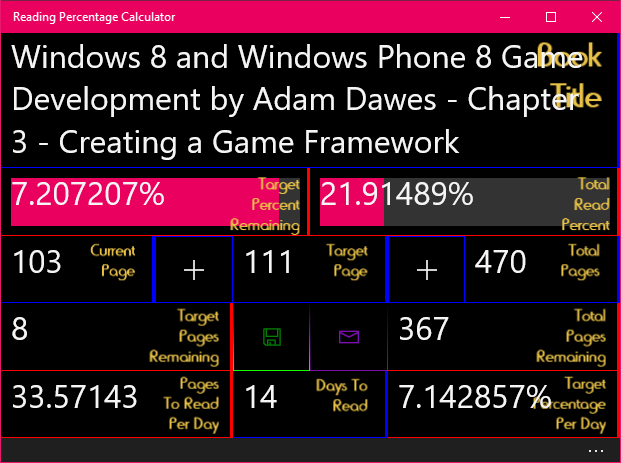
Shameless plug but that’s an app I created and is free on the store if anyone wants to use it, I wanted to point out, that the share button in the middle caused the app to fail XBOX submission… otherwise it would be on it too.

About the book, it was the only book I could find tackling the now named, UWP platform (Well I lost track honestly).

Moving along, I am following along the book mentioned in the image above, and Chapter 2 introduces adding assets to MonoGame using the XNB file formats, the history of this is in the book so if you wish to learn more about it, it’s in there. What I will add here is the process in the book is more or less, obsolete almost… and the new Pipeline tool pretty much replaces the method mentioned in the book thus far, it even says as much that it would be replaced in future (That is, post 2013).

Onto my setup, I learned of many mishaps regarding the pipeline tool… oops…

What is the pipeline tool you ask? Well as mentioned already it is what you will use to prepare your assets, whether it be audio, video, images or mesh models, you will need to prepare it or ‘convert’ it to a format MonoGame works best with.

As I was saying and before I forget, here is another thing, it is possible to convert your assets within a VS project, but as there are multiple methods to this, I am suggesting one which works with most project workflows.

OK, my suggested setup, may not be ideal for you, but I am sure someone may point out a better method for your liking and workflow, but for me, this works, so, not long ago the process of XNB conversion was simplified by way of a standalone tool in the form of an executable (.exe) application, let’s move along now.

There’s only one issue with this, you need to use it like a project, and if you are not careful as mentioned earlier, errors were made by some users and it had the unsettling effect of wiping out entire projects… apparently, permanently! (unless you are like me and you archive everything as you progress). From this I worked out that users were placing these Pipeline projects inside their VS projects or setting the export directories to them, which is a terrible idea from my point of view, Why? Well, there is an option to clean – just like in VS – a build, which deletes everything in the export folder and then recreates things, but as I have not dug into this source code for the Pipeline, I will settle for the safest method, putting it on a standalone secondary computer and setting it up in a slightly safer folder structure per project.

OK, so perhaps you do not have an old computer lying around that you can use, but the precautions I underline here on out should still almost save you from complete anarchy and a long lengthy bathroom run… get those brown pants on, prompt!

Heh, joking aside, let’s get down to the nitty gritty…

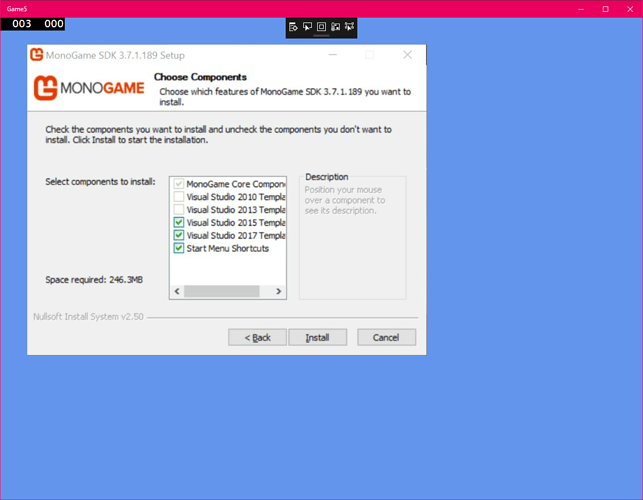
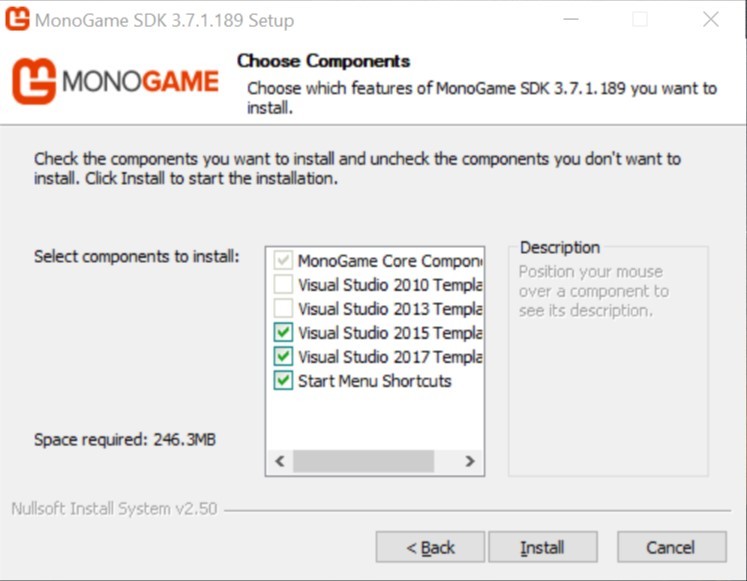
I suggest you put a computer on the side and install the latest release of Visual Studio (currently the Ace Team of MonoGame is currently preparing MonoGame to support the soon to be released 2019 VS edition, but at the time of writing this, it was 2017 as the most recent supported edition so, just presume you can install 2019 already or install 2017 if the MonoGame installer doesn’t work for you – side note, let me know if you need help installing Visual Studio, and I will…………. Consider putting a guide together to get MonoGame up and running) and then download and run the latest MonoGame installer for VS on Windows and ensure you can install the templates as in the above image (you won’t need 2015). You can find the link for the latest installer for MonoGame here: http://www.monogame.net/downloads/ - where the latest link (at the time of this writing) is 3.7.1, which will take you to a forum post where you should click ‘MonoGame 3.7.1 for VisualStudio’ which will download the setup executable. At the time of writing, this was the link to download Visual Studio Community 2017 which is a free edition of Visual Studio, no costs involved whatsoever, this can be downloaded here (for now): https://visualstudio.microsoft.com/vs/community/ - by the time some of you read this, it may have been updated to the 2019 release, I suggest a web search after April 2019.

I apologise for the depth of that paragraph…

So, that list of directions works for both your development computer as well as your asset building system (So whether you have a spare computer or not, keep reading), hold up for a second, just want to clarify a nifty feature that will make working between these distant systems, easier.

You could go old school and isolate these systems and use a USB drive between them (you old school cool person, you! {Shakes fist}), or be more modern and utilise OneDrive to transfer files between them, this has the added benefit of being a live backup system and actually for some files… version history and recovery options too.

Anyway, from this point forward, you can assume I mention transferring files via a folder between your two computers when I say: ‘Now import this to your VS project’ or something to that effect.

So, ignoring my setup there and assuming you are going forward with or without the added safety (secondary computer) as mentioned already, let’s get this Pipeline out of the way (for now).

Once you successfully install VS and MonoGame, you should find a shortcut in your start menu under ‘MonoGame’ called ‘MonoGame Pipeline’ or if you prefer, look for and run “C:\Program Files (x86)\MSBuild\MonoGame\v3.0\Tools\Pipeline.exe”, you could also try copy pasting that to your Run command without the quote marks I guess. I also suggest you Pin the Pipeline tool to your taskbar once you have it running, you can do this by either dragging the start menu shortcut to your taskbar or once you have it running right clicking it in your taskbar and clicking ‘Pin to taskbar’, that way you can just click it there to run it in future.

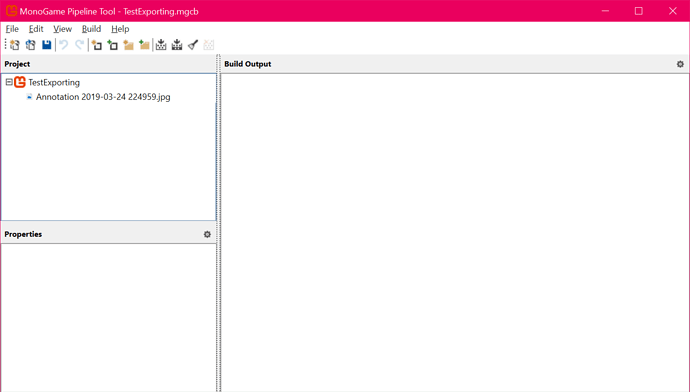
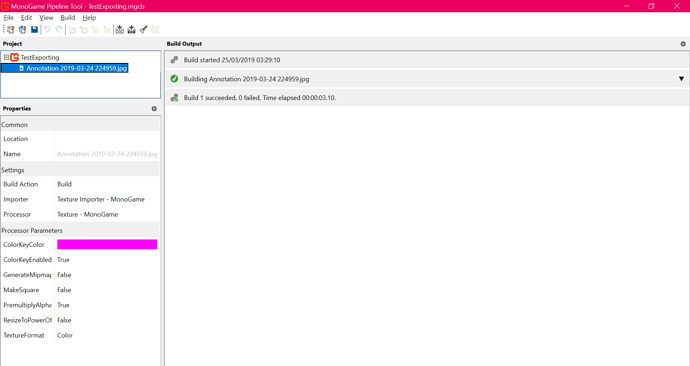
Once you have the Pipeline tool running, you should see a window like this:

Oh, you see that file name mentioned earlier, more on that shortly…

Note that the list box in the top left would also be blank… first things first, we need to get our directories in order…

Click ‘File’ and then ‘New…’ (by the way, this … is called Ellipsis, I use it a lot!)

Now you should see a file extension here called ‘.mgcontent’ which as you should see is a ‘MonoGame Content Build Project’ file extension. Don’t change the extension type here.

What we will do however at this point is go over into C:, click ‘This PC’ on the left or along the top of the frame and then click into C:, here you can right click (Ok, some people may disagree with this, so an alternative folder would be either your My ‘Documents’ (It’s just Documents but I miss the older Windows folder naming’s) folder or a folder in another disk drive such as D:\ or an external USB drive works just as well) or simply click ‘New Folder’ at the top of the window.

Name the folder like so: ‘MonoGame Pipeline Exports’ or whatever you wish to name it, but I will use this from here on out.

You should have this folder in your C:\ drive now (or wherever you put it or whatever you named it) ‘C:\MonoGame Pipeline Exports\’

Now click into this folder if not already in it and create another new folder called: ‘Test Exporting’ or again, whatever you wish to name it, I figured I could just use this one folder while following the book, but when I start working on projects, they will have their own respected folders, but for now, let’s move ahead.

Now, in the ‘File name:’ field, put: ‘TestExporting’ (no spaces, just for the purpose of this tutorial) which should give you a project name of ‘TestExporting.mgcb’ inside the folder ‘C:\MonoGame Pipeline Exports\Test Exporting’.

So, to clarify, you have some protection from accidently deleting your entire C:\ drive, thanks to the first folder ‘MonoGame Pipeline Exports’ this folder also acts as a Hold-All folder. Second you have the secondary folder which allows you to isolate per project assets. Now you might be saying, I am only working on a single project right now, and why would I need multiple project asset folders? Well, what if you want to make a level editor? You still need to convert assets to use with that editor (I should point out here, you could also embed the Content Pipeline into your projects to create ‘on-the-fly’ asset imports but this is not an out of the box solution, yet).

Oh, ok before I talk about further protection levels, I should get to what, why and how you are safeguarding from said issues.

Let’s go back to that Pipeline tool, before you proceed, I suggest doing something first, find an image you wish to use for this experiment, heck, go download the official MonoGame Logo’s here: https://github.com/MonoGame/MonoGame.Logo and you can use one of them for the purposes of this tutorial. Ok, so you have an image, yes? Mine will be the one we looked at, at the very beginning of this tutorial… ‘Annotation 2019-03-24 224959.jpg’ it’s not important what your image is called but I can suggest keeping files short, descriptive and without spaces, makes future development and coding easier. Anyhow, this was just the name the new annotations (Snip & Sketch) app came up with.

Although in future I will probably suggest making a sub folder here, say, ‘Original Images’ and ‘Original Audio’ with respective sub folders going further such as a more understandable and organisable hierarchy such as ‘Original Images/Characters/Player Model Textures’ or ‘Original Audio/SFX/Game Menus’. For now, just place it inside: ‘C:\MonoGame Pipeline Exports\Test Exporting’.

Now, before continuing, in the Pipeline tool, click ‘File>Save’ or the Diskette icon.

At this point you should have:
C:\MonoGame Pipeline Exports\Test Exporting

  • Annotation 2019-03-24 224959.jpg
  • TestExporting.mgcb

So far so good? Let’s continue.

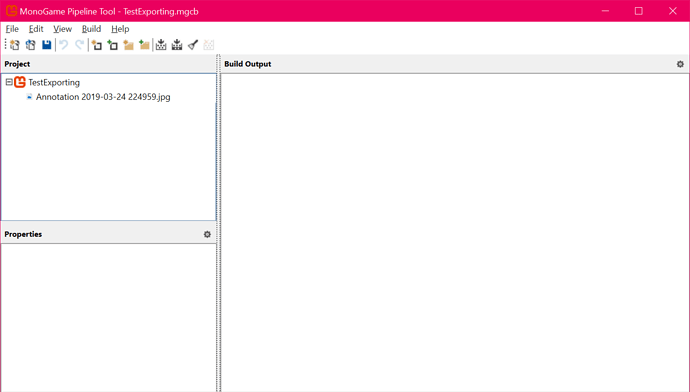
Now you need to click the icon (alternatively, click ‘Edit>Add>Existing Item…’) that shows ‘Add Existing Item’ when you hover over it. Ensure you choose the image we added to the folder earlier, click ‘Open’ in this dialogue box to close it and it should present the following:

Yep, the same image from earlier…
Let’s dig a little deeper at this point.
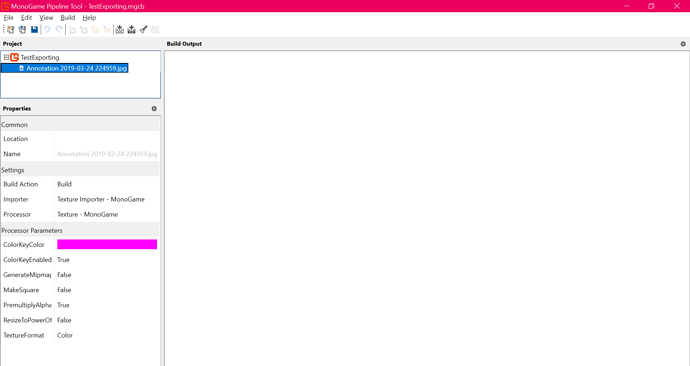
Click on your image in the upper left window frame and see what happens as below:

Oooh, Options! Yep, this is a very important aspect for you to get familiar with, but for the purpose of this tutorial, we won’t be discussing it much at present, I just wanted you to be aware of these options for now, they will come in much use for you in future. (if you are wondering why I am not simply saying Project, Properties or Build Output windows, probably because I have no idea what these say on non-English systems).

Next, we will build this project, I suggest clicking ‘Save’ at this point.

There are several other options in the top menu list, but let’s stick to essential commands right now.

At the top, there are some icons, but there is also a menu item called ‘Build’ find the icon for this to speed up this step for yourself or hit F6 to build your asset(s).

At this point, with a little luck, you should see the following:


(I just realised this gave away the time I was working on this, I am finishing up this tutorial around 6am)

And you should find the following folder structure:
C:\MonoGame Pipeline Exports\Test Exporting

  • \bin
  • \obj
  • Annotation 2019-03-24 224959.jpg
  • TestExporting.mgcb

Let’s take a closer look at the two new folders, beginning with ‘obj’, as we won’t have too much use for this at this point:
C:\MonoGame Pipeline Exports\Test Exporting\obj

  • .mgcontent
  • .mgstats
  • Annotation 2019-03-24 224959.mgcontent

I don’t really know what the first two files do really at this point but the last one I think can be added to your VS project somehow, I hope someone can shed some light on this at some point.

And now for the main event:
C:\MonoGame Pipeline Exports\Test Exporting\bin

  • Annotation 2019-03-24 224959.xnb

As you can see, your image now has the extension in this folder of ‘.xnb’, it is now ready to use in the MonoGame engine, that is, once you get a project up and running, I should have that ready within 24 hours of this post. Note that you cannot usually see the content of this file at this point within Windows Explorer.

To conclude this tutorial, we will pick up where this left off in the next tutorial, getting your first project up and running and displaying that image!

Something I wanted to add here, you may be thinking, this was a ‘road to’, but in fact, the road has yet to begin, it ends when I publish my first game! and then it continues!

Valentine out.

EDIT

Used wrong \ in that last folder structure.

Pretty nice read :slight_smile:

Strongly reminds me on my first bloody steps back in time (year 2010) with the XNA Framework.

I was 22 or 23 years old and I had no programming or software development background. I also had to improve my english skills by alot, because much ressources about developing games or software is written in this language (i am from germany).

So, I had to start completly from scratch with the help of the internet (YouTube, Forums etc) and (e)books.

I decided to buy at least one physical book to read it in my spare time without depending on electricity and to have something which I could read before going to sleep - without hurting my eyes.

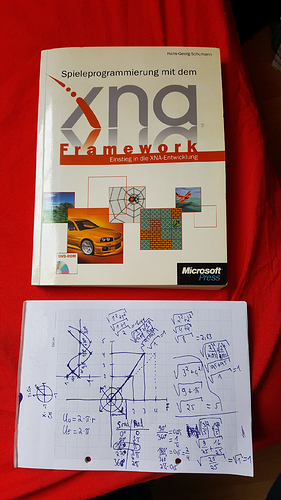
I bought this book written by Hans-Georg Schumann and released by Microsoft Press Germany. Especially in the first learning phase it helped me alot because it was written completly in german.

One of the nicest things I encountered in that time was, that learning about game development topics with the help of the internet, teached me the english language way better than any school teacher I had in my lifetime. I’m generally not that “language-guy”, but I love hearing different languages like spanish (have some basic skills here).

I would say that also my math improved over the time. Way faster than in school. Game development generally helped me to understand some topics about math easier. It’s nice to have something visually for trying things out. It’s learning by doing if you want to say it like this.

Uhm, I have a place in my room where I store things like papers and books about developing things. And I found one of my old notices about moving in 2D space. I want to share it with you:

No joke, it’s really that old :smiley: The book above is the XNA book I mentioned above. It’s slightly yellow now (originally white).
Please don’t take that paper in the bottom to seriously, I really just wanted to have something what I could drop next to my keyboard, so it would be easier for me to adapt things like this to my game samples, haha ^^

Why I am telling all this now? Well, everything starts small - very small - in life, even our life itself. But over the time it becomes bigger and bigger and in the end you can really say that you have learned something. Something nice and cool. And this is a big motivation, because it will show you some day, that your skills improved and that you can start some bigger projects.

I remember that I originally started with Visual Basic. Later C# and released my first app in the Windows Store (it was an app where you could organize your school life with a time table and placeable subjects). This also helped alot. Then 2010 I started with XNA like I mentioned above.

I wish you much, much fun on your road and never give up! Most important thing. Also finding things which motivates yourself will help alot. Watch success stories on YouTube about small indie-devs. This is cool - believe me :smiley:

Best wishes.

-Marcel

1 Like

Very nice story, very inspiring! thank you for this.

1 Like

First UWP XAML Project Setup with Asset Import and Display

That got a bit long of a title there, oops, anyway… It’s time to run Visual Studio (VS) and get our first project up and running, now I will unlikely have issues with my setup at this point as I already have it running correctly with the correct SDKs (Software Development Kits) installed, you may hit issues when you attempt to create and launch a project, if that happens, either search the forum for a solution or open a new thread asking for help along with any screenshots of any error messages.

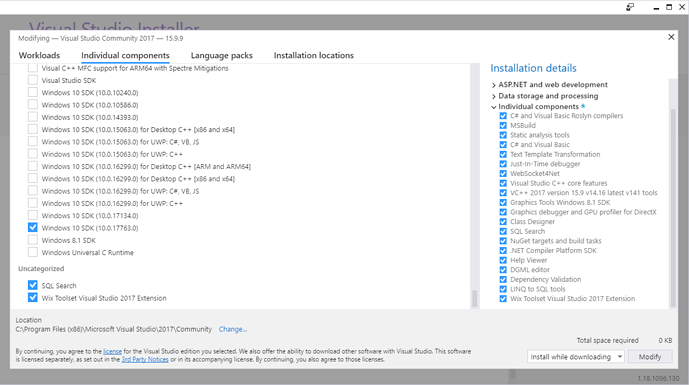
Though, looking at my VS setup, I just have one:

Here, we are looking at Windows 10 SDK (10.0.17763.0) at the time of writing this tutorial on 25/26th March 2019. Ignore the other stuff I have installed, I also do web development. There is another option on the first page in that installer, something about cross platform development with C# (there is also one for desktop development with C#, check that too), ensure that is selected, again, just ask for help with installer setup if you have issues.

You can use Snip and Sketch (The replacement for Snipping Tool) ‘sigh’ in Windows 10 to capture the error message or alternatively if you have it on your keyboard, with the error message highlighted, hold Left-ALT and press the PrtScn button (Print Screen) and if you have or see the OneDrive save message, just have it instantly created as an image in your photo collection in your OneDrive folder, under Screenshots, and simply drag it into the forum message box when writing a post (remember to crop out or cover over any private information if you took a desktop snip). Alternatively, after capturing the error message with Left-ALT + PrtScn, open MS Paint and hit Paste or CTRL+V and export it as a JPG or PNG image and as mentioned already, just drag it into the message box when posting a forum thread/post, this will help the community help you better.

Moving along…

So, you have VS installed and the templates, and you now have your first .xnb file ready to import to a project, that puts us:

/ Installed Visual Studio 2017/2019
/ Installed MonoGame
/ Setup Your Pipeline Workflow
X Run Your First Cornflower Project

Oops, we seem to have a failure in the list, let’s fix that…

Let’s get MonoGame up and going, remember my focus is UWP XAML at the moment and as such, let’s get one going…

Launch Visual Studio 2017/2019, and if you have not done so already, pin it to your taskbar (see previous tutorial on the Content Pipeline) to save you time in future.

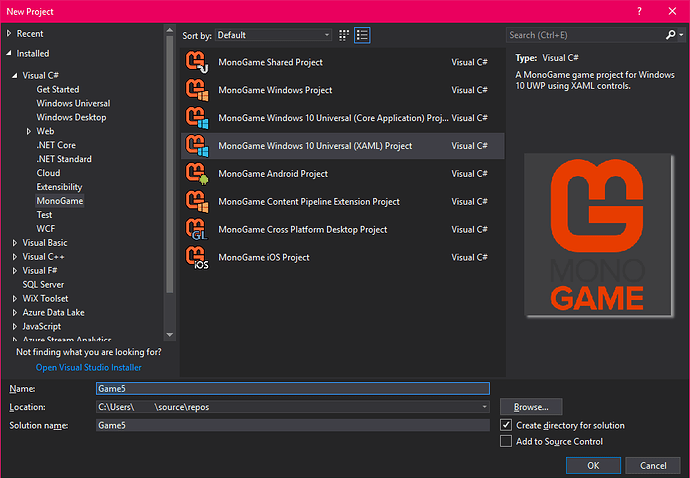
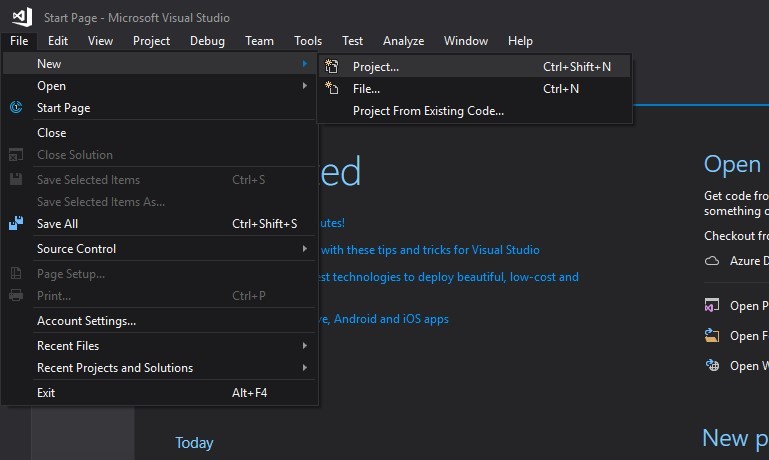
Once you have it open, head to: ‘File>New>Project…’ or as you can see, CTRL+Shift+N, like so:

Once you do this, you should see something like the following:

As you can see, you need to (if not already) click on: ‘Installed’, then click the expand arrow next to: ‘Visual C#’ and then click on: ‘MonoGame’, once here, select ‘MonoGame Windows 10 Universal (XAML) Project’, then in the ‘Name’ field, either accept the default of ‘Game1’ or give it a name you wish to use (This will auto increment depending on how often you start a project with GameX in the name, as you can see in the image above), leave it to be created in the ‘repos’ directory (the blank space in my image being your username), this should be the default, ensure ‘Create directory for solution’ is checked in the lower right as in the image above (This prevents you having a messy repos folder, and allows you to work on multiple projects at the same time). Leave Solution name alone.

Oh, right, Click OK.

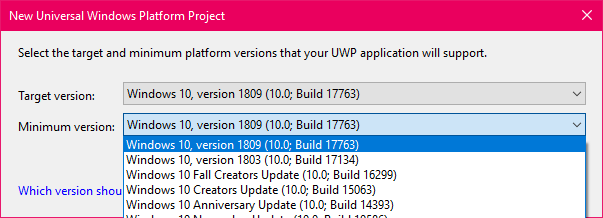
Now, you should see a window pop-up like the following:

I simply select the latest one for both choices to keep things simple, but if you have other plans with your projects, you may fiddle around. Once done here, click OK and then your project should begin preparation.

You should see this in the lower left corner, oh, I am using the dark theme for VS, you might be seeing the light theme by default.

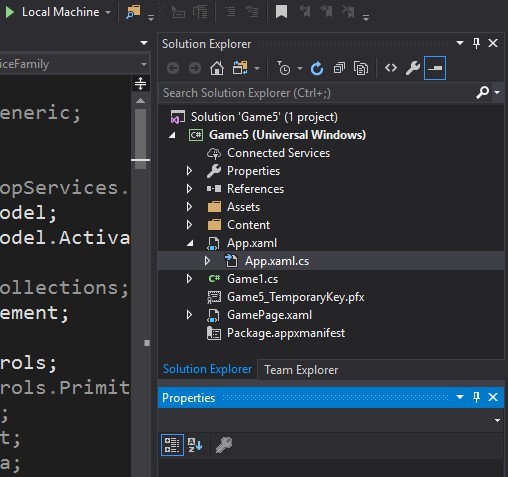
By default, ‘App.xaml.cs’ should be open in front of you, we have one change to make first, in the top left corner, look for where it says ‘x86’ like so:

Click on the drop-down arrow next to the green arrow (make note of this green arrow, we will need it shortly) side of x86 and select x64, leave debug as it is for now, and leave local machine as it is too, you should see the following:

(yeah, I noticed I moved my code view, so these images don’t match up, don’t worry).

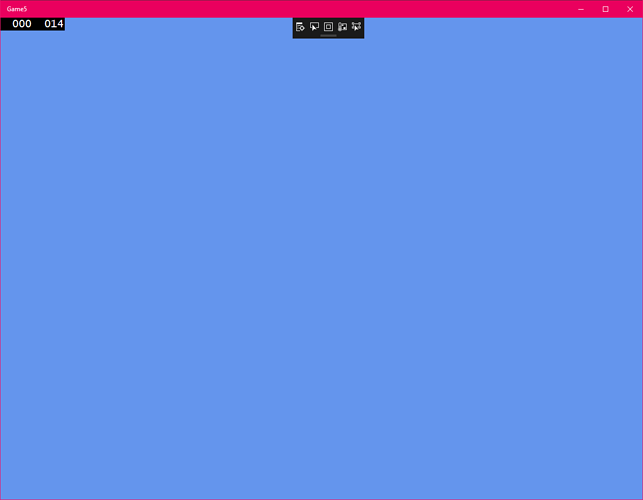
Moving along, it’s time to see if you have everything up and running correctly, hit that green arrow we saw earlier and wait a moment, you should see this:

Beautiful, right? (If this did not happen for you, please open a thread on the forum and as mentioned above, help the community help you). A side note, ignore the black bits along the top for now, you won’t see these outside of debug modes when running from within VS.

This is Cornflower Blue. A colour associated with XNA game development, sort of a ‘Hello World’ for graphics I suppose? You can find this in Game1.cs and change it to any of the .NET colours. A list of ARGB values can be found here: ‘https://docs.microsoft.com/en-us/dotnet/api/system.drawing.color?view=netframework-4.7.2’ and an RGB visible list on this web searched page here: ‘http://www.99colors.net/dot-net-colors’ with both #Hex code and RGB values, handy!

Let’s go back to our list again:

/ Installed Visual Studio 2017/2019
/ Installed MonoGame
/ Setup Your Pipeline Workflow
/ Run Your First Cornflower Project
X Add .xnb To A Project And Display It

Oh, no… we failed something again, let’s fix that too…

Hunt down your .xnb file from the previous Pipeline tutorial, use a pitchfork if required, always keep your eyes protected if doing so.

We have two typical methods to add this file to the VS project, my favourite and rather straight forward method is to open Windows Explorer above or besides my VS editor environment (IDE) and dragging the file into the solution explorer area and into the ‘Content’ folder… oh you don’t know what I am talking about? Hang on… here:

In the upper right of your IDE, you should see the frame called Solution Explorer, along with the current open and selected project document highlighted.

We won’t go into GameX.cs right now (Remember X being a number representing your project name if not changing the project name after creating multiple projects in this tutorial) but for now, focus on the folder called ‘Content’ in this area.

Everything in this window is a physical object on your hard drive, so careful what you delete here.

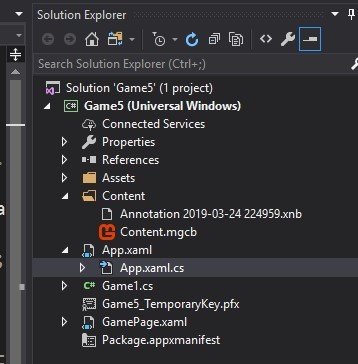
Now, in future, you will likely fiddle around with this folder, such as creating sub folders to house various content objects, such as Audio, Video and Images/Textures and 3D Models etc. (similar to how I mentioned in the Content Pipeline tutorial), so, for now, let’s not create a sub folder called ‘images’ and for now, simply drag the .xnb file into this folder (don’t worry I will explain the other method shortly).

You should have the following result:

(My .xnb file is named as such, you just need to look at the Content Pipeline tutorial to find out why.)

Now, if you went to: ‘C:\Users{USERNAME}\source\repos\Game5\Game5\Content’ you should find a copy of your .xnb file there (remember this folder location, as for the alternative method, we will be heading here for it).

That’s it, this tutorial is over… oh wait… we haven’t displayed the graphic yet…

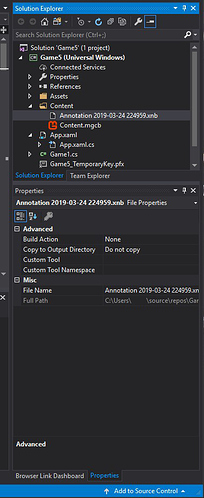
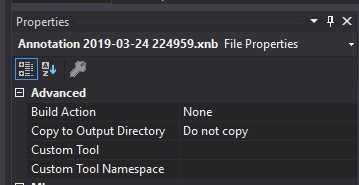
Oh, and the alternative method (I am struggling to explain this well without getting the alternate method out of the way but this is important), so, look back at the Solution Explorer window, oh one more thing, if you are using method 2 for adding objects to your project, come back and be sure to do the following, Click on your .xnb file in Solution Explorer and in the lower right corner, you should see something like this:

The Properties Pane or Panel, we need to focus on this part:

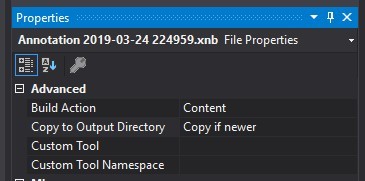
Look at the two parts named: ‘Build Action’ and ‘Copy to Output Directory’, we need to change these two, for ‘Build Action’ change it to ‘Content’ and the ‘Copy to Output Directory’ set it to ‘Copy if newer’, that’s it, you have correctly included an asset to your project, ready to use in your projects.

It should look like the following:

Now for that pesky alternative method to add content to your project.

Go back to that folder from earlier: ‘C:\Users{USERNAME}\source\repos\Game5\Game5\Content’ (of course yours will be whatever you named the project, that is to say, ‘Game5\Game5’ will be AwesomeGame/AwesomeGame, you get the message I guess), paste your .xnb in here.

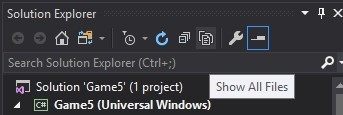
Head back to your IDE and in the Solution Explorer part, look at the icons across the top.

Click the icon which says ‘Show All Files’ when you hover over it, once you do this, your .xnb file should show up in the ‘Content’ folder (Click the expand arrow beside the ‘Content’ folder if not already expanded), right click your .xnb file and select ‘Include In Project’ and click that icon again to unhide all files, this, was the alternative method, I will never detail it again, hopefully.

Remember to head back and change the build and copy properties outlined earlier.

Let’s recap:

/ Installed Visual Studio 2017/2019
/ Installed MonoGame
/ Setup Your Pipeline Workflow
/ Run Your First Cornflower Project
- Add .xnb To A Project And Display It

Half way done on the last one… let’s get onto it then.

Now, I want to avoid going into the various methods you will see diving into Game1.cs (This will always be shown as Game1.cs, I may explain this in another tutorial in future) that is for another tutorial, or the many explanations readily available, I may skip it in my tutorials, but we shall see, as I have not planned a third tutorial at this point, so, I will instead simply get you moving at this point and get the graphic displayed and maybe a handy bonus too.

Let’s move on.

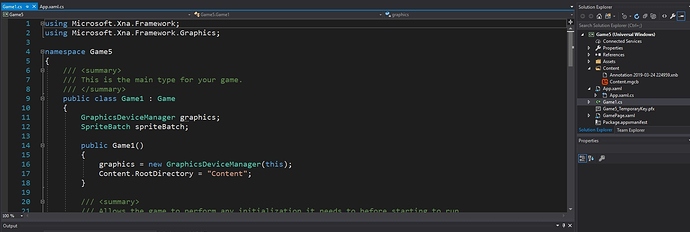
First stop, let’s chew into Game1.cs in Solution Explorer, double click Game1.cs, it should open on your left, you should still see App.xaml.cs along the top as well as the newly opened Game1.cs like so:

Moving forward…

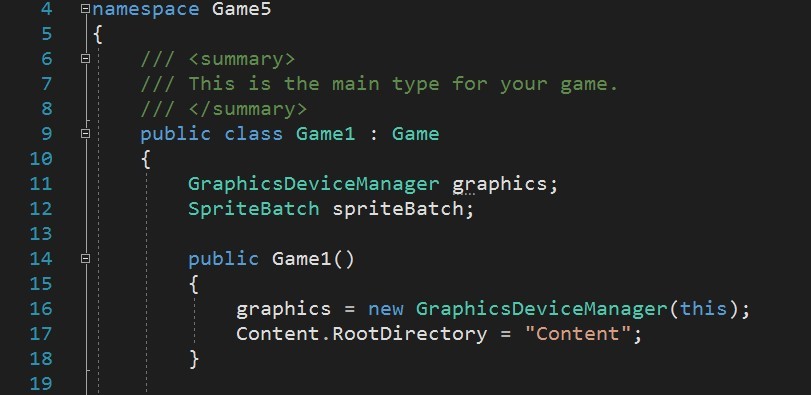
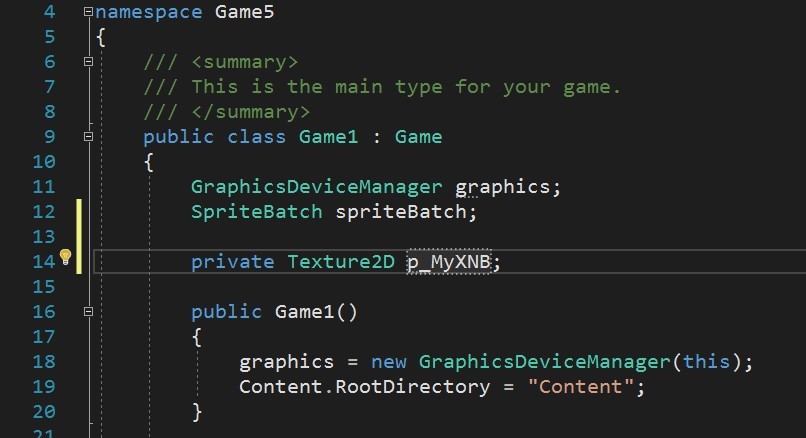
Next, we need something to hold our graphic, there is an object called Texture2D that we can use for this purpose, let’s add it to our Game1.cs file, look for:

Just below where it says ‘SpriteBatch spriteBatch;’ add the following: ‘private Texture2D p_MyXNB;’ (remember, we are just getting things to work right now, perhaps if I put more fundamental tutorials together, I may come back to these C# basics.)

Like so:

Now, head a little further down this document and look for this part:

Just below the line saying ‘// TODO: use this.Content to load your game content here’ we will add some code here to load our .xnb file into the MonoGame framework, or engine if you prefer, actually I don’t know what to call it… any way…
Type: ‘p_MyXNB = Content.Load<Texture2D>("Annotation 2019-03-24 224959");’ like so:

Note how the file extension ‘.xnb’ is not included in the file name.

And next, we will add some more code to place it on the screen…

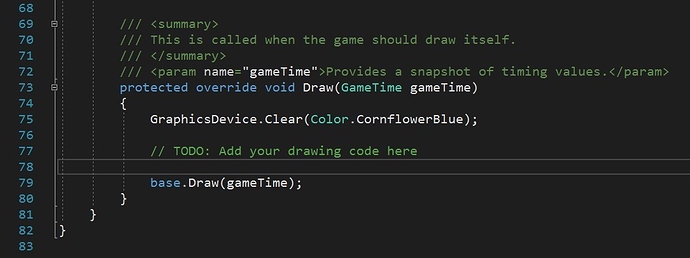
Look for this part in the Draw() method (should be at the bottom):

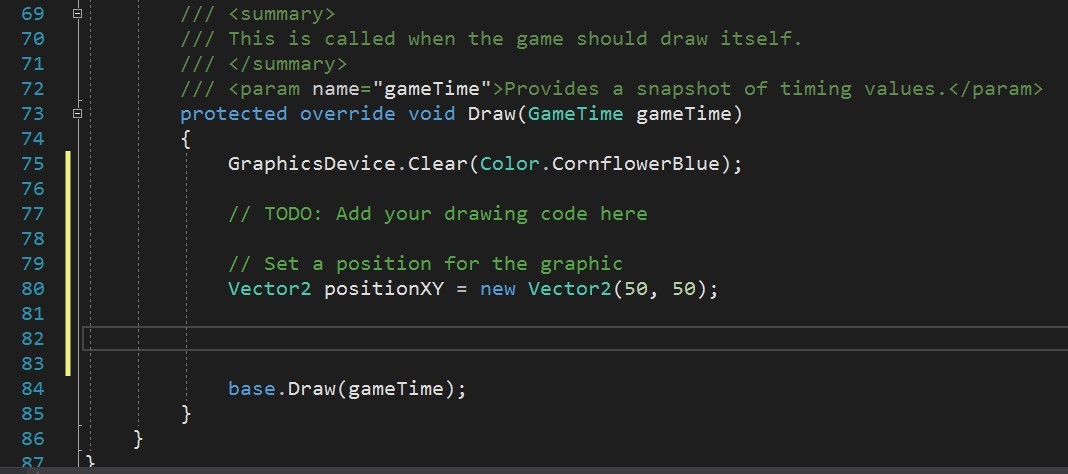
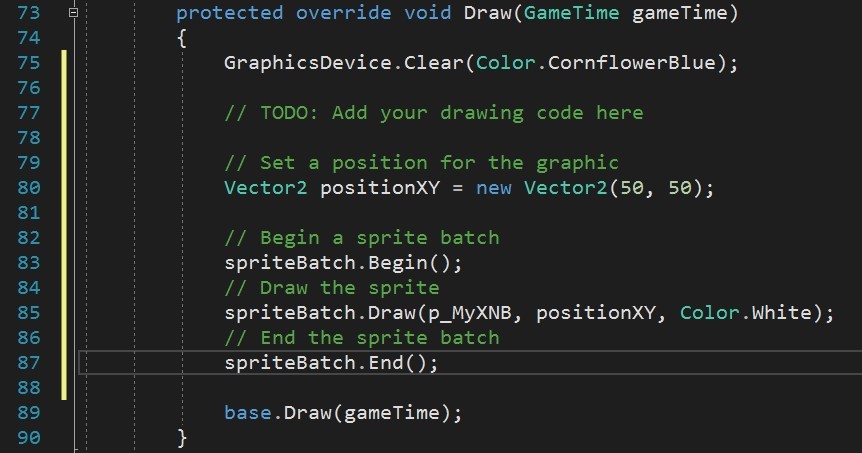
Once again, starting just below the TODO line, let’s add some code, first we need to create some code to position the graphic, add the following two lines:

// Set a position for the graphic
Vector2 positionXY = new Vector2(50, 50);

Like so:

And next we add a Sprite Batch, add the following lines:

// Begin a sprite batch
spriteBatch.Begin();
// Draw the sprite
spriteBatch.Draw(p_MyXNB, positionXY, Color.White);
// End the sprite batch
_spriteBatch.End();

Overall, we should have the following at this point:

And now, splat that green arrow to compile and run your program to see your result, here’s mine:

Success!

If you don’t get anything or some other error threw up over your floor, post a support post on the forums.

That concludes this tutorial, now I must post it to the forum with all these images in the correct places… fun!

I hope this was helpful for you, the book goes on to show some useful code, such as moving the graphic and also some special code to help with screen edges, sorry I skipped the special bit here, felt it was better being discovered in that book.

20 minutes later than planned, but I still feel fresh, so I guess I did something right…

Valentine, over and out.

EDIT

Fixed formatting, grrr. tried, giving up at this point…formatting that is…

Have you seen ‘Indie Game - The Movie’ + ‘Indie Game - Life After’? very motivating!

Thank you for sharing that throwback, actually I purchased some older XNA books this week, one based on XNA Game Studio Refresh 1.0!

It’s funny, in 2010, most tutorial content I needed was in German :laughing:

‘School’ is evidently in a failed state at present, globally. Topic for another type of forum…

A building begins with a single brick! an application begins with a single class! (well, a handful lol) and yes, confidence in coding is an essential thing to gain, I can say, confidence in coding has helped me push forward a lot this week!

WOW, that apps sounds like my book calculator 2.0! congrats on publishing it! I know how the journey must have been as I have several apps on the store and each presented new challenges!

Thank you for sharing here, sorry for the delayed response, was unsure if I should respond and found myself doing just so today, after getting some free mind time.

Thank you too, and I do hope it has helped people to push forward!

And to all reading this thread, thanks. I hope to post more soon.

Valentine, out.

1 Like

Apologies for the hiatus, but it was demanded by life, I am back and I will do 1 or 2 of 2 things, continue to add to this thread and or also start some YouTube videos, who likes videos?

Happy Coding!

Unable to edit the tutorials, but the VS17 download is further down the page and look for a button saying Older Versions or similar, you just need to register as a dev for free and you can download VS17 after doing so.

On the discord we were just talking about beginner coding adventures.

I’ll just throw in here that last year I read through a book cover to cover called: Head First C# 3rd Edition

I can recommend it to someone whose a beginner of C#. It’ll teach you how to design apps in UWP using XAML as well, and even some Winforms and MVVM thrown in for good measure. It’s fairly interactive and has a lot of illustrations(which is good for me because I don’t learn well by just reading bulk text). I read through that book and another one before I really started dabbling in Monogame. Since then most of what I’ve learned is through trial and error, and what scraps of info about gamedev I can find.

Best of luck to anyone who dives into gamedev with Monogame.

1 Like

Yep, if you read the first post here, you will see that I highly recommend taking a walk through the basics and develop knowledge of C# and .NET prior to getting started….

I was always sceptical of buying that book, the cover is not the most convincing to be honest……… will go take a looksee if they have updated lately.

Thanks for posting @Rei

EDIT

YEP, 4th Edition out on 31st August 2020, I guess I best wait lol

Admittedly, the cover looks a bit spastic. And some of the illustrations get a little weird. But its teaching methodology works well for the way I learn best, where another book I read, I think it was ‘C# Player’s Guide’, was mostly just a text crawl. But it still taught important concepts. Another example of this would be the seemingly well-known and heralded ‘Game Engine Architecture’ which I read through parts of and skimmed the rest. It’s written from the perspective of C++, but it does cover some interesting topics. But it’s also a bit of a text-crawl with rather minimal code examples.

So if anyone else out there is like me, I recommend Head First C# specifically because it avoids the text-crawl. If you learn fine by reading in bulk text, there are shorter and more succinct books out there to teach C#.

1 Like

Guess what I have on my shelf [2nd Edition]

It’s a fine book, but, oh, is it dry. It is the quintessential textbook book. Full of important and useful information which is (if you’re me) incredibly difficult and painful to digest.

Edit: Do you have any good suggestions for math-related books?

Just noticed I am unable to edit the first post any longer, unless a kind mod can help change that, I will have to start another thread with the same title and link back to this one, for my upcoming beginners/intermediate tutorials…

How come I didn’t get a notification of your message there? weird, anyway…

Depends on what maths you mean, I decided going back to basics was the best as I did not touch maths in decades, but do you mean like, gaming related maths books? I have a few of the best ones but what specifically were you hunting for?

I’d love if there was a book that focused on spatial maths. Things like vector and matrix math. Stuff that gets used in games design a lot.

Well, I have these three and possibly more on my book shelf [A bit lazy tonight]

3D Math for Game Development Hardcover – 27 May 2011


Mathematics for 3D Game Programming and Computer Graphics Hardcover – 2 Jun 2011

Mathematics & Physics for Programmers (GAME DEVELOPMENT SERIES) Paperback – 28 Sep 2011
https://www.amazon.co.uk/gp/product/1435457331/ref=ppx_yo_dt_b_search_asin_title?ie=UTF8&psc=1
[This one does not have a preview, and is no longer in print]

Take a look at the contents menus in the previews and ask me to validate any questions you may have if not available in the previews.

EDIT

Are they just popping one of these out every four years now?

Game Engine Architecture, Third Edition Hardcover – 1 Aug 2018